- How to Set Space Between Flexbox Items
- Create HTML
- Add CSS
- Example of setting distance between flexbox items:
- Result
- Setting vertical space between Flexbox items
- Evenly spacing Flexbox items in a column direction
- How to reduce the space between Flexbox items?
- CSS Gap Space with Flexbox
- Web Component Essentials
- Web Component Essentials
- Простой способ задать отступы между flexbox элементами
- Вариант 1 — отрицательный отступ для родительского блока
- Вариант 2 — без отрицательного отступа с отступами по бокам
- Вариант 3 — фиксированная ширина с помощью calc()
- Вариант 4 — фиксированная ширина с помощью calc() с отступами по бокам
How to Set Space Between Flexbox Items
Flexbox is a single-dimensional layout, which lays items in one dimension at a time (either as a row or as a column).
The main purpose of the Flexbox Layout is to distribute space between items of a container. It works even in those cases when the item size is unknown or dynamic.
You can easily set distance between flexbox items using the CSS justify-content property. In this snippet, we’ll show how to do this.
Create HTML
html> html> head> title>Title of the document title> head> body> h1>Space between flexbox h1> h2>justify-content: space-around h2> div class="flex2"> div class="flex-items">1 div> div class="flex-items">2 div> div class="flex-items">3 div> div> h2>justify-content: space-between h2> div class="flex3"> div class="flex-items">1 div> div class="flex-items">2 div> div class="flex-items">3 div> div> body> html>Add CSS
- Set the justify-content property to «space-around» for the .flex2 element.
- Set the justify-content property to «space between» for the .flex3 element.
- Set the display property to “flex” for both elements.
- Add style using the width, height, background-color, margin, and other properties.
.flex < display: flex; font-size: 30px; text-align: center; background-color: #7d7d7d; color: #000000; font-weight: bold; > .flex2 < justify-content: space-around; > .flex3 < justify-content: space-between; > .flex-items < background-color: #cccaca; width: 90px; height: 60px; margin: 10px; text-align: center; font-size: 40px; line-height: 1.5; >Let’s see the result of our code.
Example of setting distance between flexbox items:
html> html> head> title>Title of the document title> style> .flex < display: flex; font-size: 30px; text-align: center; background-color: #7d7d7d; color: #000000; font-weight: bold; > .flex2 < justify-content: space-around; > .flex3 < justify-content: space-between; > .flex-items < background-color: #cccaca; width: 90px; height: 60px; margin: 10px; text-align: center; font-size: 40px; line-height: 1.5; > style> head> body> h1>Space between flexbox h1> h2>justify-content: space-around h2> div class="flex flex2"> div class="flex-items">1 div> div class="flex-items">2 div> div class="flex-items">3 div> div> h2>justify-content: space-between h2> div class="flex flex3"> div class="flex-items">1 div> div class="flex-items">2 div> div class="flex-items">3 div> div> br> body> html>Result
In the example mentioned above, we have used the justify-content property with two of its values: space-between and space-around. The space-between value distributes the items evenly (with space between them) in the line. The first item is on the start line, and the last one is on the end line. The space-around value displays the items with space before, between, and after.
Setting vertical space between Flexbox items
For vertical spacing, you can use the align-items property with the space-between value. This will distribute the items evenly in the container, with space between them vertically. Again, you can adjust the amount of space with the margin property on the items.
Here comes an example to showcase this:
html> html> head> title>Setting vertical space between Flexbox items title> style> .container < display: flex; flex-direction: column; align-items: space-between; background: yellow; > .item < margin-bottom: 10px; border: 1px solid red; > style> head> body> div class="container"> div class="item">Item 1 div> div class="item">Item 2 div> div class="item">Item 3 div> div> body> html>To change the space between Flexbox items, you can adjust the «margin» property on the items themselves. To distribute the items evenly, you can use «justify-content» with the «space-between» or «space-around» value.
Evenly spacing Flexbox items in a column direction
To evenly space Flexbox items in a column direction, you can use the justify-content property with the space-between or space-around value, and set align-items to center to align the items in the center of the container.
html> html> head> title>Evenly spacing Flexbox items in a column direction title> style> .container < display: flex; flex-direction: column; justify-content: space-between; align-items: center; background: yellow; > .item < margin-bottom: 10px; border: 1px solid red; > style> head> body> div class="container"> div class="item">Item 1 div> div class="item">Item 2 div> div class="item">Item 3 div> div> body> html>In this example, margin-bottom is added to give some space between the items in a column direction, as justify-content: space-between only distributes items vertically.
How to reduce the space between Flexbox items?
To reduce the space between Flexbox items using the space-between or space-around value, you can adjust the margin property on the items themselves. For example, to reduce the space between items using justify-content: space-between , you can decrease the margin-right (or margin-bottom for a column direction) on each item. For justify-content: space-around , you can decrease the margin on each item by half of the desired space reduction.
Here’s an example for reducing the space between Flexbox items using justify-content: space-between:
html> html> head> title>Evenly spacing Flexbox items in a column direction title> style> .container < display: flex; justify-content: space-between; background: yellow; > .item < margin-right: 20px; /* Initial margin-right */ border: 1px solid red; > .item:last-child < margin-right: 0; /* Remove margin-right on last item */ > style> head> body> div class="container"> div class="item">Item 1 div> div class="item">Item 2 div> div class="item">Item 3 div> div> body> html>In this example, the margin-right on each item is initially set to 20px to create some space between the items using justify-content: space-between . To reduce the space between the items, the margin-right on the last item is set to 0 to remove the space on the right side of the last item. You can adjust the margin-right value on the items to your desired spacing.
Similarly, for justify-content: space-around , you can reduce the margin on each item by half of the desired space reduction. For example, if you want to reduce the space between items by 10px, you can set margin-right: 5px on each item.
CSS Gap Space with Flexbox
CSS Flexbox and CSS Grid are fantastic tools available for managing layout on the Web. Flexbox handles single-dimensional layouts very well, while CSS Grid handles two-dimensional layouts with columns and rows. Often we want to add space between the items within our layout. This post will show how to add space between flex items using the CSS gap property and the necessary workarounds for browser support.
Inline Flex
To demonstrate CSS Gap, we will use Flexbox. CSS Gap works in CSS Grid, but there are many cases where we have inline lists that need space without a defined grid.
div class="flex-gap">
div>1div>
div>2div>
div>3div>
div>4div>
div>5div>
div>6div>
div>
.flex-gap
display: inline-flex;
flex-wrap: wrap;
>We use inline-flex to have flex items but display our parent element as an inline element instead of a block element. The flex-wrap: wrap property will allow our items to wrap as the parent container shrinks or is constrained.
If we want to add space between each item, we could use margin on each item.
.flex-gap
display: inline-flex;
flex-wrap: wrap;
>
.flex-gap > div
margin: 6px;
>
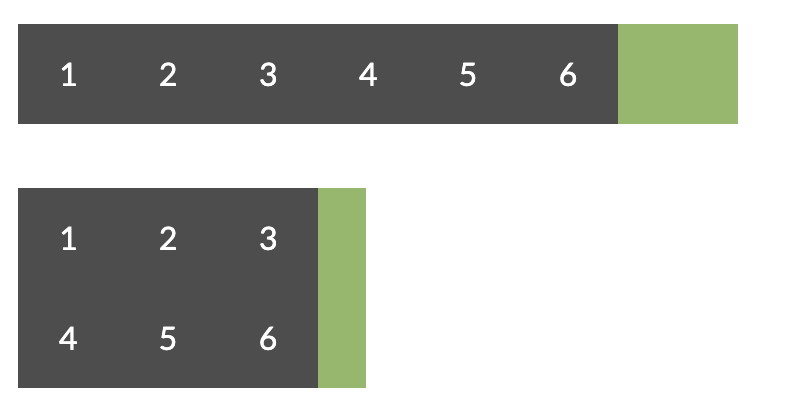
Margins works but is not the same behavior as CSS Gap space. Notice the extra space surrounding the boxes. With gap spacing, we only want space applied between the items. Using CSS Gap, we can achieve this.
.flex-gap
display: inline-flex;
flex-wrap: wrap;
gap: 12px;
>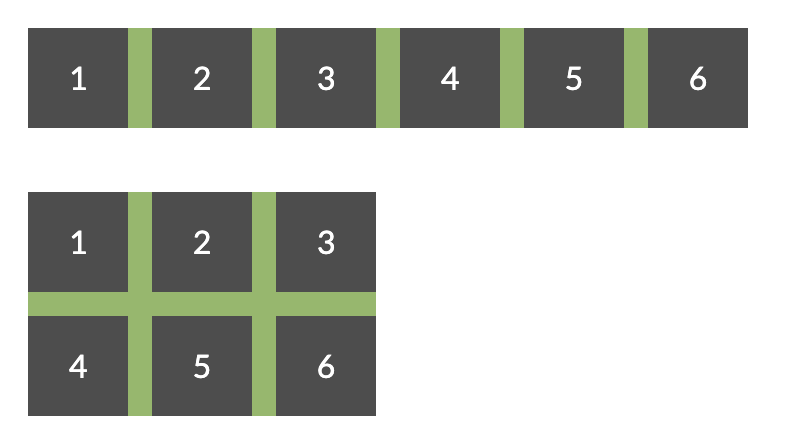
CSS Gap is a feature of the CSS Grid spec and Flexbox. Currently Firefox is the only major browser that supports gap on flex items. Update: As of April 25, 2021, CSS Gap for Flexbox is supported in all major browsers! 🎉
To support older browsers that don’t support Flex Gap in Flexbox we can use a margin hack to create a close workaround.
div class="emulated-flex-gap">
div>1div>
div>2div>
div>3div>
div>4div>
div>5div>
div>6div>
div>
.emulated-flex-gap > *
margin: 12px 0 0 12px;
>
.emulated-flex-gap
display: inline-flex;
flex-wrap: wrap;
margin: -12px 0 0 -12px;
width: calc(100% + 12px);
>We can set margin space on the top and left of each item. On the flex parent element, we use negative margins to counter the excess margin on the outer child elements. This technique will get a similar effect to CSS gap space.
We can clean up the CSS a bit by using CSS Custom Properties, so it is easier to change the margin spacing.
.emulated-flex-gap
--gap: 12px;
display: inline-flex;
flex-wrap: wrap;
margin: calc(-1 * var(--gap)) 0 0 calc(-1 * var(--gap));
width: calc(100% + var(--gap));
>

.emulated-flex-gap > *
margin: var(--gap) 0 0 var(--gap);
>
With this workaround, we can get something close to CSS Gap space in older browsers. With CSS Gap spacing, we can remove much of the white space complexities in CSS when using margins. Check out the full working demo below!

Web Component Essentials
Save development time, improve product consistency and ship everywhere. With this new Course and E-Book learn how to build UI components that work in any JavaScript framework such as Angular, Vue, React, and more!
Web Component Essentials
Reusable UI Components for all your Web Applications
Простой способ задать отступы между flexbox элементами
Вариант 1 — отрицательный отступ для родительского блока
Самый простой способ установить минимальное расстояние между элементами flexbox – используем margin: 0 5px для дочерних элементов .item и отрицательный отступ margin: 0 -5px для родительского контейнера .box .
See the Pen NWGKWGJ by Denis (@deniscreative) on CodePen.dark
Вариант 2 — без отрицательного отступа с отступами по бокам
Не используем отрицательные отступы и не используем :first-child/:last-child . Задаем внутреннее поле для контейнера padding:5px и задаем отступы для дочерних элементов margin:5px . Таким образом мы получаем равномерный отступ 10px между дочерними элементами и от дочерних элементов до контейнера.
See the Pen Uniform distribution of blocks with flex 2 by Denis (@deniscreative) on CodePen.dark
Вариант 3 — фиксированная ширина с помощью calc()
Задаем фиксированную ширину для дочерних элементов с учетом отступа между ними с помощью CSS функции calc() . Данный способ не совсем хорош для размещения флексбокс-элементов в несколько рядов, потому что элементы растягиваются по краям контейнера justify-content: space-between .
где 1/3 — это 3 колонки в ряд, и 10px — это ширина между колонками.
See the Pen Uniform distribution of blocks with flex 3 by Denis (@deniscreative) on CodePen.dark
Вариант 4 — фиксированная ширина с помощью calc() с отступами по бокам
Задаем фиксированную ширину для дочерних элементов с учетом отступа между ними с помощью CSS функции calc() . Но главное отличие от предыдущего варианта, что для дочерних элементов .item заданы отступы по бокам, а для родительского контейнера .box заданы отрицательные отступы как в первом примере. И таким образом, мы можем задать justify-content: flex-start; чтобы flexbox-элементы располагались равномерно слева направо.
Я чаще всего использую этот вариант, как наиболее универсальный и удобный для размещения любых flexbox-элементов.
где 1/3 — это 3 колонки в ряд, и 10px — это ширина между колонками.
See the Pen Uniform distribution of blocks with flex 4 by Denis (@deniscreative) on CodePen.dark
Естественно, что способов для того, чтобы задать отступы между флексбокс-элементами или для их равномерного размещения внутри контейнера, гораздо больше, и есть гораздо более изощренные варианты. Но я привел наиболее часто используемые способы и самые простые для понимания.
Допустим, у нас есть несколько nth-child элементов, к которым мы хотим применить различную задержку для…
Очень популярная функция на различных одностраничниках — плавный скролл к нужному элементу на этой же…
Использование @keyframes с препроцессором SASS. Базовый пример использования @keyframes в SASS: Создаем миксин, чтобы добавить…
CSS счетчики, в своей сущности, переменные CSS, значения которых могут быть инкрементированы при помощи CSS…