- How to Use an HTML Counter Like a Pro
- What Exactly Is an HTML Counter?
- Counter-reset
- Counter-increment
- HTML Counter Content
- HTML Counters: Fun in Designs
- There’s So Much More to Learn
- Как подключить статистику посещений к сайту
- 1. Заходим в аккаунт Яндекса
- 2. Добавляем новый счётчик в аккаунт
- 3. Получаем код счётчика
- 4. Добавляем код счётчика на сайт
- 5. Проверяем работу счётчика
How to Use an HTML Counter Like a Pro
Creating good web content involves a dedicated eye for the material that is being displayed for the end-user. Knowing how to break that content down into equal parts of readability and comforting design brings you closer to great content. Having access and knowledge of the tools to help you achieve that lands you in the area of amazing content.
Something simple like a counting system may seem like a rather mundane topic to cover when CSS has access to so many “flashier” options. However, in this tutorial, you will learn how to not only use an HTML CSS counter but also how to make it really stand out in your design.
What Exactly Is an HTML Counter?
An HTML counter does much what its namesake states. It provides a method to track incremental changes or uses of content within HTML code. This gives a visual point of reference for the end-user to see the intended flow or hierarchy in the content provided. You could of course use an ordered list for something like that, but you will quickly find inherent limits to what you can do when compared to using CSS to create an HTML counter.
There are some basic concepts of the HTML counter to know before you start trying it out for yourself. They are as follows:
- Counter-Reset: This adds a counter or resets a working counter.
- Counter-Increment: This increases the value of a counter.
- Content: Adds in the specified content.
In the next sections, these will be covered with examples to help break down their intended uses and syntax.
Counter-reset
The “counter-reset” property is what you will use to provide a zero or starting point for your counter. In the example below, you have a bit of HTML code setup to start with.
Take note of the singular button element that is within the body of the document. As it stands, this will create an HTML page with just a single small button on it. On the sample CSS code below the “counter-reset” is added within the body of the HTML document.
body counter-reset: “Name of the HTML counter”; >
The counter-reset property requires a name, (or target), to understand what it is supposed to work with. The name of the HTML counter can be anything you want. In the example below, it has been set to what is called “ buttonNumber .”
body counter-reset: buttonNumber; >
This sets up the base of the numbering system so the page knows we are starting with a reset or zero value. The next goal is to add three more buttons and also have them automatically increment with a system we create. Soon we will have a proper HTML counter set up.
Counter-increment
This is where you can direct the counters to increase with each element added. In the HTML code, you will notice that three buttons are now present. Also, note there is no content added for these buttons.
As is, the HTML content will not change much, aside from having three empty buttons on the page. The next process is to start the incrementing code. Moving to the CSS stylesheet, the following code now includes a counter-increment section for the button element.
button::after counter-increment: buttonNumber; >
Notice that the value for the counter-increment is set to the “buttonNumber” name used for the counter name before. Another important area to check out is the use of the word “ after ” placed next to the button selector. The words “before” and “after” can be added to advise the stylesheet on how to insert the applied property values. In this particular example, the use of “after” will place the details after the button property content. Speaking of content, this button element needs some of that next.
HTML Counter Content
This next section of our HTML counter is where you will fill out exactly what you want the counter to show in increment additions. For the example, the numbers are going to identify their numerical increase as they are added.
To make this visually represented on the HTML page, the “ content ” property will be added to the button selector. In the CSS example below, the content is set to display the text string “I am button number” followed by a space. Take note of the blank space added after the word number.
button::after counter-increment: buttonNumber; content: "I am button number " counter(buttonNumber); >
Directly after the quotation close of that string, you will see the counter property added with the value of “ buttonNumber ” added in between parentheses directly after it.
This section tells the browser that when a button is added into the body, it should contain the text string of “I am button number” followed by the counter value of “ buttonNumber .” With this code in place, the following HTML output is displayed.

HTML Counters: Fun in Designs
Just like that, you have walked through the creation of an HTML counter and take note that the code of the actual counter itself was nothing more than six lines. You can take this further by adding some styling to the button as well.
Take the following CSS code below.
button size: 30px; padding: 30px; border-radius: 40px; background-image: linear-gradient(blue, orange); color: white; text-transform: capitalize; font-family: sans-serif; font-weight: bold; >
By adding this separate set of CSS code into the stylesheet, the HTML counter can transform into something much less “vanilla” on the page. Take a look at the resulting output below.

This counter concept can be changed and used for other interesting ideas, as well. Take the example code for the CSS below. You will see that it is set up to number quotes of the character Dwight from the sitcom “The Office.”
body counter-reset: dwightSays; > p::before counter-increment: dwightSays; content: "Things Dwight from The Office says number " counter(dwightSays) ": "; color: blue; >
Three paragraph tags are added to the HTML code as well.
"I am better than you have ever been or ever will be." “Through concentration, I can raise and lower my cholesterol at will.” “I am fast. To give you a reference point I am somewhere between a snake and a mongoose…And a panther.”
With the HTML counter set in place, you receive the following HTML output:

The great thing about the HTML counter once it is in place, is that all added content that falls under its rules will automatically get an incrementing number assigned to it. This works on its own even if you are adding or removing content. Consider how great this is when working with chapters or index entries.
There’s So Much More to Learn
CSS as a toolbox is a welcoming set. New users can jump into some pretty amazing design options right away with very little in the way of training. If you have your interest peaked for more topics to devour, then check out options like background gradients, borders, or color choice.
Take your time and have fun with the various options available in CSS. If you ever feel like you are overwhelmed, then take a deep breath and relax. You are not expected to know everything right away, or ever at all.
Something that can help with the learning process is to imagine a simple site for something that you actually care about. Work on a small piece at a time until you feel comfortable with whatever aspect of CSS you are mastering. Remember, Udacity is here to help you out along the way.
Why stop at just web development? The power of programming is empowering people to do even more with their designs. If you are looking to advance your career, take the first steps by learning to code. Having these skills can help you open doors to those new professional possibilities. Enroll in Udacity’s Intro to Programming Nanodegree today to start the journey.
Как подключить статистику посещений к сайту
🤔 Что делаем: подключаем к сайту Яндекс.Метрику для оценки посещаемости сайтов и анализа поведения пользователей.
🕔 Время: 8 минут.
✅ Понадобится: аккаунт на Яндексе.
👉 Коротко суть. Владельцу сайта иногда бывает важно выяснить, сколько людей посещает его сайт в день или в месяц, откуда эти люди приходят и как вообще пользуются сайтом. Чтобы это узнать, на сайт ставят специальный код — при загрузке страницы он сам отслеживает действия пользователей, а потом собирает данные в разные отчёты. Сегодня поставим этот код на сайт и посмотрим, как он работает.
👉 Про сервисы сбора статистики у нас есть отдельная статья — в ней мы подробно рассказали, как они устроены, как работают и для чего применяются.
1. Заходим в аккаунт Яндекса
Чтобы пользоваться Яндекс.Метрикой, нужно войти в свой аккаунт, без этого сервис работать не будет. Для этого переходим на страницу Метрики и вводим логин и пароль. Если аккаунта ещё нет — нажмите кнопку «Зарегистрироваться».

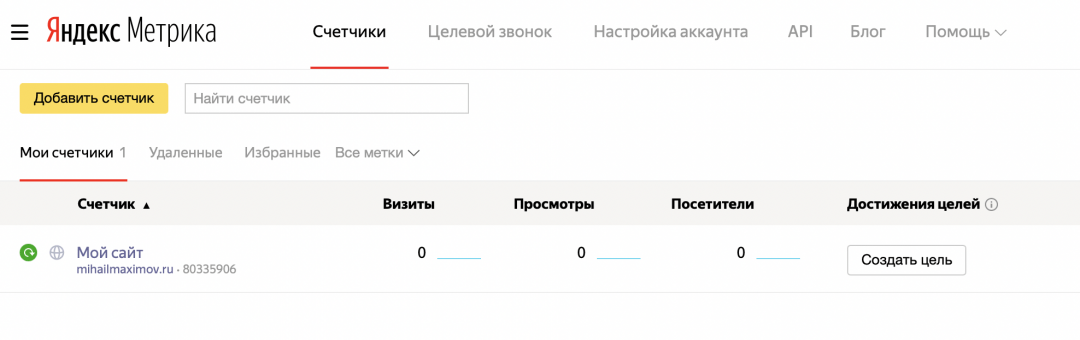
2. Добавляем новый счётчик в аккаунт
Счётчик — это код, который смотрит, как посетители пользуются сайтом, на какие страницы заходят чаще всего и откуда приходят. Чтобы получить всю эту статистику, нам нужно сначала создать счётчик, а потом добавить его на сайт.
Чтобы получить новый счётчик, на главной странице сервиса нажимаем кнопку «Добавить счётчик»:
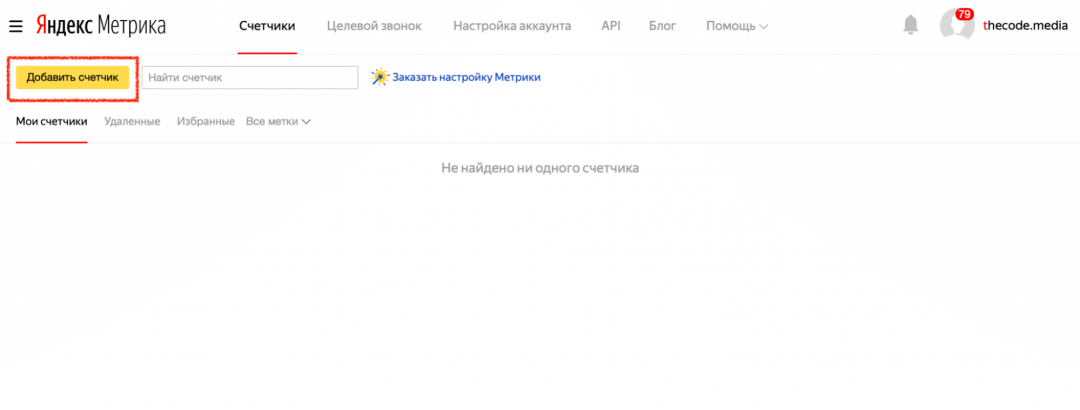
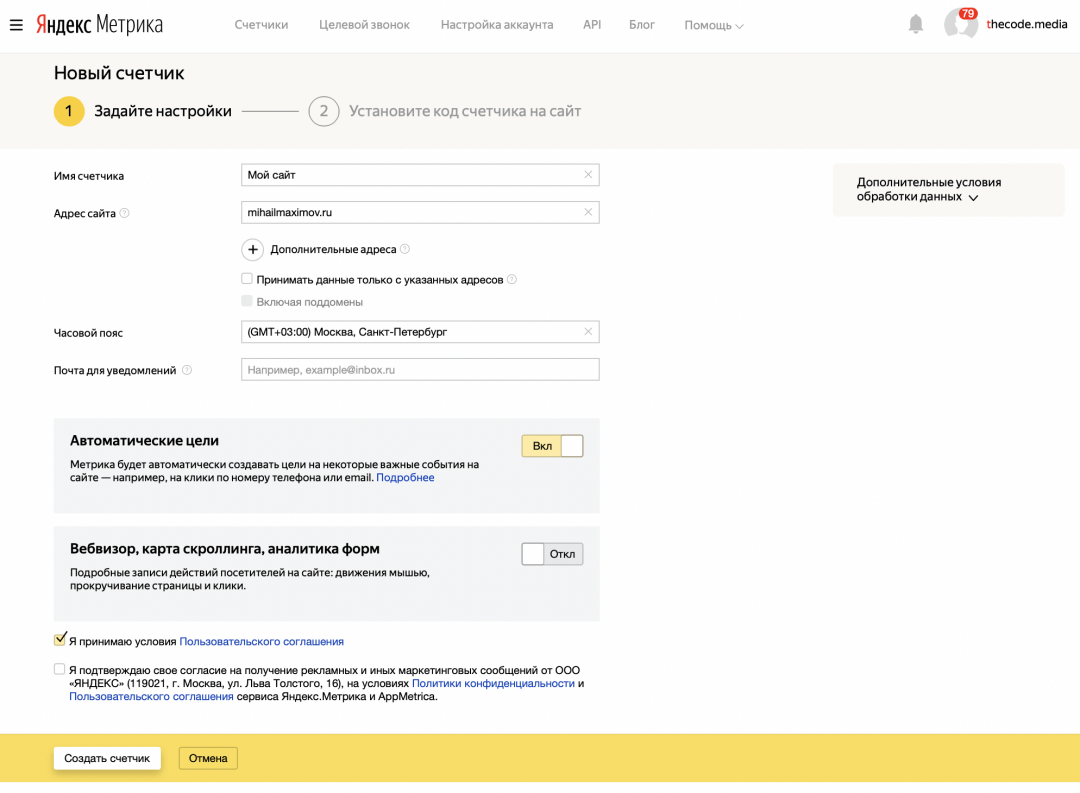
Придумываем название счётчика — оно может быть любым. Это будет полезно, если у вас будет много сайтов и нужно будет как-то различать счётчики. Дальше пишем адрес сайта. Мы разместим счётчик на нашем учебном сайте mihailmaximov.ru.
Заполняем имя, адрес и нажимаем «Создать счётчик»:
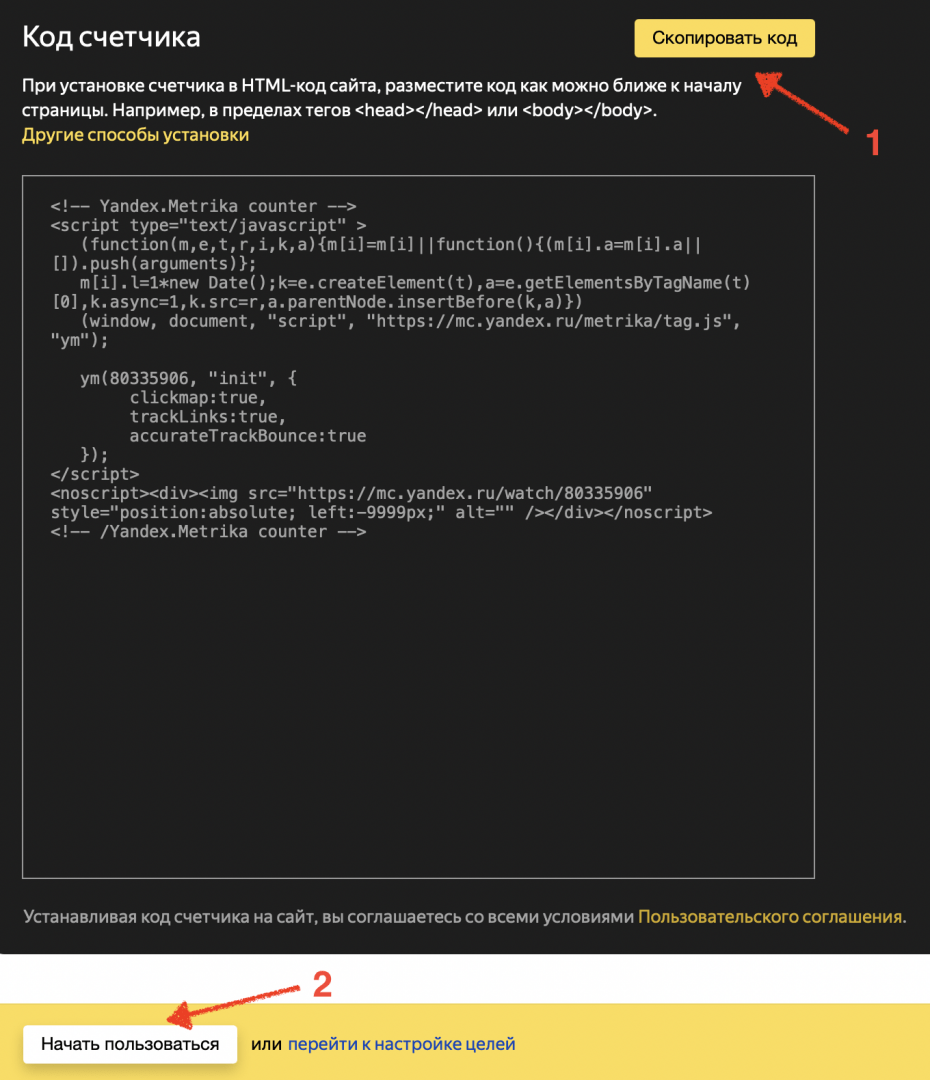
3. Получаем код счётчика
На странице счётчика система нам предложит три варианта установки:
- HTML — если у вас статический сайт (наш вариант).
- CMS — подойдёт для сайтов на Вордпрессе и других системах управления контентом.
- Система управления тегами — для опытных веб-мастеров, которые подключают сразу несколько систем мониторинга и сбора данных.
Выбираем HTML и копируем код счётчика ниже на странице:
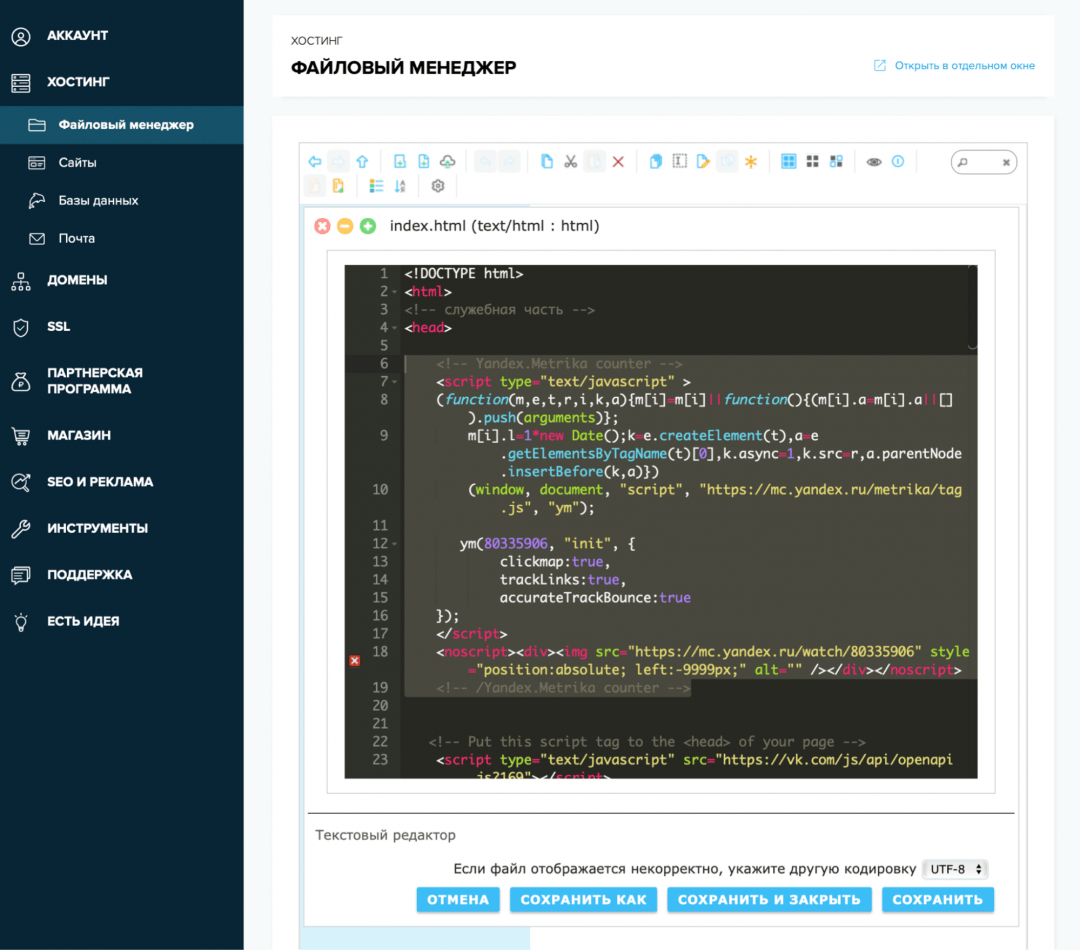
4. Добавляем код счётчика на сайт
Так как у нас вариант кода для установки в чистый HTML, то используем ту же механику, что и для установки комментариев на сайт:
- Открываем панель управления хостинга.
- Находим файл index.html — это главная страница нашего сайта.
- Открываем исходный код страницы во встроенном редакторе.
- Находим раздел .
- Вставляем в него наш код счётчика
- Сохраняем файл.
- Делаем так со всеми страницами сайта, статистику которых хотим отслеживать.
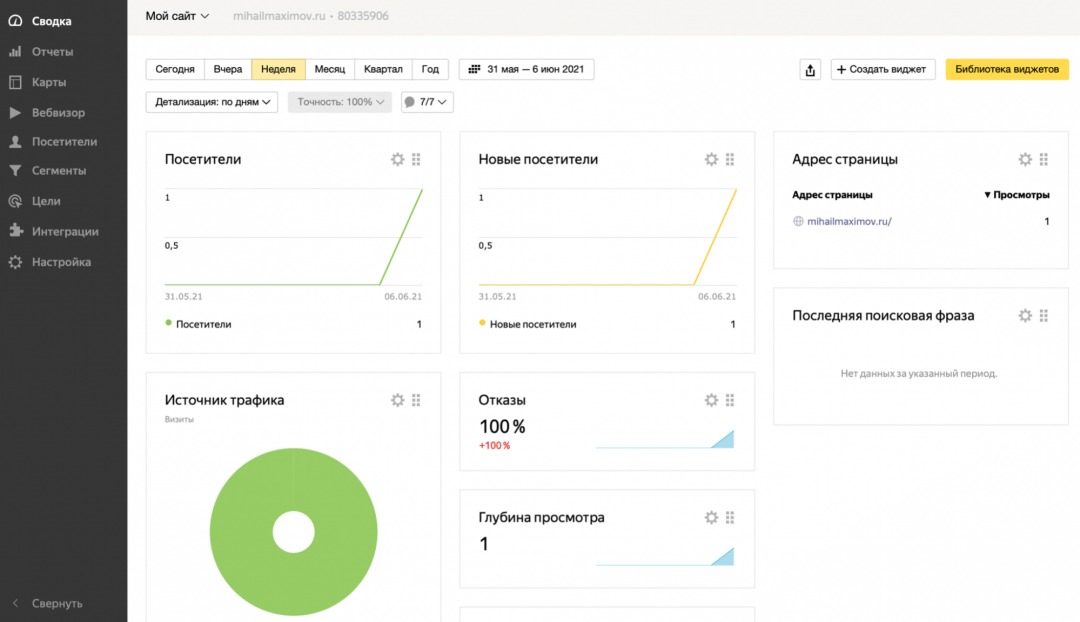
5. Проверяем работу счётчика
Заходим на страницу со счётчиками и видим зелёный значок — это значит, что Метрика увидела код на сайте:
Если зайдём в сам счётчик, то увидим, что данные уже собираются и статистика работает. На сайтах, которые посещают часто, новые данные о посетителях будут видны уже через 5–10 минут:
В «Яндекс Практикуме» можно стать разработчиком, тестировщиком, аналитиком и менеджером цифровых продуктов. Первая часть обучения всегда бесплатная, чтобы попробовать и найти то, что вам по душе. Дальше — программы трудоустройства.


Шустрый, мощный, весь обвешан классами.

Работа тестировщика как она есть.

Язык для аналитиков и дата-сайентистов

Потому что это круто. Но сложно.

Краткий курс математического ожидания.

Когда компьютер сразу понимает, что за устройство к нему подключили
