- How to Add Image in the Title Bar
- Let the browser finds the favicon!
- Let’s use HTML link tag:
- Depending on the favicon format, the type attribute must be changed:
- A favicon must have the following characteristics:
- Example of adding an image in the title bar:
- Different Platforms:
- Add it to your code in the following way:
- Add an icon before or after a link with CSS
- Matching the filename extension
- Adding an image icon to the link
- Working example
- Check Out These Related posts:
- Styling External Links with an Icon in CSS
- Adding External Link Indicator with CSS
- Setup the Link
- The CSS Selector
- Adding the Icon or Text
- Using Font Awesome Icons
- A Fool-Proof Selector
How to Add Image in the Title Bar
Most websites add an icon or image logo in the title bar. This icon logo is also called a favicon and can be useful for user engagement.
A favicon, also known as a URL icon, a tab icon, a shortcut icon, a website icon, or a bookmark icon, is a file containing one or more small icons associated with a particular website or web page.
You can let the browser detect your favicon or upload it to your hosting root area.
Let the browser finds the favicon!
One way, which is the easiest, is by uploading an icon as a .png or .ico file from your hosting’s File Manager. If you prepare your image in png or ico, you can upload it to your hosting area, and most modern browsers will automatically detect favicon.png and favicon.ico files from your host (naming matters here, it should be exactly favicon). So, you’ll need no coding.
The other way is by using the HTML link inside the head tag.
Let’s use HTML link tag:
/* it should be placed inside the head tag */ icon" type="image/png" href="path-to-your-favicon"/> If you use a different image format, implement the appropriate changes (read the next paragraph), and change the value of the href attribute to the path where your image is located in your project. The ICO format is not as reliable anymore, and it’s better to use png (to preserve transparency).
Depending on the favicon format, the type attribute must be changed:
- For PNG, use image/png.
- For GIF, use image/gif.
- For JPEG, use image/jpg.
- For ICO, use image/x-icon.
- For SVG, use image/svg+xml.
/* for gif files, for example, it should look like this: */ /* path-to-favicon should be changed to the location of your favicon file */ icon" type="image/gif" href="path-to-favicon">A favicon must have the following characteristics:
- Favicon.ico is the default name.
- Size should be 16×16, 32×32, 48×48, 64×64 or 128×128 pixels.
- Color should be 8 bites, 24 bites or 32 bites.
There are a lot of online tools that will help you create a favicon, convert the image formats, etc., and you can find them by a simple search on Google, by the way.
The image must be square dimensioned in any image format (ico, jpg, BMP, gif, png) to appear in browsers properly. Images with non-square dimensions will also work. However, such icons may not look professional.
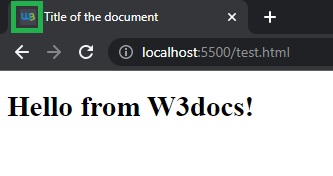
Example of adding an image in the title bar:
html> html> head> title>Title of the document title> link rel="icon" type="images/x-icon" href="https://www.w3docs.com/favicon.ico" /> head> body> h1>Hello from W3docs! h1> body> html>If you take a look at the result of the above code, it should be something like this.
Different Platforms:
For different platforms, the favicon size should also be changed:
| Platform | Name | Rel value | Favicon size |
|---|---|---|---|
| Google TV | favicon-96×96.png | icon | 96×96 |
| Ipad Retina, iOS 7 or later | apple-touch-icon-152×152-precomposed.png | apple-touch-icon-precomposed | 152×152 |
| Ipad Retina, iOS 6 or later | apple-touch-icon-144×144-precomposed.png | apple-touch-icon-precomposed | 144×144 |
| Ipad Min, first generation iOS 7 or later | apple-touch-icon-76×76-precomposed.png | apple-touch-icon-precomposed | 76×76 |
| Ipad Mini, first generation iOS 6 or previous | apple-touch-icon-72×72-precomposed.png | apple-touch-icon-precomposed | 72×72 |
| Iphone Retina, iOS 7 or later | apple-touch-icon-120×120-precomposed.png | apple-touch-icon-precomposed | 120×120 |
| Iphone Retina, iOS 6 or previous | apple-touch-icon-114×114-precomposed.png | apple-touch-icon-precomposed | 114×114 |
Add it to your code in the following way:
icon" href="/favicon.ico" type="image/x-icon"> icon" href="/favicon.png" sizes="32x32" type="image/png"> icon-precomposed" href="/apple-touch-icon-152x152-precomposed.png" type="image/png" sizes="152x152"> icon-precomposed" href="/apple-touch-icon-120x120-precomposed.png" type="image/png" sizes="120x120"> icon" href="/favicon-96x96.png" sizes="96x96" type="image/png">Please note that you must change the href attribute value based on the location of your favicon file, either in your host or in your project folder if you’re working locally. And the naming matters; otherwise, the browser can not detect it.
In the end, it is worth noting that you can use this open-source link which is a cheat sheet for favicon and has valuable information that may help you along the way.
Add an icon before or after a link with CSS
CSS has a matching syntax for selectors which makes it possible to match the filename extension at the end of an href. This makes it easy to add an icon which relates to the link before or after the text part of the link.
Matching the filename extension
This works in all modern browsers. It does not work in Internet Explorer 6 but that is becoming less relevent these days. If the browser does not support the matching syntax then it simply won’t render the image or any of the associated styling so it won’t break anything.
For example, to match all zip files add the following to your CSS file:
The $= makes the match at the end of the href part of the tag.
Adding an image icon to the link
Simply add the necessary styling to add a background image aligned either to the left or right of the link, and then enough padding to the right or left respectively so the text doesn’t go over the top of the image.
The doc/docx and xls/xlsx examples add the icon to the right of the text in the link and the pdf and zip examples to the left. Make sure the padding is at least the width of the image.
In the example presented below the images are 16px x 16px so a padding of 18px allows for a couple of pixels space between the text and the icon.
a[href$='.doc'], a[href$='.docx'] < background: transparent url(/images/content/icon_word.gif) center right no-repeat; padding-right: 18px; >a[href$='.xls'], a[href$='.xlsx'] < background: transparent url(/images/content/icon_excel.gif) center right no-repeat; padding-right: 18px; >a[href$='.pdf'] < background: transparent url(/images/content/icon_pdf.gif) center left no-repeat; padding-left: 18px; >a[href$='.zip'] < background: transparent url(/images/content/icon_zip.gif) center left no-repeat; padding-left: 18px; >
Working example
Here’s the above example working in action.
Check Out These Related posts:
Styling External Links with an Icon in CSS
For technical docs, blogs and articles it’s often a good idea to differentiate between links within the site (internal) and links to another site (external) as it can be jarring to be reading a blog or technical docs, clicking on a link and getting kicked to an external site unexpectedly.
A nice UX pattern is to display an ’external link’ icon next to external links. A simple way to implement this is using a CSS pseudo selector targeting only links which begin with http:// or https:// .
article a[href^="http"]::after, article a[href^="https://"]::after content: ""; width: 11px; height: 11px; margin-left: 4px; background-image: url("data:image/svg+xml,%3Csvg xmlns='http://www.w3.org/2000/svg' width='16' height='16' fill='currentColor' viewBox='0 0 16 16'%3E%3Cpath fill-rule='evenodd' d='M8.636 3.5a.5.5 0 0 0-.5-.5H1.5A1.5 1.5 0 0 0 0 4.5v10A1.5 1.5 0 0 0 1.5 16h10a1.5 1.5 0 0 0 1.5-1.5V7.864a.5.5 0 0 0-1 0V14.5a.5.5 0 0 1-.5.5h-10a.5.5 0 0 1-.5-.5v-10a.5.5 0 0 1 .5-.5h6.636a.5.5 0 0 0 .5-.5z'/%3E%3Cpath fill-rule='evenodd' d='M16 .5a.5.5 0 0 0-.5-.5h-5a.5.5 0 0 0 0 1h3.793L6.146 9.146a.5.5 0 1 0 .708.708L15 1.707V5.5a.5.5 0 0 0 1 0v-5z'/%3E%3C/svg%3E"); background-position: center; background-repeat: no-repeat; background-size: contain; display: inline-block; > If you’d like to exclude certain domains from displaying the icon (for example subdomains) you can set the icon to be hidden with something like:
article a[href^="https://example.com"]::after display: none !important; > The CSS examples above are to be used within the section of a page, and isn’t intended for navbars, footers or elsewhere where the font size and colors may differ — where automating the appearance of these links may not be appropriate.
The icon used in the example above is Bootstrap’s ‘box arrow up-right’ icon , but feel free to switch to something else such as Font Awesome’s External-Link-Alt’ icon .
I used the neat URL-encoder for SVG service to convert the SVG code.
One gotcha is that images which are links have the icon appended which isn’t ideal. Unfortunately I don’t have an easy CSS-only fix for that. The :has() CSS relational pseudo-class would be perfect, but browser support is unfortunately nonexistent .
Adding External Link Indicator with CSS

Indicating a link is going to open a new tab, or window, and direct users away from your site is good practice. Yon can do this with an icon, text, or image.
Maintaining that icon or image could be tough, especially when doing a redesign.
There is a very easy solution with CSS.
Setup the Link
This is just a basic link with the target set to open in a new tab. No outgoing link icon or text indicator is present.
The CSS Selector
The above code targets all links with the target aimed at opening a new tab or window.
Adding the Icon or Text
The following CSS code will add simple text indication.
a[target="_blank"]:after content: " (external)";
>
If you want an image to show after then use the following, replace IMAGEURL with the actual image URL.
a[target="_blank"]:after content: url(IMAGEURL);
>
Using Font Awesome Icons
If you have Font Awesome installed you can use the following:
a[target="_blank"]:after font-family: 'FontAwesome';
content: " \f08e";
>
A Fool-Proof Selector
The previous selector relies on the target tag. This selector will find all links to domains other than your own. I will use yourdomain.com to demonstrate.
a:not([href*='yourdomain.com']):not([href^='#']):not([href^='/']):after <>
Logic breakdown: If a link does not contain yourdomain.com then display content after link. Or, if a link does not contain a same-page anchor link then display content after, example: #top) Or, if a link does not contain an internal website like, example: /blog.