Tutorial 1: Create a simple XLSX file
Let’s start by creating a simple spreadsheet using Python and the XlsxWriter module.
Say that we have some data on monthly outgoings that we want to convert into an Excel XLSX file:
expenses = ( ['Rent', 1000], ['Gas', 100], ['Food', 300], ['Gym', 50], )
To do that we can start with a small program like the following:
import xlsxwriter # Create a workbook and add a worksheet. workbook = xlsxwriter.Workbook('Expenses01.xlsx') worksheet = workbook.add_worksheet() # Some data we want to write to the worksheet. expenses = ( ['Rent', 1000], ['Gas', 100], ['Food', 300], ['Gym', 50], ) # Start from the first cell. Rows and columns are zero indexed. row = 0 col = 0 # Iterate over the data and write it out row by row. for item, cost in (expenses): worksheet.write(row, col, item) worksheet.write(row, col + 1, cost) row += 1 # Write a total using a formula. worksheet.write(row, 0, 'Total') worksheet.write(row, 1, '=SUM(B1:B4)') workbook.close()
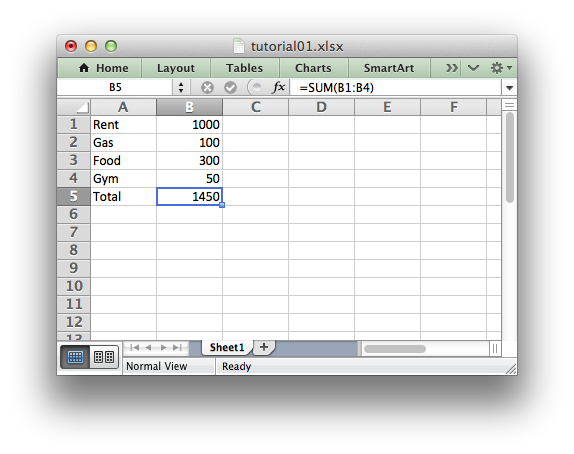
If we run this program we should get a spreadsheet that looks like this:
This is a simple example but the steps involved are representative of all programs that use XlsxWriter, so let’s break it down into separate parts.
The first step is to import the module:
The next step is to create a new workbook object using the Workbook() constructor.
Workbook() takes one, non-optional, argument which is the filename that we want to create:
workbook = xlsxwriter.Workbook('Expenses01.xlsx')
XlsxWriter can only create new files. It cannot read or modify existing files.
The workbook object is then used to add a new worksheet via the add_worksheet() method:
worksheet = workbook.add_worksheet()
By default worksheet names in the spreadsheet will be Sheet1 , Sheet2 etc., but we can also specify a name:
worksheet1 = workbook.add_worksheet() # Defaults to Sheet1. worksheet2 = workbook.add_worksheet('Data') # Data. worksheet3 = workbook.add_worksheet() # Defaults to Sheet3.
We can then use the worksheet object to write data via the write() method:
worksheet.write(row, col, some_data)
Throughout XlsxWriter, rows and columns are zero indexed. The first cell in a worksheet, A1 , is (0, 0) .
So in our example we iterate over our data and write it out as follows:
# Iterate over the data and write it out row by row. for item, cost in (expenses): worksheet.write(row, col, item) worksheet.write(row, col + 1, cost) row += 1
We then add a formula to calculate the total of the items in the second column:
worksheet.write(row, 1, '=SUM(B1:B4)')
Finally, we close the Excel file via the close() method:
And that’s it. We now have a file that can be read by Excel and other spreadsheet applications.
In the next sections we will see how we can use the XlsxWriter module to add formatting and other Excel features.
© Copyright 2013-2023, John McNamara.
Created using Sphinx 1.8.6.
Creating Excel files with Python and XlsxWriter
XlsxWriter is a Python module for creating Excel XLSX files.
XlsxWriter is a Python module that can be used to write text, numbers, formulas and hyperlinks to multiple worksheets in an Excel 2007+ XLSX file. It supports features such as formatting and many more, including:
- 100% compatible Excel XLSX files.
- Full formatting.
- Merged cells.
- Defined names.
- Charts.
- Autofilters.
- Data validation and drop down lists.
- Conditional formatting.
- Worksheet PNG/JPEG/GIF/BMP/WMF/EMF images.
- Rich multi-format strings.
- Cell comments.
- Textboxes.
- Integration with Pandas and Polars.
- Memory optimization mode for writing large files.
It supports Python 3.4+ and PyPy3 and uses standard libraries only.
This document explains how to use the XlsxWriter module. See the following sections for more information, or jump straight to the Introduction .
- Working with Cell Notation
- Working with and Writing Data
- Working with Formulas
- Working with Dates and Time
- Working with Colors
- Working with Charts
- Working with Object Positioning
- Working with Autofilters
- Working with Data Validation
- Working with Conditional Formatting
- Working with Worksheet Tables
- Working with Textboxes
- Working with Sparklines
- Working with Cell Comments
- Working with Outlines and Grouping
- Working with Memory and Performance
- Working with VBA Macros
- Working with Pandas and XlsxWriter
- Working with Polars and XlsxWriter
How to Create Excel File in Python
We can use the openpyxl library to create an Excel File in Python. This ability is an essential step for any Excel process automation. The best part – we don’t even need to have the Excel program installed.
Library
Open up a command prompt, and use pip install to download openpyxl library:
Create Excel Workbook and Add Worksheets using Python
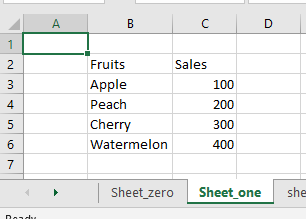
For this step, we are creating an Excel file in Python and don’t need to open the Excel program. The below code creates an Excel file in memory, then adds two sheets, namely “Sheet_one” and “Sheet_two”.
- When a Workbook is created, by default it contains at least one sheet. So this file will contain three (3) sheets in total.
- This Excel file doesn’t exist on the hard drive yet and it doesn’t have a name.
We can change the sheet name any time by setting the ws.title attribute:
Copy A Worksheet
To copy a worksheet, call the wb.copy_worksheet() method:
Note that openpyxl has limitations and can not copy everything on a sheet. For example, Images and Charts will not be copied.
Changing Sheet/tab Color
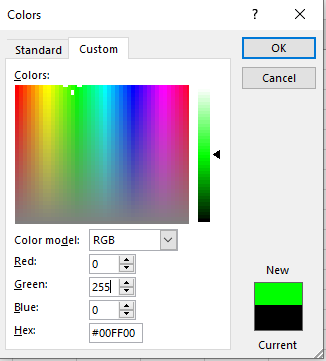
We can use the .sheet_properties.tabColor attribute to set tab colors. The value has to be a RGB hex value, and the easiest way to get those values is from the “Hex” box on Excel’s color palette.
Write Some Data Into Excel
Let’s put some values into “Sheet_one”. As the below code shows, it’s easy to access a cell using the column-row notation.
To enter values into Sheet programmatically, it’s easier to use the cell() method, which takes two arguments: row and column, both starting from an index of 1.
Saving Excel File
Up to this point, the entire Excel file including everything we’ve done is still inside our computer’s memory. We need to save the file to our disk by calling the wb.save() method. If we don’t do this step, our Excel file will disappear after shutting down the Python environment.
This is how we can create an Excel file using Python. Check the below for more resources.