- Adding a Box to HTML Code: A Step-by-Step Guide
- How to Create Text Box in Html
- How To Create Content Box In HTML
- 5: We Use Boxes in Websites
- How to insert a draw box in my html code?
- How to create three boxes in the same div using HTML and CSS ?
- CSS: Create one box inside another
- Problem:
- Solution 1: Using positioning
- Solution 2: Pseudo Effects
- Boxes in HTML: Your Guide to Create Responsive Content Boxes
- Basics to Advanced — Learn It All!
- Begin With HTML
- Basics to Advanced — Learn It All!
- Styling the Page
- Basics to Advanced — Learn It All!
- Your Content Box is Ready
- Conclusion
- Find our Post Graduate Program in Full Stack Web Development Online Bootcamp in top cities:
- About the Author
- Recommended Programs
- Create content box html
- Content Comes In Various Forms
- Content Boxes Are Simple Visual Elements
- HTML Makes Websites
Adding a Box to HTML Code: A Step-by-Step Guide
To reduce markup and improve page load speed, you can consider using pseudo effects as a solution. This can be highly beneficial as it involves using a single element instead of two. Another solution would be to use auto margin with absolute positioning, which can be demonstrated with this example: http://jsfiddle.net/gzterxrd/. You can set the height and width of the div using CSS properties. For instance, you can create multiple boxes within the same div using regular HTML and CSS as shown in this example.
How to Create Text Box in Html
To allow users to input characters on a web page, an HTML text box must be created by following the steps provided below. These steps enable any user to generate a text box with ease.
To begin, we can either input the Html code or open a pre-existing Html file in a text editor of our choice to create the text box.
Hello User!
In the second step, to generate the text box, we need to specify the tag if it isn’t already present in the code. Next, we must position the cursor at the desired location in the tag and insert the tag there.
To create a text box using the tag, we need to specify the type of data to be entered using the «type» attribute. Therefore, after writing the tag, we should set the value of the type attribute as «text».
To specify the width of the text box, we can utilize the size attribute in Step 4.
The fifth step involves saving the Html file followed by running it on a browser.
Hello User!
The following screenshot displays the output of the Html code mentioned above.

HTML textarea tag, The id attribute is needed to associate the text area with a label. Tip: Always add the
How To Create Content Box In HTML
In this video tutorial, you will learn about content boxes in html and how to create a content box Duration: 20:09
5: We Use Boxes in Websites
We use boxes in websites | Learn HTML and CSS | HTML tutorial. In this HTML tutorial you Duration: 7:04
How to insert a draw box in my html code?
The following links may be helpful:
Take a glance at this discussion on StackOverflow regarding adding drawings over an image using Javascript.
It’s not a straightforward task to achieve what you intend to do. The present HTML version (most likely 4.01) doesn’t facilitate it whatsoever. However, HTML 5, which is presently under development, comprises a element that can be utilized with javascript to accomplish the desired outcome. Nonetheless, only the most recent editions of Firefox, Chrome, Opera, and Safari support it.
Check out w3schools.com/tags/html5_canvas.asp to understand the element and visit dev.w3.org/html5/spec/#the-canvas-element for the complete (although unfinished) specifications.
Check out this link, http://devfiles.myopera.com/articles/649/example1.html, to find an illustration of the design that matches your requirements.
An HTML element called a «draw box» does not exist. To include one on your page, you will have to locate a pre-built option in JavaScript/Flash/Java and insert it.
Check out CanvasPaint application or this alternative painter for Canvas.
Text Box in HTML – The Input Field HTML Tag, In this article you’ll learn how to create a text input field in HTML. You’ll also learn about web forms and get an overview of how they
How to create three boxes in the same div using HTML and CSS ?
Utilizing CSS, it is possible to position multiple divs alongside each other within a singular div. This can be accomplished using flexbox, although it is important to apply distinct flex-directions to wrapper divs in order to achieve a functional grid layout. To set the dimensions of the divs, employ CSS properties.
flex: flex-grow flex-shrink flex-basis | auto | initial | inherit; flex-direction: row; flex-direction: row-reverse; flex-direction: column; flex-direction: column-reverse; flex-grow: number | initial | inherit;
The following example demonstrates how to utilize HTML and CSS to generate three boxes within a single div.
| The following codes are listed: through . > through div . This is a string of code represented by a series of numbers from 195 to 287, each preceded by «msdt_code». |

How to Create Text Box in Html, Step 1: Firstly, we have to type the Html code in any text editor or open the existing Html file in the text editor in which we want to create the text box.
CSS: Create one box inside another
Problem:
Your child elements are aligning to the top left of their parent element by default, which is causing the issue you are experiencing. To position your child element in the center horizontally, you may use the following css.
This will center it horizontally.
Aligning content vertically can be a bit challenging as it requires ensuring that it is properly positioned both at the top and bottom of its parent container. To achieve this, you may consider using:
It’s important to note that position:absolute; must be added to the child element, but only if it’s aligned with the parent div.
To maximize benefits, it’s preferable to use both left and top properties when setting it in our child element.
position: absolute; left:25%; top:25%; Therefore, based on this information, we have arrived at our initial resolution.
Solution 1: Using positioning
The issue can be resolved by implementing absolute positioning, along with assigning relative positioning to the parent.
Solution 2: Pseudo Effects
To decrease the page load time, utilizing pseudo effects can be helpful in reducing markup. Moreover, the use of pseudo effects can be advantageous as it involves only one element instead of two.
An approach to employ absolute positioning with auto margin is by using it.
Check out the demo at http://jsfiddle.net/gzterxrd/.
HTML input type=»checkbox», The defines a checkbox. The checkbox is shown as a square box that is ticked (checked) when activated. Checkboxes are used to let a user
Boxes in HTML: Your Guide to Create Responsive Content Boxes

The CSS box model is a container that contains several properties, including borders, margin, padding, and the content itself. It is used to create the design and structure of web pages. You can use it as a framework for customizing the layout of different elements. In this tutorial, you will look at the application of box models, i.e., Content Boxes In HTML.
Basics to Advanced — Learn It All!
Begin With HTML
Now, you must start by creating the HTML part. You will add three boxes with content inside it. You must use the icons from font-awesome.
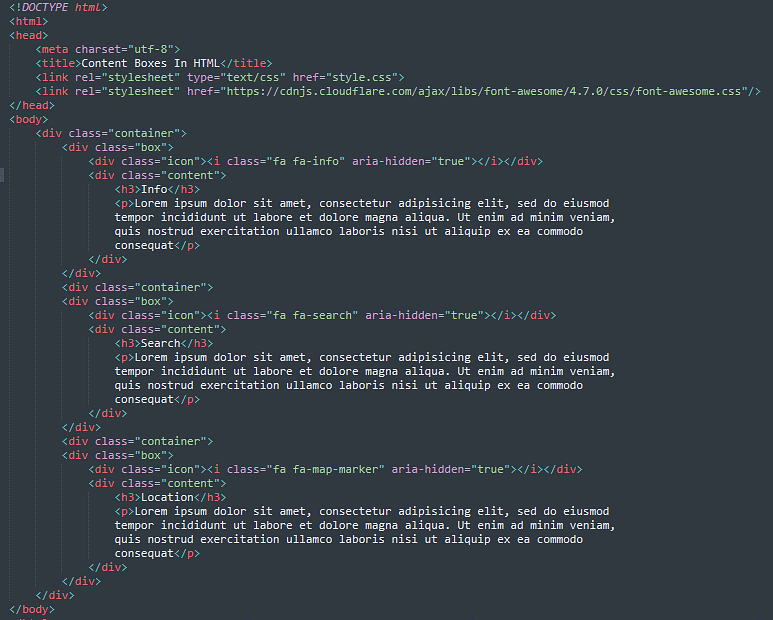
- Add the font-awesome CDN to the href tag, so that you can use the icon on your page.
- Create a tag with class name ‘container’ and add the details you want to mention in the content box.
Basics to Advanced — Learn It All!
Styling the Page
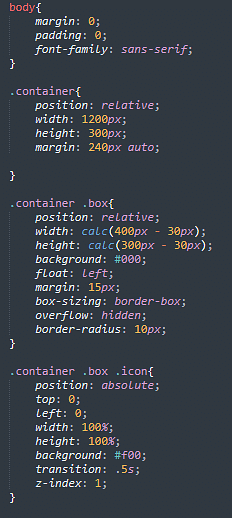
- The box-sizing property allows you to add the padding and border with respect to the element’s total width and height.
- The overflow property only works with block elements.
- The z-index specifies the position of the element along the z-axis.
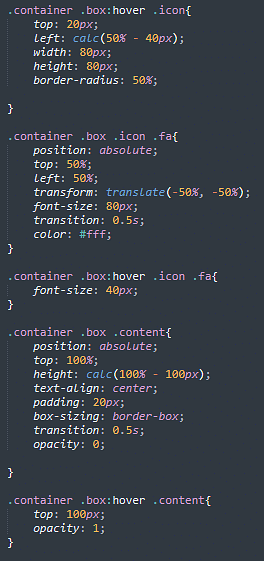
- The translate() property translates, moves, scales and rotates a page element up, down, left, and right on the page by a set amount. The first number specifies the horizontal distance in the parenthesis, and the second number specifies the vertical space.
- The CSS calc() function lets you perform calculations when specifying CSS property values. The calc() function takes a single expression as its parameter, with the expression’s result used as the value.
Basics to Advanced — Learn It All!
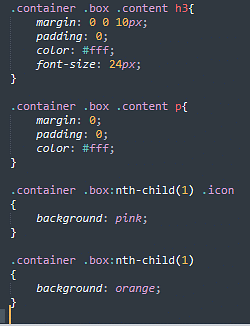
Your Content Box is Ready
The content box is ready for use.
Conclusion
So with this, you come to the end of this Content Boxes In HTML article. Here, you saw how you can create responsive content boxes to make your web page more interactive using just HTML and CSS.
If you want to learn more about CSS and more importantly Full-Stack Development, you should check our Postgraduate Program in Full Stack Web Development.
If you have any feedback for us or need any queries answered, share them in the comments section of this tutorial page. Our team of Subject Matter Experts will review them and respond to you very soon.
Find our Post Graduate Program in Full Stack Web Development Online Bootcamp in top cities:
| Name | Date | Place | |
|---|---|---|---|
| Post Graduate Program in Full Stack Web Development | Cohort starts on 15th Aug 2023, Weekend batch | Your City | View Details |
| Post Graduate Program in Full Stack Web Development | Cohort starts on 12th Sep 2023, Weekend batch | Your City | View Details |
| Post Graduate Program in Full Stack Web Development | Cohort starts on 10th Oct 2023, Weekend batch | Your City | View Details |
About the Author
Aryan Gupta
Aryan is a tech enthusiast who likes to stay updated about trending technologies of today. He is passionate about all things technology, a keen researcher, and writes to inspire. Aside from technology, he is an active football player and a keen enthusiast of the game.
Recommended Programs
Post Graduate Program in Full Stack Web Development
Create content box html
When it comes to building out your websites, you should have content.
Content Comes In Various Forms
Content includes a mix of text, images, videos, banners, call to actions, buttons, boxes, icons, etc.
WordPress Themes offer overall visual layouts for your websites and blogs.
But with simple HTML and CSS code, you can also add visual elements inside your pages and posts to make content more visually appealing.
Content Boxes Are Simple Visual Elements
As with anything, there is always more than one way to achieve your desired end result.
You can make your pages and post more visually appealing by adding content boxes, buttons and special text call outs.
This blue border box is one example of a special note callout. Visually, this content box separates the text inside the box from the page and brings extra attention to it.
These HTML content boxes and buttons can be used for many different purposes:
- Call to Actions — A specific action you want your viewers to take
- Special Notes — A special note such as a required affiliate disclosure statement
- Headlines — A boxed in headline that helps break out sections of a long post
- Images — An image with a special background color

The sky is the limit with content boxes.
And there are multiple ways to create content boxes and buttons.
You can create a box or button with:
- HTML — uses HTML code to create boxes and buttons
- Image — create a button and take a screenshot of it
- Page Builder Plugins — Use plugins to add visual elements inside your page or post content
You can find plenty of WordPress plugins for page builders that allow you to easily insert in a content box, a button and many more visual elements.
You can even find them themes that come with page builder plugins included.

However, it is very easy and completely free to use HTML code to create a content box.
HTML Makes Websites
HTML is what makes up your website pages anyway. Why not customize the code?
The reason these plugins exist is because HTML is a coding language and can seem technical. So the plugins make it easy to build elements like content boxes without knowing html or how to code.
I personally would like to show how easy HTML really is.
I would like to see if I can convince you that using HTML is easier than you think.
If you know code for specific HTML elements such as a content box, you can easily create these content boxes and customize them however you want.
- Without installing a plugin
- Without having to learn how to use the plugin
- Without worrying about slowing down your site with plugins or images
And if you know of some really good free resources, you can grab more HTML codes for about anything you want.
This tutorial will show you step by step how to create a content box in HTML.
You will get the HTML codes for different content boxes and variations. You will also get a list of resources, tips and tricks to make this an easy learning process.
The 6 Steps in this tutorial include:
- Step 1 — How To Access Text Editor in WordPress
- Step 2 — How To Create A Box Around Text in HTML
- Step 3 — How To Change Box Color in HTML
- Step 4 — How To Create A Border in HTML
- Step 5 — How To Create A Button in HTML
- Step 6 — HTML Code Tips
Ready to get started? Cool. Let’s do this!
Next Page -> How To Access Text Editor in WordPress