- Creating Python Programs
- 1. Create a Python file
- So what should we use?
- 2. Enter the code
- 3. Save the file
- 4. Execute a Python program file
- Get certified with our courses
- Learn more
- Leave a Comment Cancel reply
- Tutorial: Work with Python in Visual Studio
- Prerequisites
- Step 1: Create a new Python project
- Next step
- Go deeper
Creating Python Programs
After reading the Python tutorial so far, you should have a basic understanding of Python and the REPL. Even though the latter can be very useful, you probably noticed in the last example that the REPL has its limits. It’s nice for quick experiments, but:
- It’s really hard to enter more than a few lines
- It’s hard to go back to previous lines
- There’s no syntax highlighting
- We can’t store our programs and re-use them later on
If we want to store our programs and use a decent editor, we need to simply:
No worries, we’ll go over it step by step.
1. Create a Python file
We need to create a so-called plain text file, meaning there’s nothing special about this file. It’s just text. Sounds simple, but it’s not. For example, if you start Word or a similar program, enter some text, and save it, you don’t end up with plain text.
Text processing software like Word will add all kinds of extra codes to define the markup, allow for images to be included, etcetera. It looks a little like HTML, in fact, which is used to create websites (see this HTML tutorial for an introduction).
So what should we use?
If you’re on Windows, try Notepad. It’s a plain text editor that does not add any markup. It’s a horrible way to create Python programs, but we’ll explore better options later on.
If you’re on Linux, you could open a terminal and try a text editor like nano or vim (the last one is hard to use if you haven’t read the manual, though). Many Linux installations include a GUI text editor too, like gedit.
MacOS comes with a program called TextEdit.
2. Enter the code
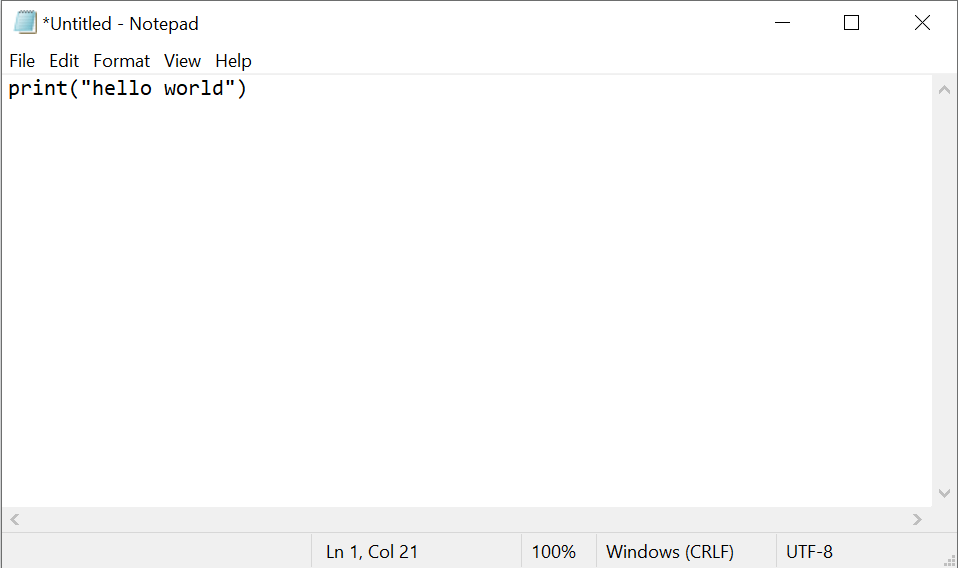
Now it’s time to enter some code. We’ll keep it super simple for now. Just enter something like:
On Windows, it should look like this:
3. Save the file
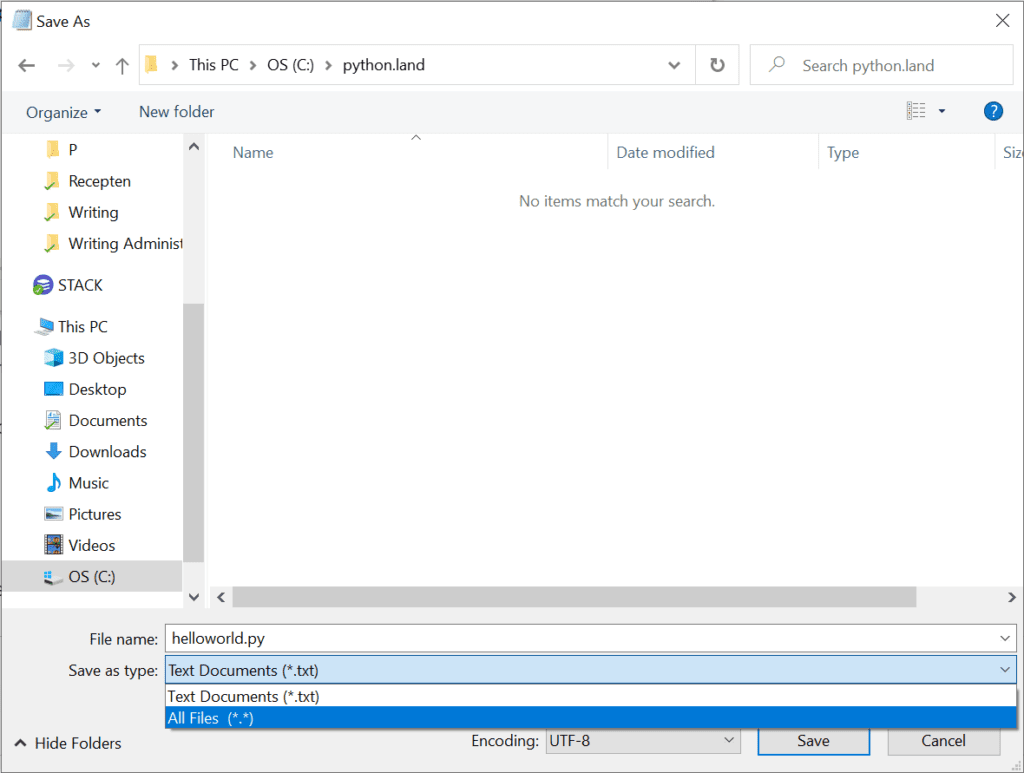
Save the file. The most important thing to look out for is the file extension. Python files end with the .py extension. Call your file helloworld.py . In Notepad, you need to click the dropdown list called ‘Save as type’ and select All files (*.* ):
4. Execute a Python program file
Now that you saved the file, we can execute it. There are two options, and most often you want to go for option one:
- Open a terminal or command prompt, go to the file’s directory, and execute it with the python3 command
- Find the file with Windows explorer, right click, open with ‘Python 3.X’.
If you try option two, you’ll find out that the program flashes on the screen shortly, and you won’t see the output because the window closes itself directly after the text is printed to the screen. So now you know why you want option one! If you create more advanced programs that keep running instead of quitting directly, option two can be an OK way to start a Python script.
Note: I’ll demonstrate using Windows, but this works the same on Linux and MacOS. Instead of opening a Command Prompt or Windows Terminal, you open a MacOS terminal or Linux terminal.
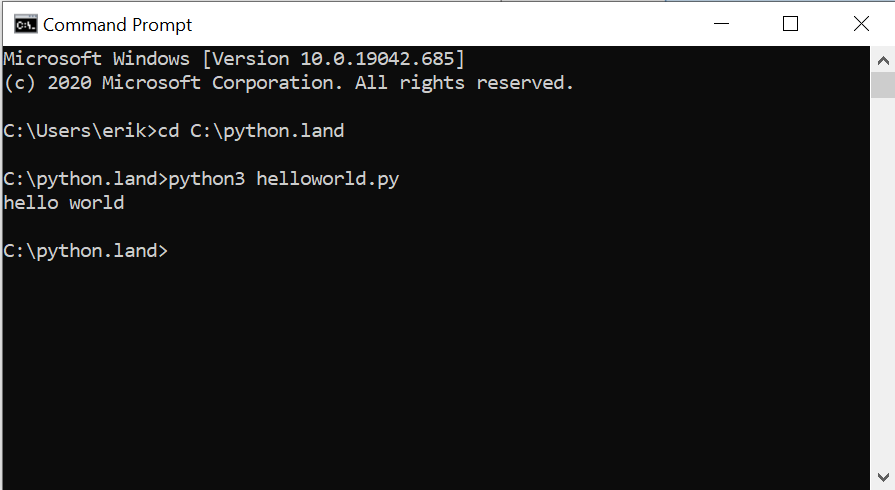
- Open the start menu and type ‘Command Prompt.’ It might be named differently if your OS is configured with another language than English. Hint: Create a new profile with English settings. It may be helpful because most examples on the web and in books assume English settings.
- cd to the directory where you stored your file. In my case, it’s C:\python.land
- Run the program with the command python3 helloworld.py
The output should look like this:
Congrats, You did it. You wrote a Python program, saved it to a file, and executed it like a boss! Don’t celebrate too hard, though. You don’t want to develop Python software using Notepad or other simple text editors. What you really want is a Python IDE: an Integrated Development Environment. Sounds scary, but it’s not!
Get certified with our courses
Our premium courses offer a superior user experience with small, easy-to-digest lessons, progress tracking, quizzes to test your knowledge, and practice sessions. Each course will earn you a downloadable course certificate.


Learn more
This article is part of my Python tutorial. You can head over to the start of the tutorial here. You can navigate this tutorial using the buttons at the top and bottom of the articles. To get an overview of all articles in the tutorial, please use the fold-out menu at the top.
If you liked this article, you might also like to read the following articles:
Leave a Comment Cancel reply
You must be logged in to post a comment.
You are browsing the free Python tutorial. Make sure to check out my full Python courses as well.
Subscribe to my newsletter for Python news, tips, and tricks!
Tutorial: Work with Python in Visual Studio
Applies to: ![]() Visual Studio
Visual Studio ![]() Visual Studio for Mac
Visual Studio for Mac ![]() Visual Studio Code
Visual Studio Code
Python is a popular programming language that is reliable, flexible, easy to learn, and free to use on all operating systems. Python is supported by both a strong developer community and many, free libraries. The language supports all kinds of development, including web applications, web services, desktop apps, scripting, and scientific computing. Many universities, scientists, casual developers, and professional developers use Python.
Visual Studio provides first-class language support for Python. This tutorial guides you through the following steps:
Prerequisites
Visual Studio with the Python workload installed. For instructions, see Install Python tools for Visual Studio.
Step 1: Create a new Python project
A project is how Visual Studio manages all the files that come together to produce a single application. Application files include source code, resources, and configurations. A project formalizes and maintains the relationships among all the project’s files. The project also manages external resources that are shared between multiple projects. A project allows your application to effortlessly expand and grow. Using projects is much easier than manually managing relationships in unplanned folders, scripts, text files, and your memory.
This tutorial begins with a simple project containing a single, empty code file.
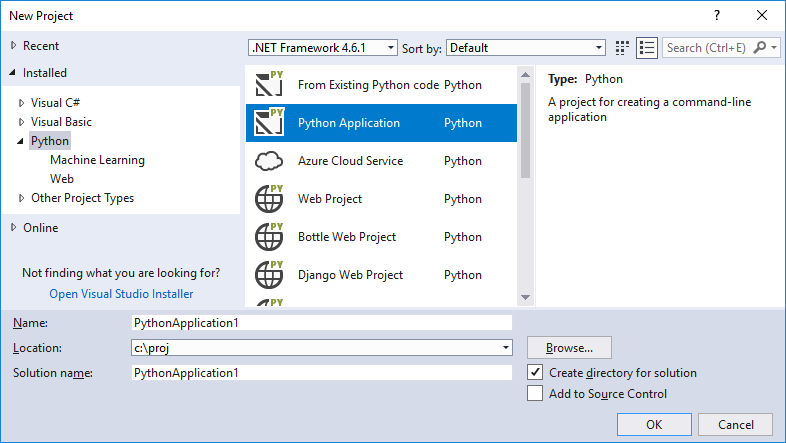
- In Visual Studio, select File >New >Project (Ctrl+Shift+N), which brings up the New Project dialog. Here you browse templates across different languages, then select one for your project and specify where Visual Studio places files.
- To view Python templates, select Installed >Python on the left, or search for «Python». Using search is a great way to find a template when you can’t remember its location in the languages tree.
 Python support in Visual Studio includes several project templates, including web applications using the Bottle, Flask, and Django frameworks. For the purposes of this walkthrough, however, let’s start with an empty project.
 - Select the Python Application template, specify a name for the project, and select OK.
- After a few moments, Visual Studio shows the project structure in the Solution Explorer window (1). The default code file is open in the editor (2). The Properties window (3) also appears to show additional information for any item selected in Solution Explorer, including its exact location on disk.
- Take a few moments to familiarize yourself with Solution Explorer, which is where you browse files and folders in your project. (1) Highlighted in bold is your project, using the name you gave in the New Project dialog. On disk, this project is represented by a .pyproj file in your project folder. (2) At the top level is a solution, which by default has the same name as your project. A solution, represented by a .sln file on disk, is a container for one or more related projects. For example, if you write a C++ extension for your Python application, that C++ project could be in the same solution. The solution might also contain a project for a web service, along with projects for dedicated test programs. (3) Under your project you see source files, in this case only a single .py file. Selecting a file displays its properties in the Properties window. Double-clicking a file opens it in whatever way is appropriate for that file. (4) Also under the project is the Python Environments node. When expanded, you see the Python interpreters that are available to you. Expand an interpreter node to see the libraries that are installed into that environment (5). Right-click any node or item in Solution Explorer to access a menu of applicable commands. For example, the Rename command lets you to change the name of any node or item, including the project and the solution.
 Python support in Visual Studio includes several project templates, including web applications using the Bottle, Flask, and Django frameworks. For the purposes of this walkthrough, however, let’s start with an empty project.
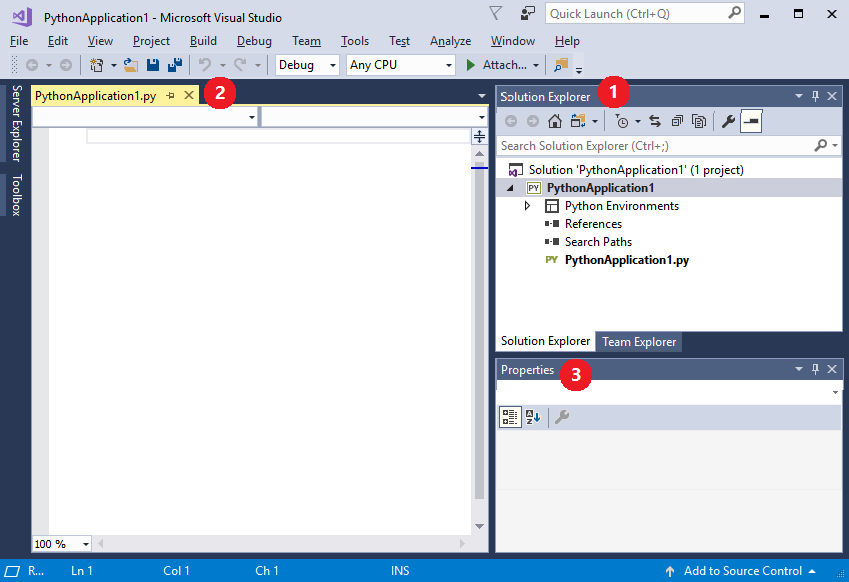
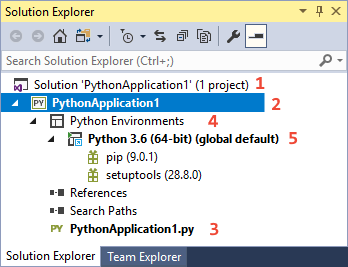 (1) Highlighted in bold is your project, using the name you gave in the New Project dialog. On disk, this project is represented by a .pyproj file in your project folder. (2) At the top level is a solution, which by default has the same name as your project. A solution, represented by a .sln file on disk, is a container for one or more related projects. For example, if you write a C++ extension for your Python application, that C++ project could be in the same solution. The solution might also contain a project for a web service, along with projects for dedicated test programs. (3) Under your project you see source files, in this case only a single .py file. Selecting a file displays its properties in the Properties window. Double-clicking a file opens it in whatever way is appropriate for that file. (4) Also under the project is the Python Environments node. When expanded, you see the Python interpreters that are available to you. Expand an interpreter node to see the libraries that are installed into that environment (5). Right-click any node or item in Solution Explorer to access a menu of applicable commands. For example, the Rename command lets you to change the name of any node or item, including the project and the solution.
- In Visual Studio, select File >New >Project or press Ctrl+Shift+N. The Create a new project screen displays, where you can search and browse templates across different languages.
- To view Python templates, search for python. Search is a great way to find a template when you can’t remember its location in the languages tree. Python web support in Visual Studio includes several project templates, such as web applications in the Bottle, Flask, and Django frameworks. When installing Python with the Visual Studio Installer, check «Python Web Support» under optional to install these templates. For this tutorial, start with an empty project.
- Select the Python Application template, and select Next.
- On the Configure your new project screen, specify a name and file location for the project, and then select Create. The new project opens in Visual Studio.
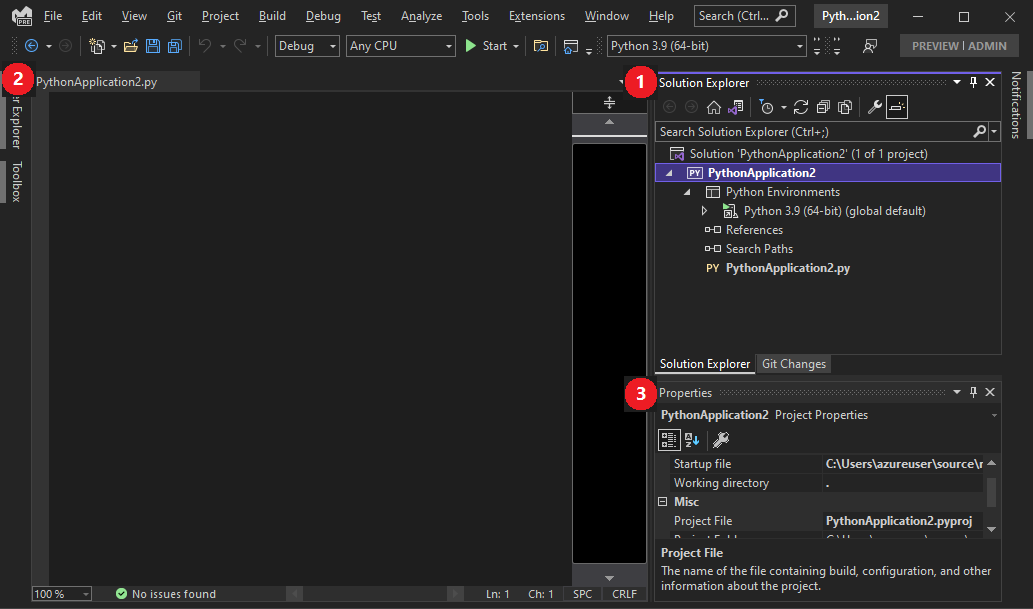
- The Visual Studio Solution Explorer window shows the project structure (1).
- The default code file opens in the editor (2).
- The Properties window shows more information for the item selected in Solution Explorer, including its exact location on disk (3).

- At the top level is the solution, which by default has the same name as your project (1). A solution, which is shown as a .sln file on disk, is a container for one or more related projects. For example, if you write a C++ extension for your Python application, that C++ project can be in the same solution. The solution could also contain a project for a web service, and projects for dedicated test programs.
- Your project, with the name you gave in the Create a new project dialog box, displays in bold (2). On disk, the project is a .pyproj file in your project folder.
- Under your project are source files, in this case only a single .py file (3). Selecting a file displays its properties in the Properties window (if you do not see the Properties window, click the wrench in the Solution Explorer banner). Double-clicking a file opens it in whatever way is appropriate for that file.
- Also under the project is the Python Environments node (4). Expand the node to show the available Python interpreters.
- Expand an interpreter node to see the libraries installed in that environment (5).
Right-click any node or item in Solution Explorer to show a context menu of applicable commands. For example, Rename lets you change the name of a node or item, including the project and the solution.