- How TO — Create and View a Website
- Step 1: Open Notepad (PC)
- Step 1: Open TextEdit (Mac)
- Step 2: Write Some HTML
- My First Heading
- Step 3: Save the HTML Page
- Step 4: View the HTML Page in Your Browser
- W3Schools Online Editor — «Try it Yourself»
- Example
- This is a Heading
- How TO — Create a Free Website
- Why Build with W3Schools Spaces?
- Edit and Preview Code
- Build From Anywhere
- Free Templates
- What Do I Need to Know to Get Started?
- Lets Get Started in a Few Steps
- Step One: Sign Up For an Account
- Step Two: Start with a template or HTML skeleton
- Step Three: Give your space a name
- Step Four: Enter your space
- Step Five: Edit code or upload files
- Step Six: Publish your site and share it with someone
- How TO — Make a Website
- Create a Website from Scratch
- A «Layout Draft»
- Navigation bar
- Side Content
- Main Content
- Footer
- First Step — Basic HTML Page
- Example
- My Website
- Example Explained
- Creating Page Content
- Header
- My Website
- Navigation Bar
- Content
- Footer
- Footer
- W3Schools Spaces
How TO — Create and View a Website
Learn how to create and view a web page on your computer.
Step 1: Open Notepad (PC)
Windows 8 or later:
Open the Start Screen (the window symbol at the bottom left on your screen). Type Notepad.
Windows 7 or earlier:
Open Start > Programs > Accessories > Notepad
Step 1: Open TextEdit (Mac)
Open Finder > Applications > TextEdit
Also change some preferences to get the application to save files correctly. In Preferences > Format > choose «Plain Text»
Then under «Open and Save», check the box that says «Display HTML files as HTML code instead of formatted text».
Then open a new document to place the code.
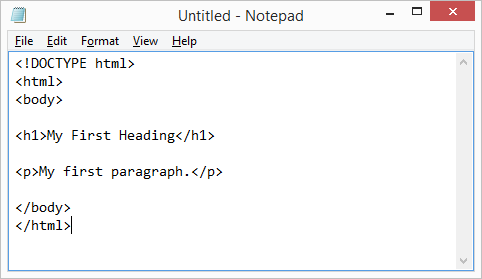
Step 2: Write Some HTML
Write or copy the following HTML code into Notepad:
My First Heading
Step 3: Save the HTML Page
Save the file on your computer. Select File > Save as in the Notepad menu.
Name the file «index.htm» and set the encoding to UTF-8 (which is the preferred encoding for HTML files).
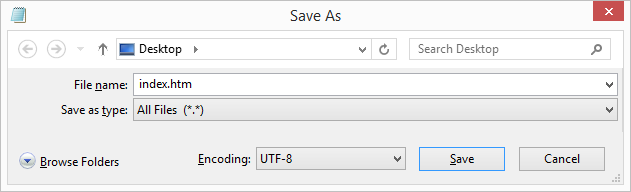
Tip: You can use either .htm or .html as file extension. There is no difference; it is up to you.
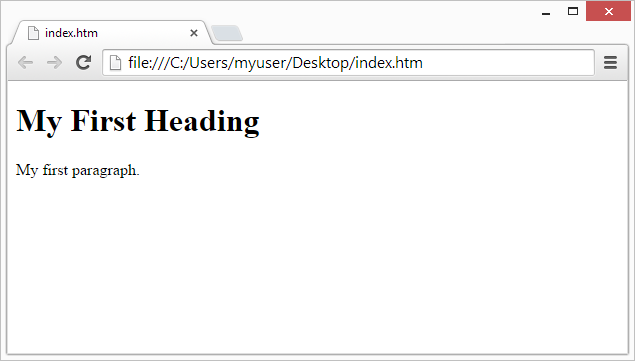
Step 4: View the HTML Page in Your Browser
Open the saved HTML file in your favorite browser (double click on the file, or right-click — and choose «Open with»).
The result will look much like this:
W3Schools Online Editor — «Try it Yourself»
With our free online editor, you can edit the HTML code and view the result in your browser.
It is the perfect tool when you want to test code fast. It also has color coding and the ability to save and share code with others:
Example
This is a Heading
This is a paragraph.
Click on the «Try it Yourself» button to see how it works.
How TO — Create a Free Website
W3Schools Spaces is a personal place where you can build and experiment with code and host your own website.
With W3Schools Spaces you can build with HTML, CSS and JavaScript.
Edit code directly in your browser.
Upload and host your files and images.
Start to grow your online presence today!
Why Build with W3Schools Spaces?
Spaces is made by web developers for web developers.
- The interface is simple and easy to use.
- Host and edit your files right in the browser.
- Free templates.
It is free to get started and you do not have to enter your credit card.
Edit and Preview Code
The editor is easy to use — which helps you to focus on the most imporant things.
Check the responsiveness of your site with the different preview alternatives.
Preview changes on your site, live!

Build From Anywhere
Host your files and images in the cloud.
Keep organized by creating a structure with folders.
Everything you need right in the browser.

Free Templates
Browse and use our responsive website templates.
Modify, save, share, and use them in your projects.

The templates are powered by W3.CSS
What Do I Need to Know to Get Started?
HTML, CSS and JavaScript are the foundational languages to build a website.
- Create the structure with HTML. The first thing you have to learn, is HTML, which is the standard markup language for creating web pages. Learn HTML »
- Style with CSS. The next step is to learn CSS, to set the layout of your web page with beautiful colors, fonts, and much more. Learn CSS »
- Make it interactive with JavaScript. After studying HTML and CSS, you should learn JavaScript to create dynamic and interactive web pages for your users. Learn JavaScript »
Do not worry if you do not know how to code. The most important thing is to get hands on, early on. Learning how to code is best done with getting practical. Start to build something today!
Lets Get Started in a Few Steps
Do you already have a W3Schools Account? If so, skip the first step
Step One: Sign Up For an Account
To be able to use Spaces you need to sign up and get your account.

Go to W3Schools Profile — Click «Sign up» and enter your email and password, then click the «Sign up for free» button.
Remember to validate your account in your email. Check the spam filter if you cannot find the validation email in your inbox.
Get more information about how to sign up in our article — How to sign up
Step Two: Start with a template or HTML skeleton
Select one of the options and click the «Continue» button.
Do not worry too much about this decision. You can reset your Space and start over again whenever you want.

Step Three: Give your space a name
Personalize your Space by giving it an amazing name.

You can not use special letters in the name, such as (#, ! or :). The only exception is dash ( — )
The name will be the link that you share with others to see your site. For example: yourname.w3spaces.com
Step Four: Enter your space
Great job! you made it to the dashboard.
In the dashboard you get an overview of your spaces and usage.
Enter your space and its File Overview by clicking somewhere on the space’s row or click the button with the three dots to the right inside the row.

You can only have one space with the free plan. However, you can always upgrade to get more spaces.
Step Five: Edit code or upload files
This is where the magic happens!
Start to edit code or upload files

- Edit code by clicking on the «Pen icon» to the right of the file that you want to edit.
- Create new files by clicking on the «New file» button.
- Upload files by clicking on the «Upload files» button.
Step Six: Publish your site and share it with someone
This is the start of building your online presence.
Learn, test, build, and go live with your space.
Create your website and share it with others.

Note: Your space name with the .w3spaces.com extension is your shareable link. Read more about how to share your space in this article How can I share my space?
How TO — Make a Website
Learn how to create a responsive website that will work on all devices, PC, laptop, tablet, and phone.
Create a Website from Scratch
A «Layout Draft»
It can be wise to draw a layout draft of the page design before creating a website:
Navigation bar
Side Content
Main Content
Footer
First Step — Basic HTML Page
HTML is the standard markup language for creating websites and CSS is the language that describes the style of an HTML document. We will combine HTML and CSS to create a basic web page.
Example
My Website
A website created by me.
Example Explained
- The declaration defines this document to be HTML5
- The element is the root element of an HTML page
- The element contains meta information about the document
- The element specifies a title for the document
- The element should define the character set to be UTF-8
- The element with name=»viewport» makes the website look good on all devices and screen resolutions
- The element contains the styles for the website (layout/design)
- The element contains the visible page content
- The element defines a large heading
- The
element defines a paragraph
Creating Page Content
Inside the element of our website, we will use our «Layout Draft» and create:
- A header
- A navigation bar
- Main content
- Side content
- A footer
Header
A header is usually located at the top of the website (or right below a top navigation menu). It often contains a logo or the website name:
My Website
A website created by me.
Then we use CSS to style the header:
.header <
padding: 80px; /* some padding */
text-align: center; /* center the text */
background: #1abc9c; /* green background */
color: white; /* white text color */
>
/* Increase the font size of the element */
.header h1 font-size: 40px;
>
Navigation Bar
A navigation bar contains a list of links to help visitors navigating through your website:
Use CSS to style the navigation bar:
/* Style the top navigation bar */
.navbar overflow: hidden; /* Hide overflow */
background-color: #333; /* Dark background color */
>
/* Style the navigation bar links */
.navbar a float: left; /* Make sure that the links stay side-by-side */
display: block; /* Change the display to block, for responsive reasons (see below) */
color: white; /* White text color */
text-align: center; /* Center the text */
padding: 14px 20px; /* Add some padding */
text-decoration: none; /* Remove underline */
>
/* Right-aligned link */
.navbar a.right float: right; /* Float a link to the right */
>
/* Change color on hover/mouse-over */
.navbar a:hover background-color: #ddd; /* Grey background color */
color: black; /* Black text color */
>
Content
Create a 2-column layout, divided into a «side content» and a «main content».
We use CSS Flexbox to handle the layout:
/* Ensure proper sizing */
* box-sizing: border-box;
>
/* Column container */
.row <
display: flex;
flex-wrap: wrap;
>
/* Create two unequal columns that sits next to each other */
/* Sidebar/left column */
.side flex: 30%; /* Set the width of the sidebar */
background-color: #f1f1f1; /* Grey background color */
padding: 20px; /* Some padding */
>
/* Main column */
.main <
flex: 70%; /* Set the width of the main content */
background-color: white; /* White background color */
padding: 20px; /* Some padding */
>
Then add media queries to make the layout responsive. This will make sure that your website looks good on all devices (desktops, laptops, tablets and phones). Resize the browser window to see the result.
/* Responsive layout — when the screen is less than 700px wide, make the two columns stack on top of each other instead of next to each other */
@media screen and (max-width: 700px) .row <
flex-direction: column;
>
>
/* Responsive layout — when the screen is less than 400px wide, make the navigation links stack on top of each other instead of next to each other */
@media screen and (max-width: 400px) .navbar a float: none;
width: 100%;
>
>
Tip: To create a different kind of layout, just change the flex width (but make sure that it adds up to 100%).
Tip: Do you wonder how the @media rule works? Read more about it in our CSS Media Queries chapter.
Tip: To learn more about the Flexible Box Layout Module, read our CSS Flexbox chapter.
What is box-sizing?
You can easily create three floating boxes side by side. However, when you add something that enlarges the width of each box (e.g. padding or borders), the box will break. The box-sizing property allows us to include the padding and border in the box’s total width (and height), making sure that the padding stays inside of the box and that it does not break.
You can read more about the box-sizing property in our CSS Box Sizing Tutorial.
Footer
At last, we will add a footer.
Footer
.footer <
padding: 20px; /* Some padding */
text-align: center; /* Center text*/
background: #ddd; /* Grey background */
>
Congratulations! You have built a responsive website from scratch.
W3Schools Spaces
If you want to create your own website and host your .html files, try our website builder, called W3schools Spaces: