- Create a box with CSS styling
- CSS Box Model
- The CSS Box Model
- Width and Height of an Element
- Create a box with CSS styling
- How to create a post box with HTML and CSS
- How do I make CSS row boxes?
- Create A Box Around Text In HTML (The Easy Way)
- TLDR – QUICK SLIDES
- TABLE OF CONTENTS
- DOWNLOAD & NOTES
- QUICK NOTES
- EXAMPLE CODE DOWNLOAD
- CREATING BOXES
- EXAMPLE 1) BOX BASICS – THE BOX MODEL
- HMTL & CSS
- THE EXPLANATION
- EXAMPLE 2) CSS CLASSES – SOMETHING LIKE TEMPLATES
- HMTL & CSS
- THE EXPLANATION
- EXTRA) ADDING ICONS
- HMTL & CSS
- THE EXPLANATION
- EXTRA) ROUNDED CORNERS
- HMTL & CSS
- THE EXPLANATION
- EXTRA BITS & LINKS
- LINKS & REFERENCES
- INFOGRAPHIC CHEAT SHEET
- THE END
Create a box with CSS styling
The total width of an element should be calculated like this: Total element width = width + left padding + right padding + left border + right border + left margin + right margin The total height of an element should be calculated like this: Total element height = height + top padding + bottom padding + top border + bottom border + top margin + bottom margin
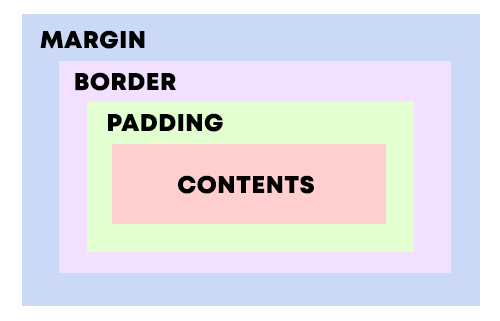
CSS Box Model
All HTML elements can be considered as boxes.
The CSS Box Model
In CSS, the term «Box Model» is used when talking about design and layout.
The CSS Box Model is essentially a box that wraps around every HTML element. It consists of: margins, borders, padding, and the actual content. The image below illustrates the box model:
Explanation of the different parts:
- Content — The content of the box, where text and images appear
- Padding — Clears an area around the content. The padding is transparent
- Border — A border that goes around the padding and content
- Margin — Clears an area outside the border. The margin is transparent
The box model allows us to add a border around elements, and to define space between elements.
Example
Demonstration of the box model:
Width and Height of an Element
In order to set the width and height of an element correctly in all browsers, you need to know how the box model works.
Important: When you set the width and height properties of an element with CSS, you just set the width and height of the content area . To calculate the full size of an element, you must also add padding, borders and margins.
Example
This element will have a total width of 350px:
320px (width)
+ 20px (left + right padding)
+ 10px (left + right border)
+ 0px (left + right margin)
= 350px
The total width of an element should be calculated like this:
Total element width = width + left padding + right padding + left border + right border + left margin + right margin
The total height of an element should be calculated like this:
Total element height = height + top padding + bottom padding + top border + bottom border + top margin + bottom margin
Css: how to center box div element directly in center?, 7 Answers. top and left correspond to the top-left corner of your box. What you’re trying to do is have them correspond to the center. So if you set margin-top and margin-left to negative of one-half the height and width respectively, you’ll get a centered box. width: 300px; height: 200px; top: 50%; left: 50%; margin-left: -150px; …
Create a box with CSS styling

I need to create a box as shown in the attached image with CSS styling. Is it possible to do with CSS or would I have to use the image.
Here’s as close as I could get in 10 minutes.
There’s scope for improvement — the ‘border’ (actually a drop shadow) is only present on the main box, not the arrow, but it otherwise does a decent job on fidelity: the arrow shape and angle are all there.
There is a great tool here that makes this effect very simple. Highly customizable too. Once you can see how it is working it is easy to tweak for example moving the arrow further to the right rather than dead center.
Html — How to make a box rotate and scale in CSS?, Both can be done with transform, like so: .myClass < transform: scale (1.3) rotate (360deg); >but to be on the safe side, you should take care of older browsers: .myClass < -moz-transform: scale (1.3) rotate (360deg); -webkit-transform: scale (1.3) rotate (360deg); -o-transform: scale (1.3) rotate (360deg); …
How to create a post box with HTML and CSS

I am trying to make a social media site from scratch, and I was wonder how to create a post box like this using html and css. So far I haven’t found ANYTHING. Please help if you can!
This is what you want?
I have a code only like this in my source
* < box-sizing: border-box; >body < padding: 0 1em; font-family: sans-serif; >/* * Post widget * */ input[type="file"] < display: none; >ul < list-style-type: none; >.btn < padding: .5em 1em; background-color: transparent; color: #6b7270; border: none; cursor: pointer; >.widget-post < width: 600px; min-height: 100px; height: auto; border: 1px solid #eaeaea; border-radius: 6px; box-shadow: 0 1px 2px 1px rgba(130, 130, 130, 0.1); background-color: #fff; margin: auto; overflow: hidden; >.widget-post__header < padding: .2em .5em; background-color: #eaeaea; color: #3f5563; >.widget-post__title < font-size: 18px; >.widget-post__content < width: 100%; height: 50%; >.widget-post__textarea < width: 100%; height: 100%; padding: .5em; border: none; resize: none; >.widget-post__textarea:focus < outline: none; >.widget-post__options < padding: .5em; >.widget-post___input < display: inline-block; width: 24%; padding: .2em .5em; border: 1px solid #eaeaea; border-radius: 1.5em; >.post-actions__label < cursor: pointer; >.widget-post__actions < width: 100%; padding: .5em; >.post--actions < position: relative; padding: .5em; background-color: #f5f5f5; color: #a2a6a7; >.post-actions__attachments < display: inline-block; width: 60%; >.attachments--btn < background-color: #eaeaea; color: #007582; border-radius: 1.5em; >.post-actions__widget < display: inline-block; width: 38%; text-align: right; >.post-actions__publish < width: 120px; background-color: #008391; color: #fff; border-radius: 1.5em; >.scroller::-webkit-scrollbar < display: none; >.is--hidden < display: none; >.sr-only < width: 1px; height: 1px; clip: rect(1px, 1px, 1px, 1px); -webkit-clip-path: inset(50%); clip-path: inset(50%); overflow: hidden; white-space: nowrap; position: absolute; top: 0; >/* * Placeholder contrast * */ ::-webkit-input-placeholder < color: #666; >::-moz-placeholder < color: #666; >:-ms-input-placeholder < color: #666; >:-moz-placeholder
Write Me stock publish CSS box-shadow property, Required. The horizontal offset of the shadow. A positive value puts the shadow on the right side of the box, a negative value puts the shadow on the left side of the box. Required. The vertical offset of the shadow. A positive value puts the shadow below the box, a negative value puts the shadow above the box. Optional.
How do I make CSS row boxes?
I’m trying to make a few rows like in a table, but with divs.

Each one has an image on the left, a block of text, and «read more»..
I’ve tried using display:table, but it doesn’t seem to be working.. The text is and images are not aligned properly..
Thanks for the answers everyone, I see what I did wrong and have fixed it now 🙂
With these changes, it looks more like your image.
Here is the solution you want:

Lorem ipsum dolor sit amet, consectetur adipiscing elit. Curabitur scelerisque arcu at accumsan feugiat. Fusce at interdum sapien. Phasellus nec odio varius ante imperdiet facilisis. Etiam iaculis dui vitae nibh scelerisque fermentum. Nam iaculis quis purus ac congue. Maecenas sed elit tortor. Sed gravida velit nulla, sit amet dapibus elit mollis vitae. In libero libero, mattis et ipsum eu, euismod aliquet diam. Nulla eu neque interdum, suscipit libero nec, facilisis sapien. Donec consequat porttitor interdum. Nullam non blandit massa.
.entry > a < float: left; >.entry img < width: 130px; height: 130px; >.entry .text < float: right; width: 700px; >.entry:after < clear: both; content: ''; display: block; >.entry .title < color: #FF7A00; font-family: arial; font-size: 15px; >.entry .text < margin: 0px 0px 0px 20px; >.entry .text * < margin: 0px; >.entry .read-more
Create A Box Around Text In HTML (The Easy Way)
Welcome to a beginner’s tutorial on how to create a box around the text in HTML. New to HTML and want to quickly create your own notification or information box?
An easy way to create a box around text is to simply add padding and border. For example,
TEXT
That’s it. But rather than leaving you guys clueless as to what just happened, we will walk through more examples in this guide – Read on!
ⓘ I have included a zip file with all the example source code at the start of this tutorial, so you don’t have to copy-paste everything… Or if you just want to dive straight in.
TLDR – QUICK SLIDES

TABLE OF CONTENTS
DOWNLOAD & NOTES
Firstly, here is the download link to the example code as promised.
QUICK NOTES
If you spot a bug, feel free to comment below. I try to answer short questions too, but it is one person versus the entire world… If you need answers urgently, please check out my list of websites to get help with programming.
EXAMPLE CODE DOWNLOAD
Click here to download the source code, I have released it under the MIT license, so feel free to build on top of it or use it in your own project.
CREATING BOXES
All right, let us now get into the details of creating boxes with HTML and CSS.
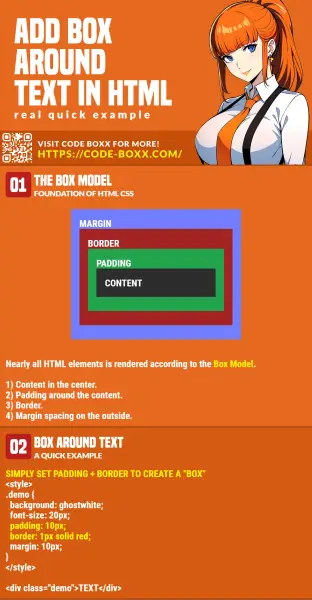
EXAMPLE 1) BOX BASICS – THE BOX MODEL
HMTL & CSS
THE EXPLANATION
Just what are all those background, font-size, padding, border, margin ? Simply put, HTML renders each element based on something called “the box model” – Which is something like layers of an onion.
- At the center of the box, we have the content (text, image, or video).
- The text can be controlled with various properties – font-size, font-weight, font-familiy, text-decoration, color … Which should be pretty self-explanatory.
- We can also set the background color or use a background-image .
- Followed by a layer of padding .
- Next, we can set a border .
- Finally, margin on the outside. This is simply an “empty transparent space” around the box.
Well, the best is to test it hands-on. Go ahead, download the example above, edit each property and see for yourself.
EXAMPLE 2) CSS CLASSES – SOMETHING LIKE TEMPLATES
HMTL & CSS
/* (A) SHARED CLASS */ .box < margin: 10px; padding: 10px; font-size: 18px; >/* (B) BOX VARIATIONS */ /* (B1) INFORMATION BOX */ .info < color: brown; background: cornsilk; border: 1px solid burlywood; >/* (B2) WARNING BOX */ .warn < color: darkmagenta; background: lightpink; border: 1px solid darkred; >/* (B3) SUCCESS */ .ok ⓘ Information box. ⚠ Warning icon. ⓘ Successful! THE EXPLANATION
- First, we create a tag in the section.
- Then define the CSS classes .CLASS-NAME < STYLES-TO-APPLY >in the tag .
- Finally, simply attach the CSS classes to the HTML elements – .
Yep, it’s that simple, and it should save you a lot of time from copy-pasting the same style property all over the place. This will also make it easier for future updates – Just change the class styles in the section once, and all the rest will follow.
EXTRA) ADDING ICONS
HMTL & CSS
 ⓘ Information icon.
⚠ Warning icon.
❤ Heart icon.
💡 Bulb icon.
THE EXPLANATION
Just what are those &#ABCD ? Those are called “HTML symbols”, and they are native to HTML. We don’t need to download any images nor use any extra third-party libraries to spice up the boxes. HTML actually has a ton of symbols, and I will leave a link in the extras section below for the complete list of symbols.
EXTRA) ROUNDED CORNERS
HMTL & CSS
THE EXPLANATION
Yep, just add border-radius to round the corners. If we define border-radius: 50% , which will literally turn the box into a circle or oval.
EXTRA BITS & LINKS
That’s all for this tutorial, and here is a small section on some extras and links that may be useful to you.
LINKS & REFERENCES
INFOGRAPHIC CHEAT SHEET
THE END
Thank you for reading, and we have come to the end of this guide. I hope that it has helped you with your project, and if you want to share anything with this guide, please feel free to comment below. Good luck and happy coding!