- How to configure Nginx
- BitLaunch
- BitLaunch
- Nginx basics: config location and terminology
- Nginx.conf directives
- Nginx server blocks
- Location blocks
- Server name and virtual hosting
- How to Install LEMP Stack on Ubuntu 20.04
- A Beginners Guide to systemctl
- How do I serve index.html with Nginx
- How to install Nginx in CentOS
- How to enable Nginx in CentOS
- How to set firewall rules for Nginx in CentOS
- How to serve index.html file with Nginx
- Conclusion
- About the author
- Sharqa Hameed
How to configure Nginx
Nginx is a popular open-source software that server admins can use for a variety of tasks, from the setup of a reverse proxy server to media streaming, load balancing, and web serving.
BitLaunch
BitLaunch
Sign up for BitLaunch and learn how to configure Nginx today.
Nginx is a popular open-source software that server admins can use for a variety of tasks, from the setup of a reverse proxy server to media streaming, load balancing, and web serving. We’ve already covered how to quickly install Nginx on Ubuntu 20.04, but the bulk of the work comes in its full configuration.
The idea of this tutorial isn’t to show you how to configure Nginx for your specific situation, but to give a better understanding of basic parameters and conventions so you have the flexibility to utilize it for various use cases in the future. Either way, you’ll want to be aware of a few pre-requisites if you want to explore the Nginx config files for yourself while we explain them:

- A Linux install, preferably on a VPS (we’ll be using Ubuntu 20.04)
- Your VPS credentials, found in your hosts’ control panel
- A pre-existing Nginx install on your VPS or local machine
- An SSH tool like PuTTy, to connect to your VPS
- A secured VPS server to avoid breaches
Nginx basics: config location and terminology
The Nginx config location, as you may expect, is in /etc/nginx . You can type cd nginx followed by ls to view them all, but know that the main file you’ll be working with is nginx.conf.
Before we dive into things, it’s worth pinning down some terminology. Nginx configuration options are known as Nginx directives, with themselves are organized into groups, called Nginx contexts or Nginx blocks. There’s no real difference between blocks and contexts, and the two can be used interchangeably.
A # , also known as a comment, usually precedes text and forces Nginx to ignore that line. This is typically used to explain options, but it can also be utilized to temporarily remove a troublesome value from the document for troubleshooting purposes. Commenting a line is different from removing the semi-colon from the end of it – Nginx will still try to run lines without a semi-colon and will report an error.
Nginx.conf directives
Open your Nginx configuration file with with sudo nano /etc/nginx/nginx.conf . You’ll see similar output to our Nginx test config below:
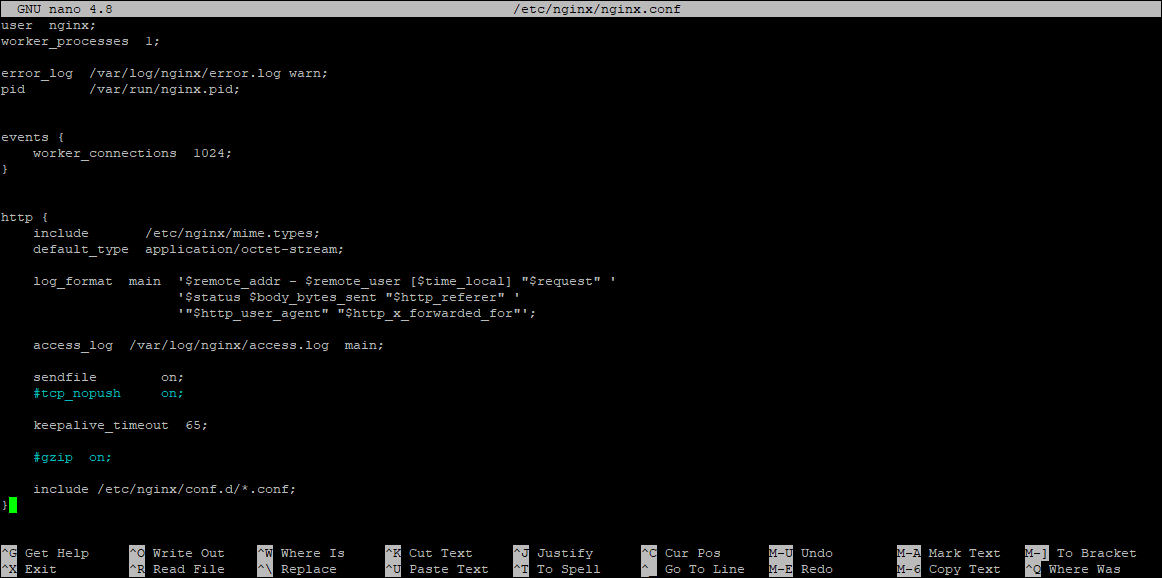
In this case, we have four directives that sit on their own: user nginx , worker_processes , error_log , and pid . Directives that aren’t within a block/context are referred to as being in the main block. You’ll notice that events and http are also in the main block, but they have room for additional directives inside their brackets. We can, therefore, refer to them as the http block and the events block.
The http block helps to define how Ngnix handles web traffic. The directives in this block are inherited by all the website configs Nginx servers, making them universal. You can see, for example, that our config has a line, #tcp_nopush on; , which is commented out. Removing the hash would enable the use of the TCP_cork option on Linux for all sites under Nginx. You can read a full list of http directives in the official Nginx documentation.
Nginx server blocks
You may have noticed that the include directive at the bottom of the http block links to further .conf files. This is the location of your website Ngnix files, and their location will vary depending on which option you used to install Nginx in our previous tutorial.
If you installed Nginx via apt-get , the line will point to /etc/nginx/sites-enabled* . Insides the sites-enabled directory will be symlinks to Nginx config files in /etc/nginx/sites-available . You can therefore remove sites from sites-available by removing the symlink. You can view symlinks in a folder with ls -l , then remove them with rm symlink_name .
Those who installed Nginx via the official repository will instead see include etc/nginx/conf.d/*.conf; . Exploring the folder, you’ll notice that each site hosted with Nginx will have its own .conf file here with its url at as the name.
You’ll find an Nginx config example to give you an idea of what Nginx server blocks look like at etc/nginx/sites-enabled/default or /etc/nginx/conf.d/default.conf .
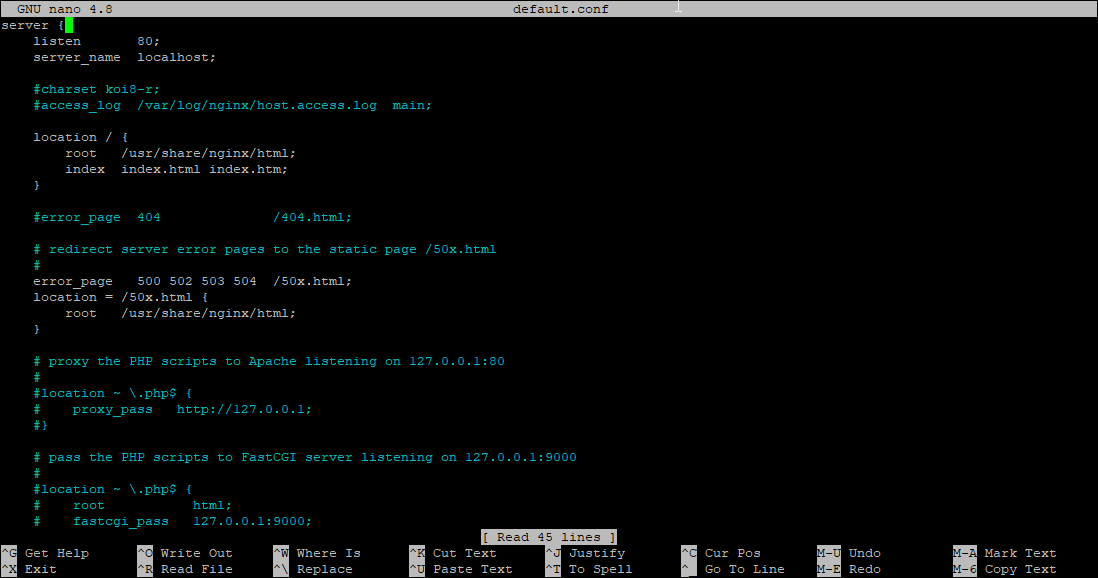
Ours looks like the above, but a real site may have some additional Nginx directives and will point to the server URL, rather than localhost. You’ll also note the listen directive, which is 80 by default, and defines the port at which Nginx should listen for HTTP connections. You’ll likely have two of these, one of IPv4 and one for IPv6, and they may or may not contain the argument default_server .
“The default_server parameter, if present, will cause the server to become the default server for the specified address:port pair,” explains Nginx. “If none of the directives have the default_server parameter then the first server with the address:port pair will be the default server for this pair.”
Location blocks
In your server directive, you’ll also notice the location block, which lets the admin define how Ngnix will process resource requests. As a result, you’ll see several directories and files here, such as
location /about/ < >location /about/education < >location /education/ < >location /education/about
Nginx will always return the location with the longest matching prefix string when someone sends a HTTP request. It looks for strings first, then regular expressions, which are created when a location is followed by the tidle ‘~’ symbol. Here’s one from our example config:

Regular expression matches are always case sensitive, so \.PhP$ wouldn’t match. A case insensitive regular expression can be created by adding a * after the tilde (location ~* \.PhP$`). You can also add a caret ‘^’ before your tilde to tell Nginx to stop searching for more specific matches once it matches a particular string. The equals = sign, meanwhile, forced an exact match and stop searching for more specific matches after that point.
Exact strings are processed first, followed by literal strings, then regular expressions, and finally, the most specific literal string if there are no matching regular expressions.
You may have also noticed a location setting like this in your config:
The location directive can have its own blocks. These determine how it will respond to a request once a match is found. Index determines what Nginx will serve to the user if nothing is specified. Therefore, if somebody tries to visit http://yourwebiste.com, they’ll be served index.html, or index.htm if the html file doesn’t exist in that directory. If there’s no match, they’ll be hit with a 404 error.
Server name and virtual hosting
The server_name field in your server block may point to an IP address or the name-based version of the site (www.bitlaunch.io). It can be used to serve more than one domain from a single IP, for example, if you want it to process requests for bitlaunch.com and www.bitlaunch.io, for example, which would read:
It’s best to create one Nginx config file for each site you want to host on your server, rather than defining server_name for bitlaunch.io and example.com in the same .conf.
To save time, you can use wildcards to indicate that Nginx should process requests for all subdomains, or even for request from all domain names beginning with a certain string:
- For subdomains:
- server_name *.yourwebsite.com;
- For all domains beginning with yourwebsite.:
- server_name yourwebsite.*;
If your server is over LAN, server_name also lets you define server names that don’t exist. One instance of this is in our example default.conf file, where you’ll notice server_name localhost .

How to Install LEMP Stack on Ubuntu 20.04
LEMP is a stack of software that includes Linux, Nginx, MySQL and PHP, and is used for the deployment and management of web applications such as WordPress.
A Beginners Guide to systemctl
Today, we’re going to be showing you how to perform all of the above, while explaining some core concepts surrounding the tools so you can gain a better understanding.
How do I serve index.html with Nginx
![]()
Nginx was first released in October 2004. Nginx is a freely available open-source web server that can be utilized for reverse proxy, caching, video streaming, email proxy, and load balancing. The developers aimed to design a web server that provides maximum performance and stability. It was originally envisioned as software to solve the C10k problem.
For the busiest websites on the internet, Nginx optimizes content and application delivery, increases security, and facilitates availability and scalability. It is also an ideal web server for serving your static website files or files generated by static site generators. In this post, we will set up a server and show you how to serve the index.html file with Nginx. Let’s start!
How to install Nginx in CentOS
If you do not have Nginx, then first install it on your system by following the given procedure:
In the first step, open up your CentOS terminal by pressing “CTRL+ALT+T” and then write out the below-given command:
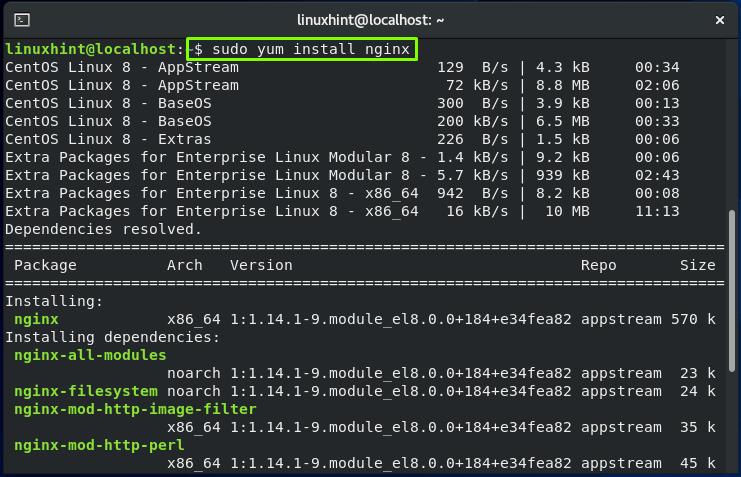
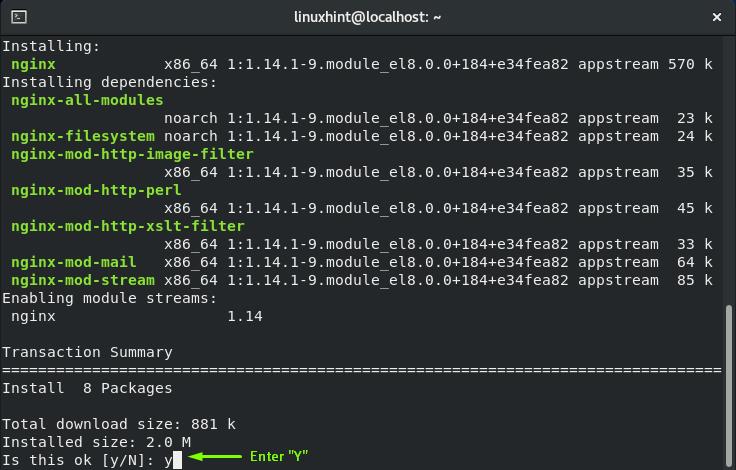
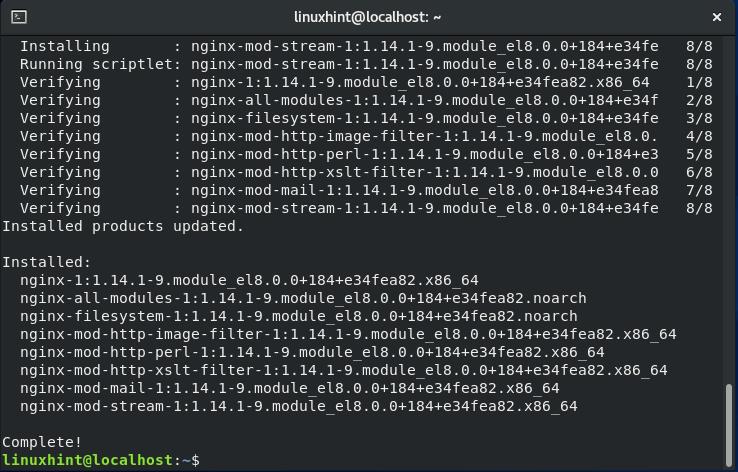
The error-free output declares that Nginx is successfully installed on your system.
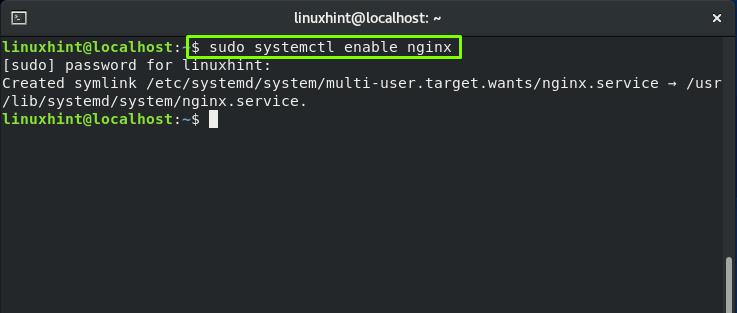
How to enable Nginx in CentOS
Now, utilize the below-given command for enabling Nginx on the CentOS system:
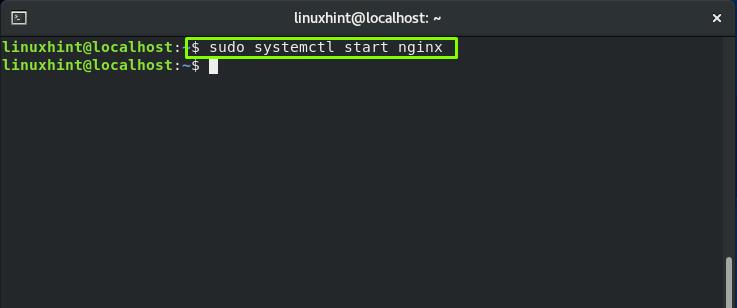
After that, start the Nginx service:
How to set firewall rules for Nginx in CentOS
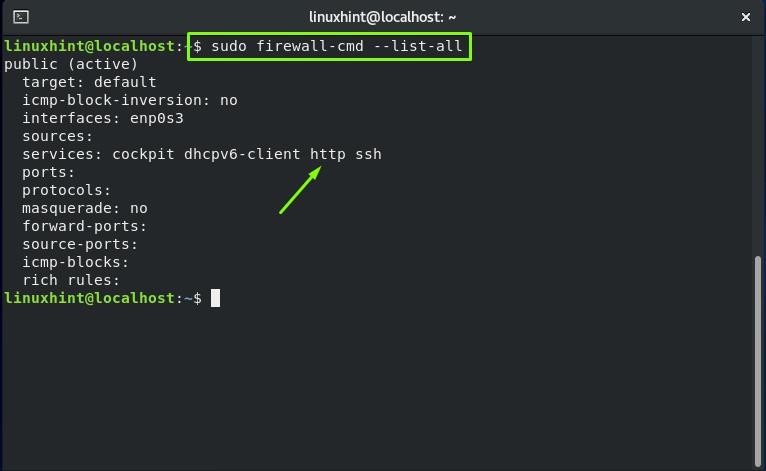
The next thing we are going to do is set the firewall settings to permit the external connections for the Nginx, running on port 80 by default. The firewall-cmd is the command that is utilized for managing permanent and runtime firewalld configuration.
For permanently enabling the HTTP connections on port 80, write out the below-given command in your CentOS terminal:

To verify if the HTTP firewall service was correctly added to the system, execute this command:
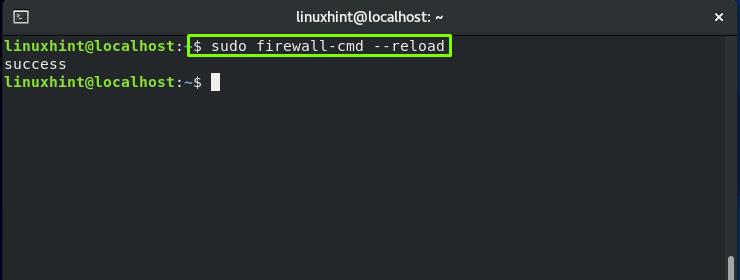
Now, reload the firewall service:
How to serve index.html file with Nginx
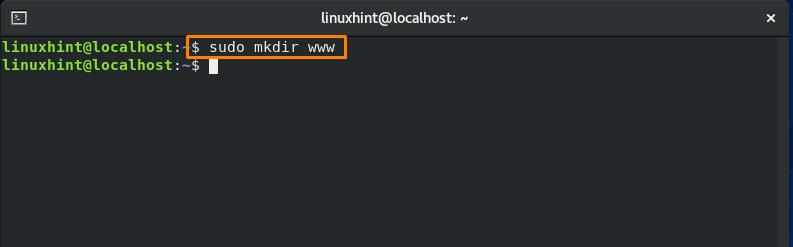
To follow the procedure of serving HTML files, we will create a “www” directory using the “mkdir” command. The “mkdir” command is utilized in Linux-based systems such as CentOS for creating one or more directories.
Execute the below-given command in your terminal for creating a “www” in the current working directory:
Next, we create a sample “index.html” file within our “www” directory:
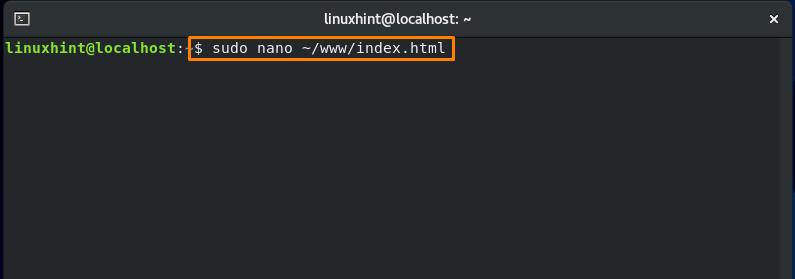
Add anything in the “index.html,” according to your requirement. However, we will add the following test content in our “index.html” file:
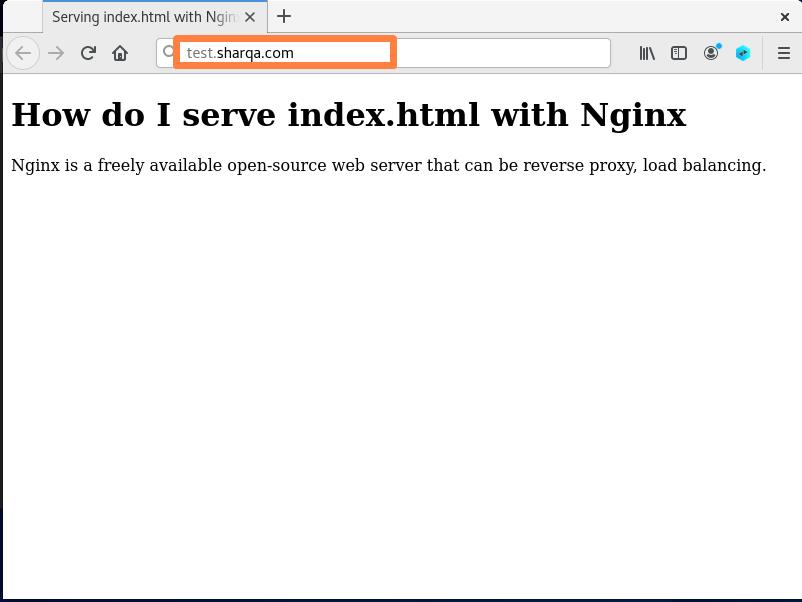
Serving index.html with Nginx < / title >
How do I serve index.html with Nginx < / h1 >
Nginx is a freely available open-source web server that can be reverse proxy, load balancing. < / p >
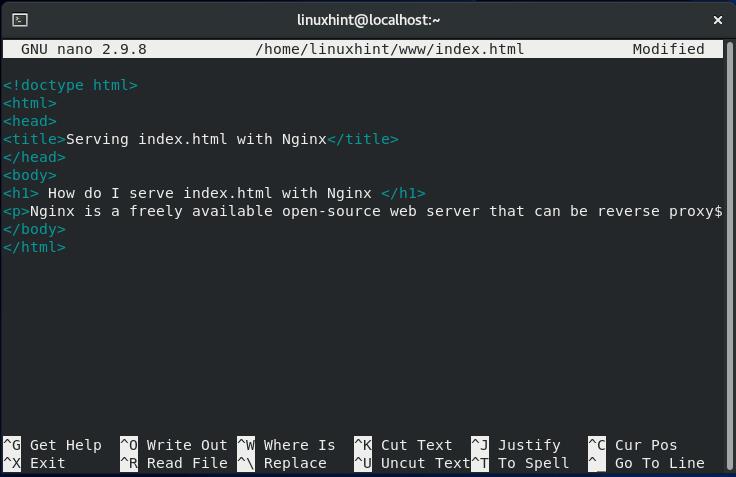
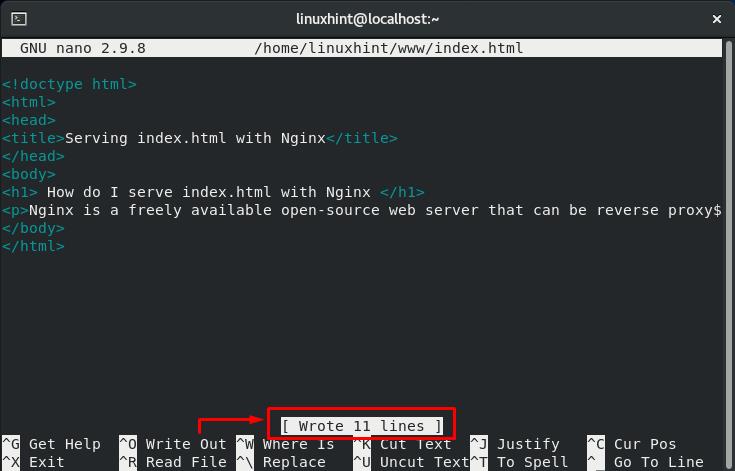
Now, press “CTRL+O” to save the content we have added in the “index.html” file present in the “www” directory:
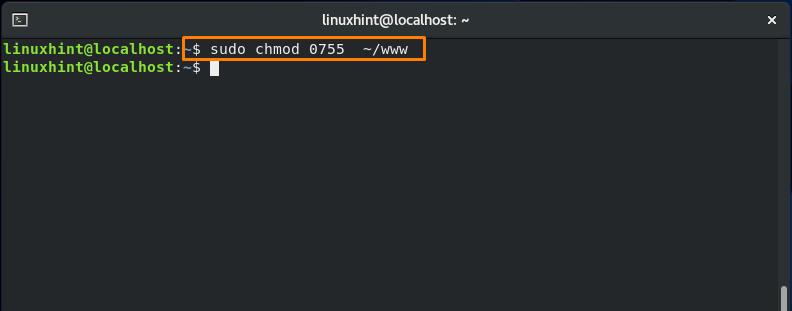
After that, we will change the permissions of the “www” directory using the “chmod” command. The “chmod” which stands for “change mode“, is a command that Linux users utilize for changing the file permissions.
Here in the below-given command, we will attempt to assign, read, write, and execute permissions to everyone who is going to use the “www” directory:
Now, open up the Nginx configuration file “/etc/nginx/nginx.conf” in the nano editor:
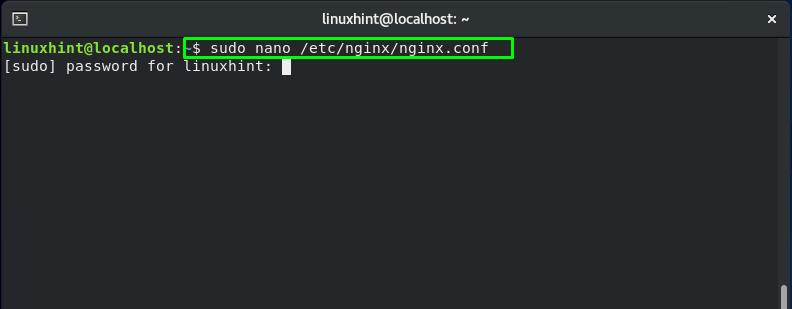
The “/etc/nginx/nginx.conf” file has different blocks such as http, server, and location for the Nginx configuration. Look for the following line in the file:
The above line declares that the configuration file present in the “site-available” is considered as a part of Nginx configuration:
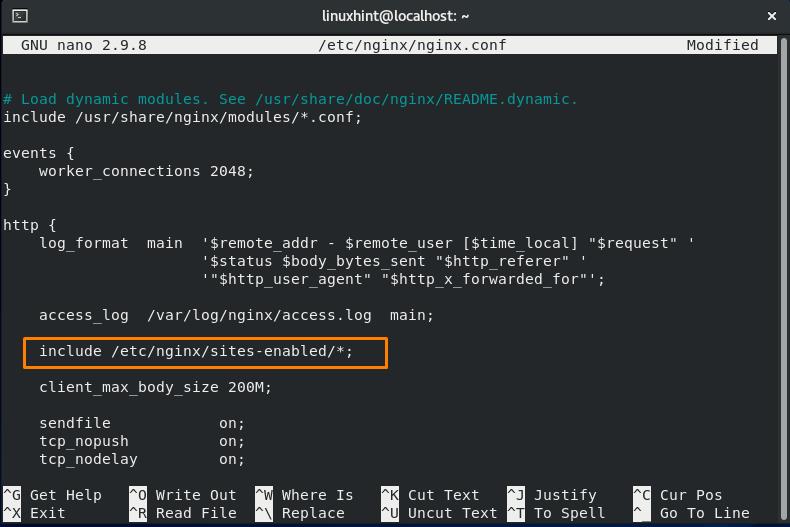
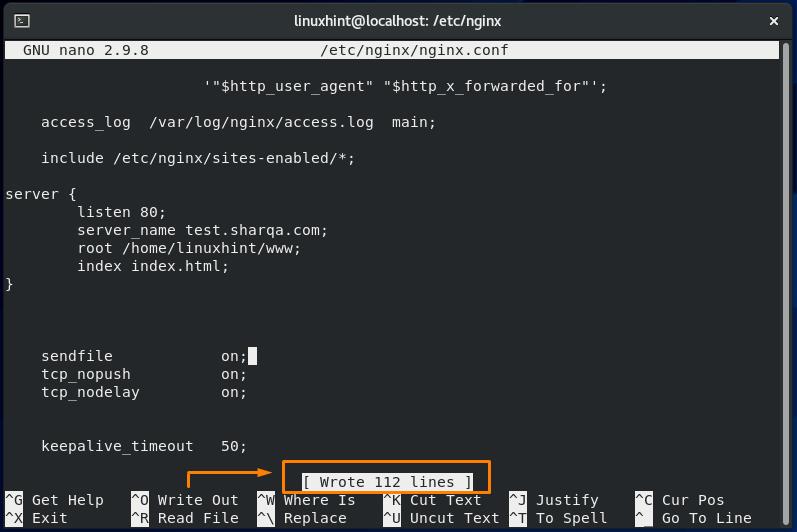
Now, add the following server block in the Nginx configuration file:
root / home / linuxhint / www;
This server block specifies that for all connections, Nginx will listen at port “80”, our server name is “test.sharqa.com”, index file to serve with Nginx is “index.html” file, and all files related to the server are present in the “/home/linuxhint/www” directory:

Press “CTRL+O” to save the changes we have made into the opened file:
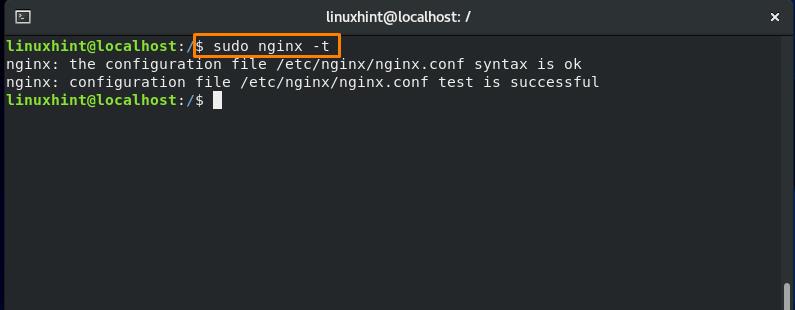
Execute the “nginx” command with the “-t” option to test the configuration file and its syntax:
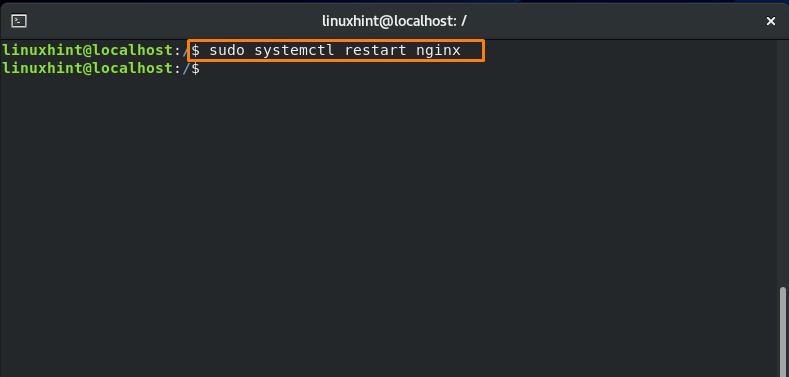
Now, restart the Nginx service on your system:
After restarting the Nginx service, visit your domain which you have added in the ”server_name”. As a result of this, your index.html web page will be served:
Conclusion
Nginx was designed to provide excellent performance as a web server, especially when there are many simultaneous connections or static content to handle. That’s why it is highly optimized for serving static files. You have seen the Nginx installation method and how I serve the index.html with Nginx on my system in this post.
About the author
Sharqa Hameed
I am a Linux enthusiast, I love to read Every Linux blog on the internet. I hold masters degree in computer science and am passionate about learning and teaching.