Commenting System with PHP, MySQL, and AJAX
In this tutorial, we’ll be creating a commenting system with PHP, MySQL, and AJAX (JavaScript). The commenting system will add functionally to your website (blog, news website, etc.) that your guests can use to submit content and share opinions.
The commenting system we’ll be developing today will be minimal, clean, and fast! And with the use of AJAX, you can seamlessly implement the system on any webpage.
Submitted comments will be stored and retrieved in and from a MySQL database and subsequently populated with PHP and HTML.
The Advanced package includes additional features and a download link to the source code.
Contents
1. Getting Started
You will need to install a web server environment if you’re going to test the commenting system on your own computer system. Follow the below instructions.
- Install a web server environment solution package — I recommend you install XAMPP.
- If you have your own production server (VPS, Dedicated, etc) you’ll need to install PHP, Apache, MySQL, and phpMyAdmin (Note: these are already included with XAMPP).
- Install a code editor. You can use Notepad but I don’t recommend it, use one of the following instead: Notepad++, Visual Studio Code, or Atom.
2. Creating the Database and setting-up Tables
We need to create the MySQL database and create the comments table as that is what we’ll use to store and retrieve all our comments. We can do that with phpMyAdmin.
Navigate to phpMyAdmin (e.g. http://localhost/phpmyadmin/) in your browser and follow the below instructions:
- Click the Databases tab at the top
- Under Create database, type in phpcomments in the text box
- Select utf8_general_ci as the collation (UTF-8 is the default encoding in HTML5)
- Click Create
While the database is selected, click the SQL tab and execute the following statement code:
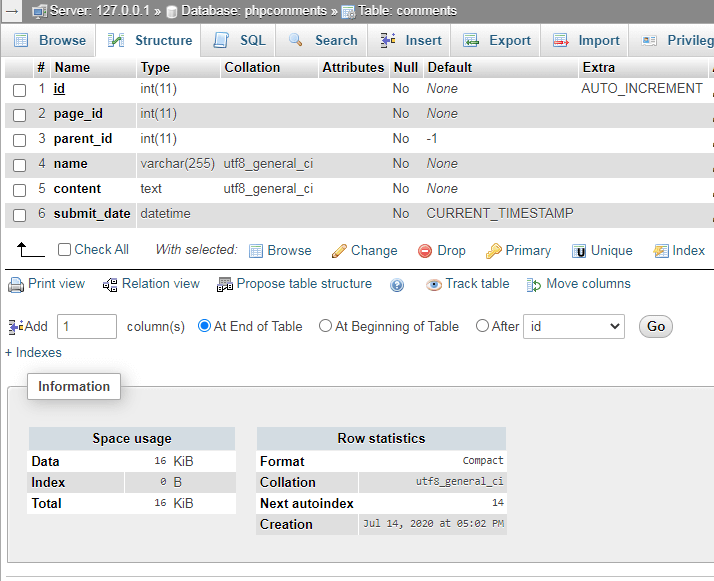
CREATE TABLE IF NOT EXISTS `comments` ( `id` int(11) NOT NULL AUTO_INCREMENT, `page_id` int(11) NOT NULL, `parent_id` int(11) NOT NULL DEFAULT '-1', `name` varchar(255) NOT NULL, `content` text NOT NULL, `submit_date` datetime NOT NULL DEFAULT CURRENT_TIMESTAMP, PRIMARY KEY (`id`) ) ENGINE=InnoDB AUTO_INCREMENT=4 DEFAULT CHARSET=utf8; INSERT INTO `comments` (`id`, `page_id`, `parent_id`, `name`, `content`, `submit_date`) VALUES (1, 1, -1, 'John Doe', 'Thank you for taking the time to write this article, I really enjoyed reading it!\r\n\r\nThank you, David!', '2020-07-22 14:35:15'), (2, 1, 11, 'David Adams', 'It''s good to hear that you enjoyed this article.', '2020-07-22 14:36:19'), (3, 1, -1, 'Michael', 'I appreciate the time and effort you spent writing this article, good job!', '2020-07-22 14:37:43'); The above SQL statement will create the comments table with the following columns:
- id — The unique comment ID.
- page_id — This will determine which comment is for which page, it will be the page ID that you can specify on any webpage.
- parent_id — The parent comment ID that we’ll use for comment replies.
- name — The name of the user (e.g. Joe Bloggs).
- content — The comment content will be what the user inputs via the form.
- submit_date — The date the comment was posted.
The data that we insert into the comments table will be for testing purposes.
In phpMyAdmin the table structure should look like the following:
3. Creating the Stylesheets (CSS3)
We’ll be creating two stylesheets for our commenting system — one will be for our home page as this page will be used as an example of how we’ll implement the commenting system. The other stylesheet will be used for the commenting system itself.
Stylesheets are used to format the layout of our commenting system.
Create the style.css file and add:
* < box-sizing: border-box; font-family: -apple-system, BlinkMacSystemFont, "segoe ui", roboto, oxygen, ubuntu, cantarell, "fira sans", "droid sans", "helvetica neue", Arial, sans-serif; font-size: 16px; -webkit-font-smoothing: antialiased; -moz-osx-font-smoothing: grayscale; >body < background-color: #FFFFFF; margin: 0; >.navtop < background-color: #3f69a8; height: 60px; width: 100%; border: 0; >.navtop div < display: flex; margin: 0 auto; width: 1000px; height: 100%; >.navtop div h1, .navtop div a < display: inline-flex; align-items: center; >.navtop div h1 < flex: 1; font-size: 24px; padding: 0; margin: 0; color: #ecf0f6; font-weight: normal; >.navtop div a < padding: 0 20px; text-decoration: none; color: #c5d2e5; font-weight: bold; >.navtop div a i < padding: 2px 8px 0 0; >.navtop div a:hover < color: #ecf0f6; >.content < width: 1000px; margin: 0 auto; >.content h2
Create the comments.css file and add:
.comments .comment_header < display: flex; justify-content: space-between; border-bottom: 1px solid #eee; padding: 15px 0; margin-bottom: 10px; align-items: center; >.comments .comment_header .total < color: #777777; font-size: 14px; >.comments .comment_header .write_comment_btn < margin: 0; >.comments .write_comment_btn, .comments .write_comment button < display: inline-block; background-color: #565656; color: #fff; text-decoration: none; margin: 10px 0 0 0; padding: 5px 10px; border-radius: 5px; font-size: 14px; font-weight: 600; border: 0; >.comments .write_comment_btn:hover, .comments .write_comment button:hover < background-color: #636363; >.comments .write_comment < display: none; padding: 20px 0 10px 0; >.comments .write_comment textarea < width: 100%; padding: 10px; border: 1px solid #ddd; border-radius: 5px; height: 150px; margin-top: 10px; >.comments .write_comment input < display: block; width: 250px; padding: 10px; border: 1px solid #ddd; border-radius: 5px; margin-top: 10px; >.comments .write_comment button < cursor: pointer; >.comments .comment < padding-top: 10px; >.comments .comment .name < display: inline; padding: 0 5px 3px 0; margin: 0; font-size: 16px; color: #555555; >.comments .comment .date < color: #888888; font-size: 14px; >.comments .comment .content < padding: 5px 0 5px 0; >.comments .comment .reply_comment_btn < display: inline-block; text-decoration: none; margin-bottom: 10px; font-size: 14px; color: #888888; >.comments .comment .replies
Feel free to customize the stylesheets above and add your own CSS rules.
4. Creating the Commenting System with PHP
We are now going to start coding our commenting system with PHP. In this section, we’re going to connect to the database using PDO, create the template functions, and execute queries using prepared statements (prevents SQL injection).
Create the comments.php file and add:
catch (PDOException $exception) < // If there is an error with the connection, stop the script and display the error exit('Failed to connect to database!'); >The code above will connect to our MySQL database using the PDO interface. Remember to update the connection variables if yours are different.
// Below function will convert datetime to time elapsed string function time_elapsed_string($datetime, $full = false) < $now = new DateTime; $ago = new DateTime($datetime); $diff = $now->diff($ago); $diff->w = floor($diff->d / 7); $diff->d -= $diff->w * 7; $string = array('y' => 'year', 'm' => 'month', 'w' => 'week', 'd' => 'day', 'h' => 'hour', 'i' => 'minute', 's' => 'second'); foreach ($string as $k => &$v) < if ($diff->$k) < $v = $diff->$k . ' ' . $v . ($diff->$k > 1 ? 's' : ''); > else < unset($string[$k]); >> if (!$full) $string = array_slice($string, 0, 1); return $string ? implode(', ', $string) . ' ago' : 'just now'; >The above function will convert our date and time to an elapsed string, which will appear as «1 day ago» etc in the commenting section.
// This function will populate the comments and comments replies using a loop function show_comments($comments, $parent_id = -1) < $html = ''; if ($parent_id != -1) < // If the comments are replies sort them by the "submit_date" column array_multisort(array_column($comments, 'submit_date'), SORT_ASC, $comments); >// Iterate the comments using the foreach loop foreach ($comments as $comment) < if ($comment['parent_id'] == $parent_id) < // Add the comment to the $html variable $html .= '
Reply ' . show_write_comment_form($comment['id']) . '
'; > > return $html; >This function will populate the array of comments and return the value in HTML format. The replies are populated by executing the same function along with the parent comment ID.
The htmlspecialchars function will convert special characters to HTML entities, which will prevent XSS attacks.
// This function is the template for the write comment form function show_write_comment_form($parent_id = -1) < $html = ' '; return $html; >This function contains the template for our «write comment» form, which will be used by visitors to write comments and submit them.
// Page ID needs to exist, this is used to determine which comments are for which page if (isset($_GET['page_id'])) < // Check if the submitted form variables exist if (isset($_POST['name'], $_POST['content'])) < // POST variables exist, insert a new comment into the MySQL comments table (user submitted form) $stmt = $pdo->prepare('INSERT INTO comments (page_id, parent_id, name, content, submit_date) VALUES (. NOW())'); $stmt->execute([ $_GET['page_id'], $_POST['parent_id'], $_POST['name'], $_POST['content'] ]); exit('Your comment has been submitted!'); > // Get all comments by the Page ID ordered by the submit date $stmt = $pdo->prepare('SELECT * FROM comments WHERE page_id = ? ORDER BY submit_date DESC'); $stmt->execute([ $_GET['page_id'] ]); $comments = $stmt->fetchAll(PDO::FETCH_ASSOC); // Get the total number of comments $stmt = $pdo->prepare('SELECT COUNT(*) AS total_comments FROM comments WHERE page_id = ?'); $stmt->execute([ $_GET['page_id'] ]); $comments_info = $stmt->fetch(PDO::FETCH_ASSOC); > else < exit('No page ID specified!'); >?>The code above will check if the page ID variable is specified as this is used to determine which comments to show on which page. If the page ID is not specified, stop the script and output the error.
Comments are then retrieved from the database (ordered by the submit date in descending order) and are stored in an associative array. The total number of comments is calculated using the MySQL COUNT(*) function.
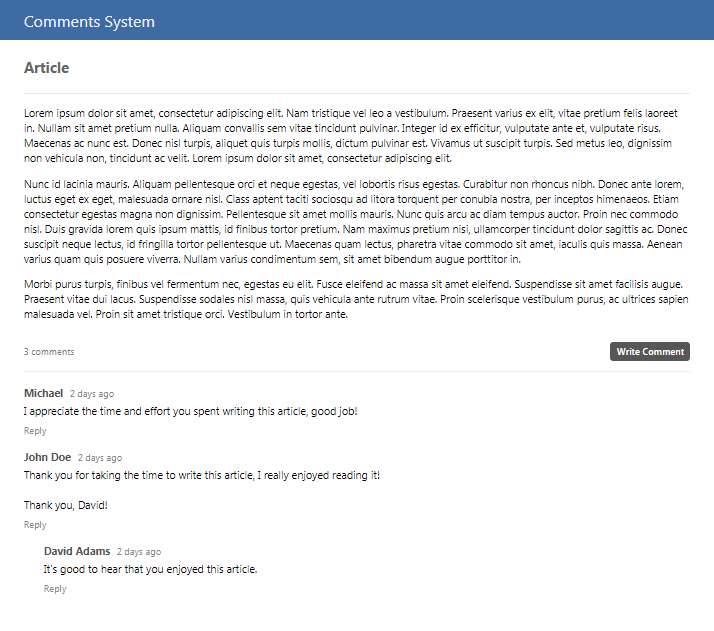
This is the template for our commenting system, the comments are populated by executing the show_comments() function along with the comments associative array variable that we previously defined.
The show_write_comment_form() function will show the form that visitors can use to write and submit comments.
That’s everything we need to code in this file. The next step is to implement the commenting system on a webpage using AJAX.
5. Implementing the Commenting System into our Webpage with AJAX
Now that we have our server-side PHP file created, we can implement the comment system on our webpage.
Create the index.html file and add: