- How to create, build and run a Java Hello World program with Eclipse
- 1. Download and Install Eclipse IDE
- 2. Choose a Workspace Directory
- 3. Change Perspective
- 4. Create a Java Project
- 5. Write Your First Java Program
- 6. Compile, Build and Run Your First Java Program
- Related Java Hello World Tutorials:
- Other Eclipse Tutorials:
- About the Author:
- How to Start and Compile a Short Java Program in Eclipse
How to create, build and run a Java Hello World program with Eclipse
If you are new to Java programming and Eclipse IDE, this step-by-step tutorial helps you get started to be familiar with the most Java IDE by writing your first Java program using Eclipse. And you will be able to build and run your program inside Eclipse.
1. Download and Install Eclipse IDE
Eclipse is the most popular Integrated Development Environment (IDE) for developing Java applications. It is robust, feature-rich, easy-to-use and powerful IDE which is the #1 choice of almost Java programmers in the world. And it is totally FREE.
As of now (fall 2016), the latest release of Eclipse is Neon (version 4.6). Click the following link to download Eclipse:
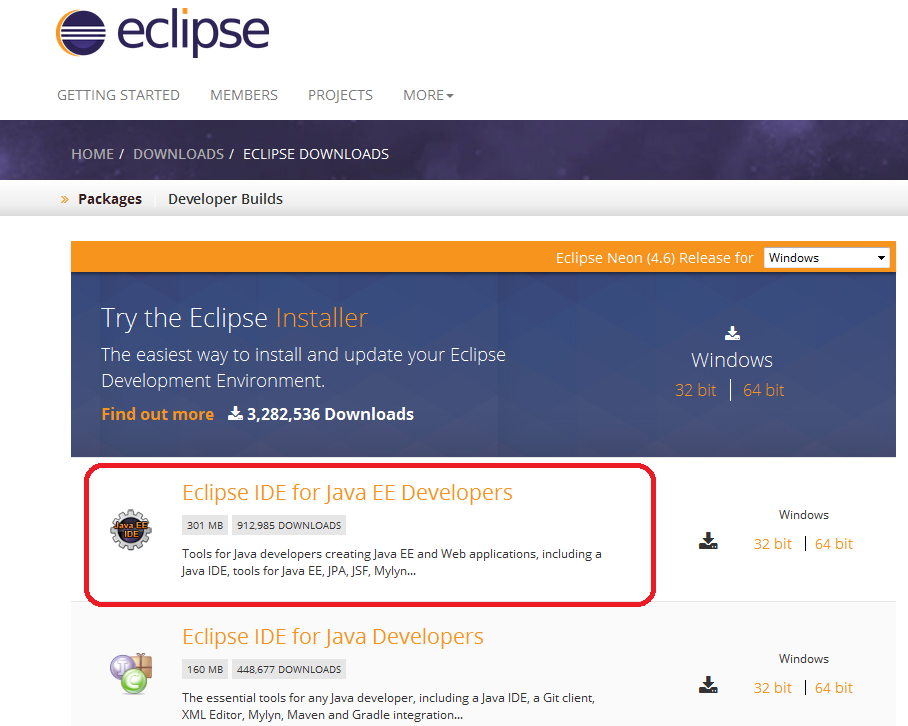
You will see the download page like this:
You can install Eclipse either by downloading the Eclipse Installer or package (zip file). I’d recommend you to download by package. Eclipse comes with various packages for different development purposes. For Java, there are two main packages listed as you see above:
- Eclipse IDE for Java EE Developers: This is for developing Java EE applications (web applications using Servlets & JSP).
- Eclipse IDE for Java Developers: This is for developing Java SE applications, a subset of the Java EE Developer package.
Click on the link 32-bit or 64-bit (depending on the bit version of your operating system) to start download the package.
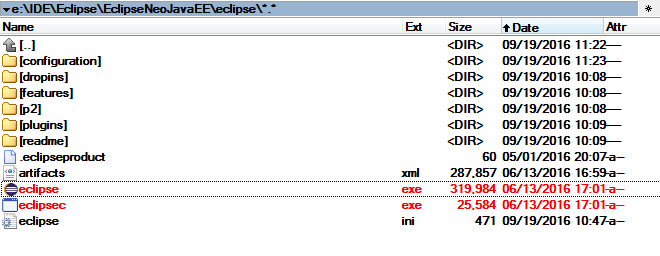
Extract this ZIP file into a directory on your computer. You will see a directory called eclipse containing Eclipse’s installed files:
Eclipse Neon requires Java 8 or newer so make sure you have JDK 8 already installed on your computer. If not, follow this tutorial to install JDK.
Click eclipse.exe file (Windows) to start the IDE. You will see the splash screen of Eclipse Neo:
That’s it! You have successfully installed Eclipse IDE. Next, let’s see how to create a workspace.
2. Choose a Workspace Directory
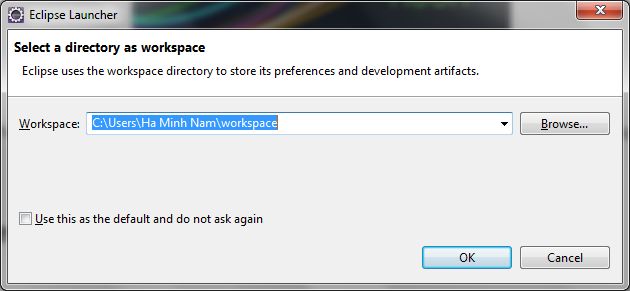
Eclipse organizes projects by workspaces. A workspace is a group of related projects and it is actually a directory on your computer. That’s why when you start Eclipse, it asks to choose a workspace location like this:
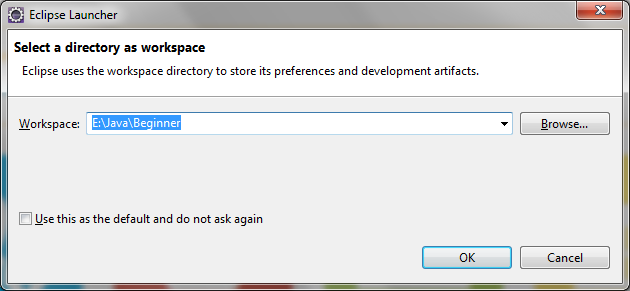
By default, Eclipse created a workspace directory at your USER_HOME\workspace. If you want to choose another directory, click Browse. Here I chose a different workspace:
Check Use this as the default and do not ask again if you don’t want to be asked whenever you start Eclipse. You can always change workspace when Eclipse is running.
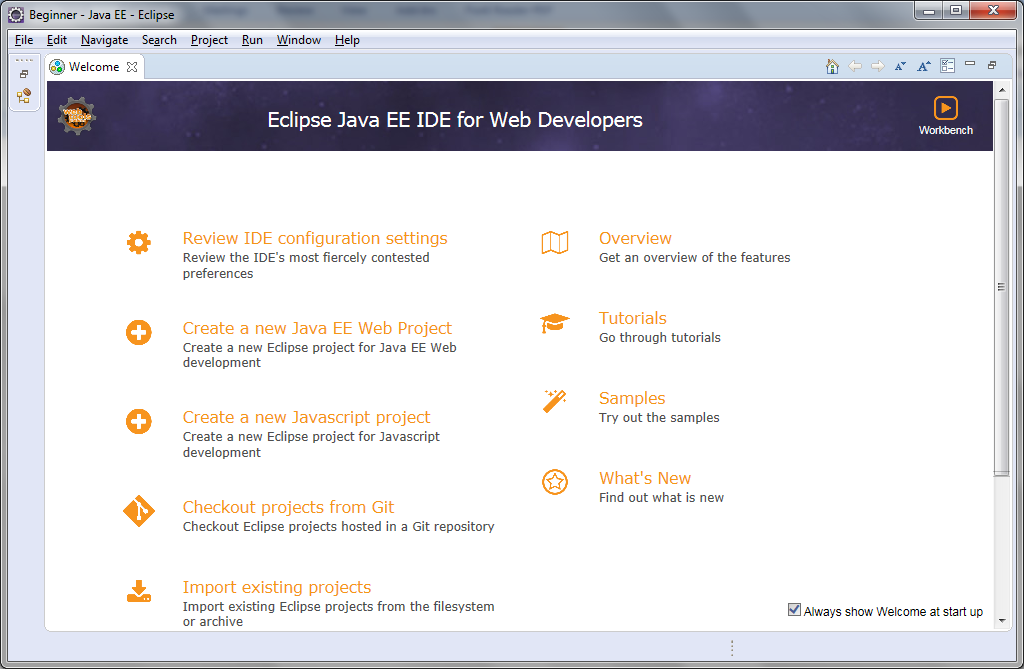
Click OK. You should see the welcome screen:
Now, we are ready to create a Java project.
3. Change Perspective
Before creating a new Java project, let familiarize yourself with Perspective. Imagine a perspective is a predefined configuration specialized for a specific aspect of development process such as Java, Java EE, Debug, Database Development, Web, etc. Depending on your need, you can switch back and forth among different perspectives during a development session.
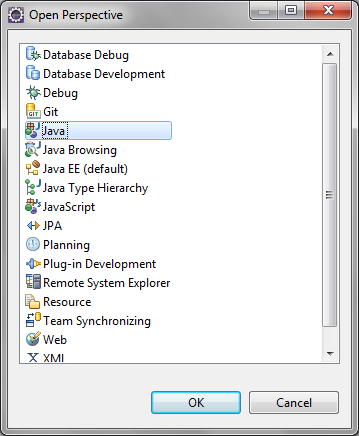
Since we installed Eclipse IDE for Java EE Developers, the default perspective is Java EE. To change perspective, go to Window > Perspective > Open Perspective > Other… You will see a small dialog listing all available perspectives:
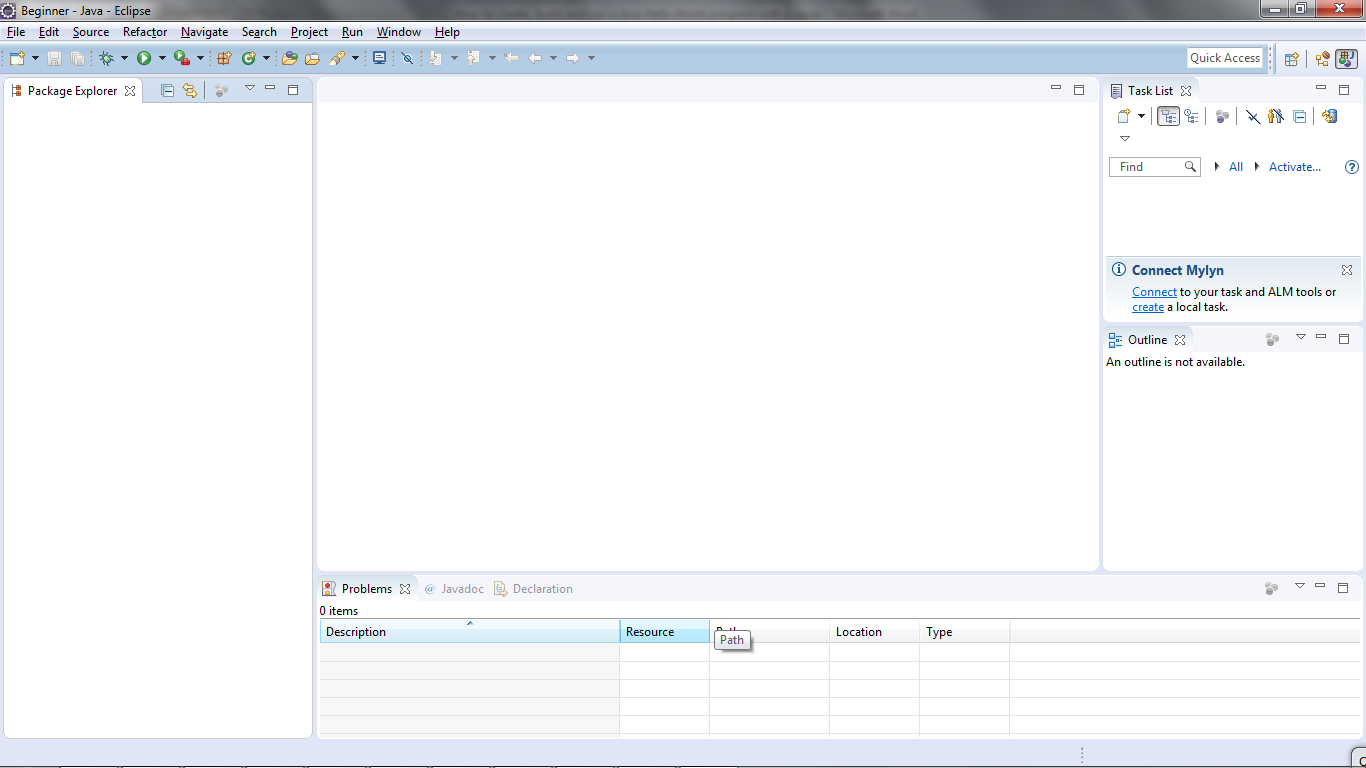
Here we choose Java perspective. Click OK. Here’s how the Java perspective would look like:
4. Create a Java Project
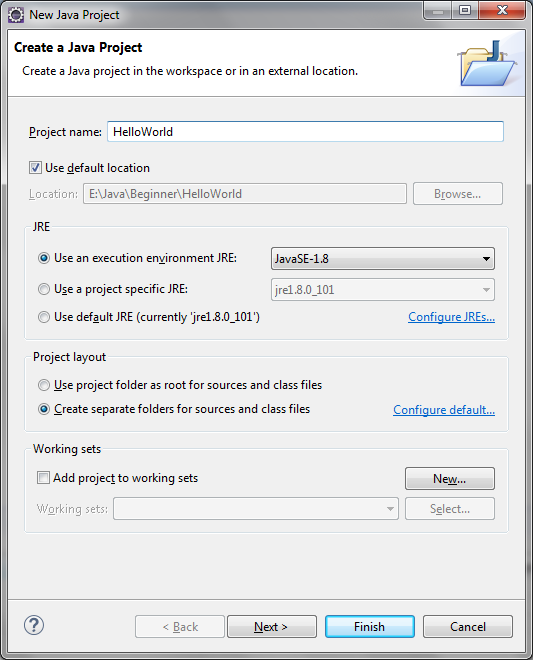
To create a new Java project in Eclipse, go to File > New > Java Project. The New Java Project wizard dialog appears let you specify configurations for the project:
Enter project name: HelloWorld. Leave the rest as it is, and click Finish.
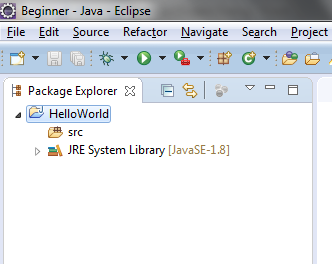
You should see the HelloWorld project is created in the Package Explorer view as following:
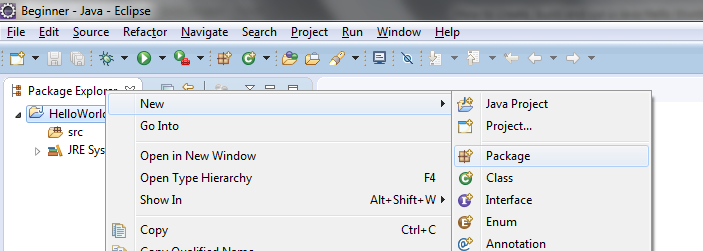
It’s recommended to create a package for your project. Right click on the project, and select New > Package from the context menu:
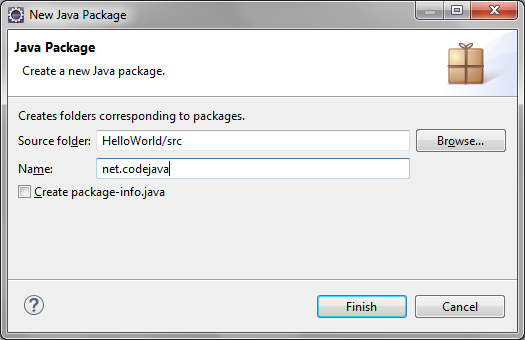
In the New Java Package dialog, enter the name your package. Here I enter net.codejava :
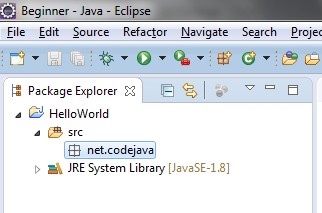
Click Finish. You should see the newly created package appears:
Now, it’s time to create a Java class for your hello world application.
5. Write Your First Java Program
To create a new Java class under a specified package, right click on the package and select New > Class from the context menu:
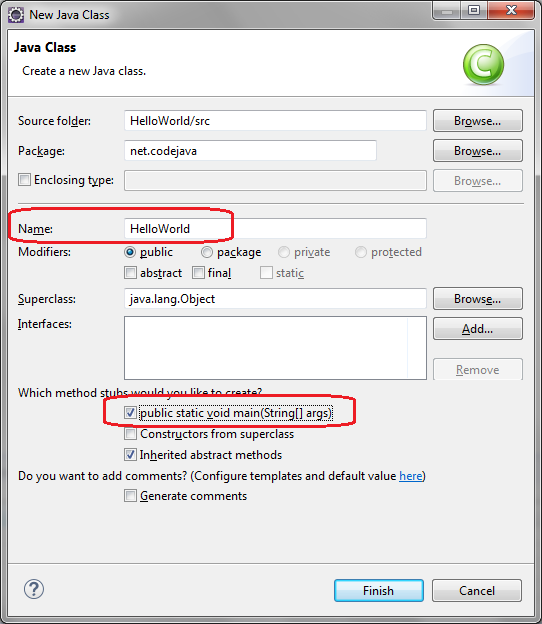
The New Java Class dialog appears, type the name of class as HelloWorld and choose the option to generate the main() method:
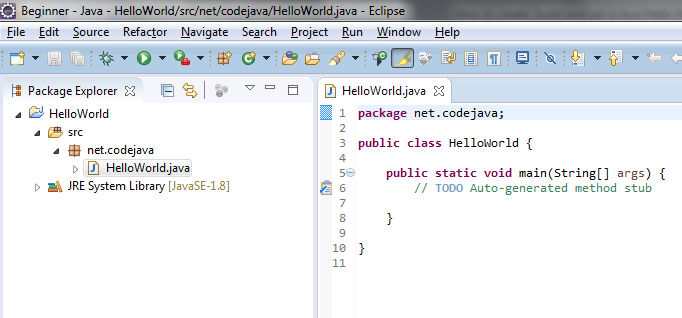
And click Finish. The HelloWorld class is generated like this:
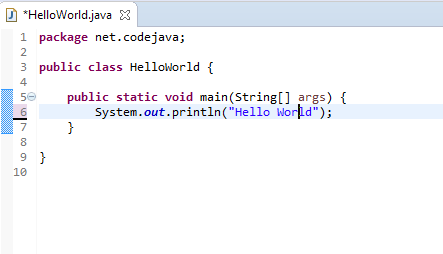
Now, type some code in the main() method to print the message “Hello World” to the console:
That’s it. We have created a Java hello world program using Eclipse IDE.
6. Compile, Build and Run Your First Java Program
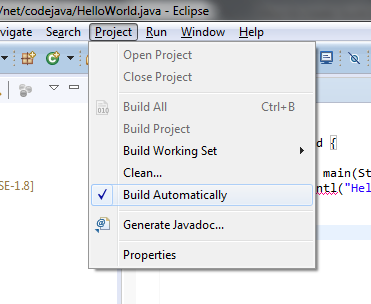
By default, Eclipse compiles the code automatically as you type. And it will report compile errors in the Problems view at the bottom like this:
If you want to disable automatically build feature, click the menu Project and uncheck Build Automatically:
However, it’s strongly recommended to keep the auto build mode for it helps you detect errors instantly.
Now, let’s run the hello world application. Click menu Run > Run (or press Ctrl + F11), Eclipse will execute the application and show the output in the Console view:
That’s it! The HelloWorld program has run and printed the output “Hello World” and terminates.
We hope this tutorial help you get started with Eclipse and Java easily. Thank you for reading.
What’s next? I recommend you to continue with this article: Java OOP: Understand Classes and Objects
Watch this tutorial in video:
Related Java Hello World Tutorials:
Other Eclipse Tutorials:
About the Author:
Nam Ha Minh is certified Java programmer (SCJP and SCWCD). He started programming with Java in the time of Java 1.4 and has been falling in love with Java since then. Make friend with him on Facebook and watch his Java videos you YouTube.
How to Start and Compile a Short Java Program in Eclipse
wikiHow is a “wiki,” similar to Wikipedia, which means that many of our articles are co-written by multiple authors. To create this article, volunteer authors worked to edit and improve it over time.
This article has been viewed 87,265 times.
These instructions will teach you how to start and compile a short Java program using the Indigo release of Eclipse. Eclipse is a free, open-source integrated development environment that you can use to develop Java programs, as well as programs in other languages. This tutorial assumes that you already have Eclipse installed on your computer. The purpose of this tutorial is to help you navigate Eclipse and to show off a few of its many features. Eclipse is easy to learn and will increase your productivity dramatically.
Begin by creating a new Java project. There are a few different ways of accomplishing this. You can click the arrow next to the left-most icon on the toolbar and select «Java Project» from the drop-down menu. Alternately, you can start a new Java project by choosing «File,» then «New,» followed by «Java Project.» You can also use the shortcut Alt+Shift+N.
Enter a project name. You will see a window titled «Create a Java Project.» The buttons «Next» and «Finish» at the bottom of the window will be greyed out until a project name is entered in the first field. To proceed, give your project a name and enter it into this field. For this tutorial, we will use the name «Project1.» Enter the name and then click «Finish.» Your new project will appear on the left-hand side of the screen under «Package Explorer» among existing projects. Projects are listed in alphabetical order.
Start a new Java class. Before you begin writing code, you will need to create a new Java class. A class is a blueprint for an object. It defines the data stored in the object as well as its actions. Create a class by clicking the «New Java Class» icon, which looks like a green circle with the letter «C» in the center of it.
Enter the name of your class. You will see a window titled «Java Class.» To proceed, enter the name of your class into the field «Name.» Since this class will be the main class of the simple project, check the selection box labeled «public static void main(String[] args)» to include the method stub. Afterwards, click «Finish.»
Enter your Java code. Your new class called Class1.java is created. It appears with the method stub «public static void main(String[] args)» along with some automatically generated comments. A method will contain a sequence of instructions to be executed by the program. A comment is a statement that is ignored by the compiler. Comments are used by programmers to document their code. Edit this file and insert the code for your Java program.
Watch out for errors in your code. Any errors will be underlined in red, and an icon with an «X» will show up on the left. Fix your errors. By mousing over an error icon, you can see a suggestion box that lists the ways you can fix the error. In this tutorial, we will double-click «Create local variable answer» so that the variable is declared first before it is used.
Ensure that your entire program is free of errors. There are three types of errors you must beware of: syntax errors, run-time errors, and logic errors. The compiler will alert you of the first of these three, the syntax errors. Examples of syntax errors are misspelled variable names or missing semi-colons. Until you remove all syntax errors from your code, your program will not compile. Unfortunately, the compiler will not catch run-time errors or logic errors. An example of a run-time error is trying to open a file that does not exist. An example of a logic error is opening and using data from the wrong file.
Compile your program. Now that your program is free from errors, click the triangular icon to run your program. Another way to run your program is to select «Run» from the main menu and then select «Run» again from the drop-down menu. The shortcut is Ctrl+F11.
Verify that the output is what you expected. When your program runs, the output, should there be any, will be displayed on console at the bottom of the screen. In this tutorial, our Java program added two integers together. As two plus two equals four, the program is running as intended.
Fix any run-time or logic errors. As stated previously, the compiler will only catch syntax errors. If the output of your program is different from what you’ve expected, then there might have been an error even though the program compiled. For example, if the output was zero instead of four, then there was a mistake in the program’s calculation.
