- Replacing css file on the fly (and apply the new style to the page)
- 11 Answers 11
- Toggle rel=alternate
- Set and toggle disabled
- Toggle media=none
- How to overwrite CSS style?
- What is Overriding mean in CSS?
- The order of priority inline style is as follows:
- Method 1: Overriding CSS style with the ID selector:
- Method 2 Overriding CSS style with the Class selector:
- Method 3: Creating CSS class with different property
- Method 4: Using Inline CSS
- Method 5: Using !important directive
Replacing css file on the fly (and apply the new style to the page)
I have a page which has in the header that loads the CSS named light.css . I also have a file named dark.css . I want a button to swap the style of the page all together (there are 40 selectors used in css file and some do not match in two files). How can I remove reference to light.css with JS and remove all the styles that were applied and then load dark.css and apply all the styles from that? I can’t simply reset all of the elements, since some of the styles are applied through different css files and some are dynamically generated by JS. Is there a simple, yet effective way to do that without reloading the page? Vanilla JS is preferable, however I will use jQuery for later processing anyways, so jQ is also fine.
I chose Mattew’s answer because with that method, I can easily extend the for() loop to handle multiple files and swap light and dark in other scripts/stylesheets.
11 Answers 11
You can include all the stylesheets in the document and then activate/deactivate them as needed.
In my reading of the spec, you should be able to activate an alternate stylesheet by changing its disabled property from true to false, but only Firefox seems to do this correctly.
So I think you have a few options:
Toggle rel=alternate
function enableStylesheet (node) < node.rel = 'stylesheet'; >function disableStylesheet (node) Set and toggle disabled
Toggle media=none
function enableStylesheet (node) < node.media = ''; >function disableStylesheet (node) You can select a stylesheet node with getElementById, querySelector, etc.
(Avoid the nonstandard . Setting HTMLLinkElement#disabled is fine though.)
@sam now I am sorry that I can’t accept an answer on somebody else’s question :). only, is there any impact on page’s performance? Is the disabled link ignored by the browser before that attribute is set to false?
unfortunately setting disabled as an attribute is discuraged: «The use of disabled as an HTML attribute is non-standard and only used by some browsers (W3 #27677). Do not use it.» -> developer.mozilla.org/en-US/docs/Web/HTML/Element/…
@dzenesiz browsers can skip downloading an alternate stylesheet until it’s needed but I don’t know how they actually behave.
Just to clarify what @Daniel said, the HTML attribute is non standard, BUT according to Mozilla, the DOM property IS. So toggling it with javascript in the way described above is, in fact, standard-compliant. Unless I’m missing something this should be the accepted answer.
The CSS Object Model says this about the disabled flag: «Note: Even when unset it does not necessarily mean that the CSS style sheet is actually used for rendering». It’s probably the reason why the answer works on Firefox, but not on Webkit & Blink (Epyphany & Chromium).
You can create a new link, and replace the old one with the new one. If you put it in a function, you can reuse it wherever it’s needed.
function changeCSS(cssFile, cssLinkIndex) < var oldlink = document.getElementsByTagName("link").item(cssLinkIndex); var newlink = document.createElement("link"); newlink.setAttribute("rel", "stylesheet"); newlink.setAttribute("type", "text/css"); newlink.setAttribute("href", cssFile); document.getElementsByTagName("head").item(cssLinkIndex).replaceChild(newlink, oldlink); > STYLE 1 STYLE 2 For simplicity, I used inline javascript. In production you would want to use unobtrusive event listeners.
If you’re wanting to pull a live-reload type of thing, this is probably the way to go since the href may be the same and the browser may not actually do anything if the href hasn’t actually changed.
while switching css files, the gap in downloading the file and rendering the styles leaves the html without styles. I guess, there should be a default stylesheet, which adds basic styles, always there. Mobile browsers simply take much time to replace the css style sheet. Also the index of link might vary in different pages, given a static website generated by jekyll
You could do an absolute URL to get around pages being in different folders or whatnot. I like the idea of a default style sheet to prevent the FOUC from showing. Nice tip!
If you set an ID on the link element
you can target it with Javascript
document.getElementsByTagName('head')[0].getElementById('stylesheet').href='stylesheet2.css'; document.getElementById('stylesheet').href='stylesheet2.css'; Here’s a more thorough example:
function setStyleSheet(url) Style 1 Style 2 This question is pretty old but I would suggest an approach which is not mentioned here, in which you will include both the CSS files in the HTML, but the CSS will be like
/*** light.css ***/ p.main < color: #222; >/*** other light CSS ***/ and dark.css will be like
/*** dark.css ***/ .dark_theme p.main < color: #fff; background-color: #222; >/*** other dark CSS ***/ basicall every selector in dark.css will be a child of .dark_theme
Then all you need to do is to change the class of body element if someone selects to change the theme of the website.
And now all your elements will have the dark css once the user clicks on #changetheme . This is very easy to do if you are using any kind of CSS preprocessors.
You can also add CSS animations for backgrounds and colors which makes the transition highly smooth.
Using jquery you can definitely swap the css file. Do this on button click.
var cssLink = $('link[href*="light.css"]'); cssLink.replaceWith(''); Or as sam’s answer, that works too. Here is the jquery syntax.
$('link[href*="light.css"]').prop('disabled', true); $('link[href*="dark.css"]').prop('disabled', false); it could be better, but i like how you’ve cleanly defined sam’s jQ portion & helped me understand everything clearly.
Using jquery .attr() you can set href of your link tag .i.e
$("#yourButtonId").on('click',function()< $("link").attr(href,yourCssUrl); >); Maybe I’m thinking too complicated, but since the accepted answer was not working for me I thought I’d share my solution as well.
Story:
What I wanted to do was to include different ‘skins’ of my page in the head as additional stylesheets that where added to the ‘main’ style and switch them by pressing a button on the page (no browser settings or stuff).
Problem:
I thought @sam’s solution was very elegant but it did not work at all for me. At least part of the problem is that I’m using one main CSS file and just add others on top as ‘skins’ and thus I had to group the files with the missing ‘title’ property.
Here is what I came up with.
First add all ‘skins’ to the head using ‘alternate’:
Note that I gave the main CSS file the title=’main’ and all others have a and no title.
To switch the skins I’m using jQuery. I leave it up to the purists to find an elegant VanillaJS version:
var activeSkin = 0; $('#myButton').on('click', function() < var skins = $('.style-skin'); if (activeSkin >skins.length) activeSkin=0; skins.each(function(index)< if (index === activeSkin)< $(this).prop('title', 'main'); $(this).prop('disabled', false); >else < $(this).prop('title', ''); $(this).prop('disabled', true); >>); activeSkin++ >); What it does is it iterates over all available skins, takes the (soon) active one, sets the title to ‘main’ and activates it. All other skins are disabled and title is removed.
How to overwrite CSS style?
Using CSS, users can add different features to their web page. When users use multiple CSS rules within the same HTML element, they should direct the browser with the rule of thumb to signify which styling instruction should take priority.
Depending on which selector type users use to style the HTML element, these rules will set or determine which style overrides the other. It is what the article will briefly discuss with its different criteria users can use in CSS.
What is Overriding mean in CSS?
To override means to use the property of one CSS class over another. Overriding in CSS indicates that users use any style property to the specified HTML element for which they have already provided the CSS style.
For example, if users want to change the CSS style they have used to the HTML element using an external CSS, but if they do not find where they have written the line of code, then they can only override another CSS style by using inline CSS which has the highest precedence. Also, they can use or !important directive that overrides the CSS class over another.
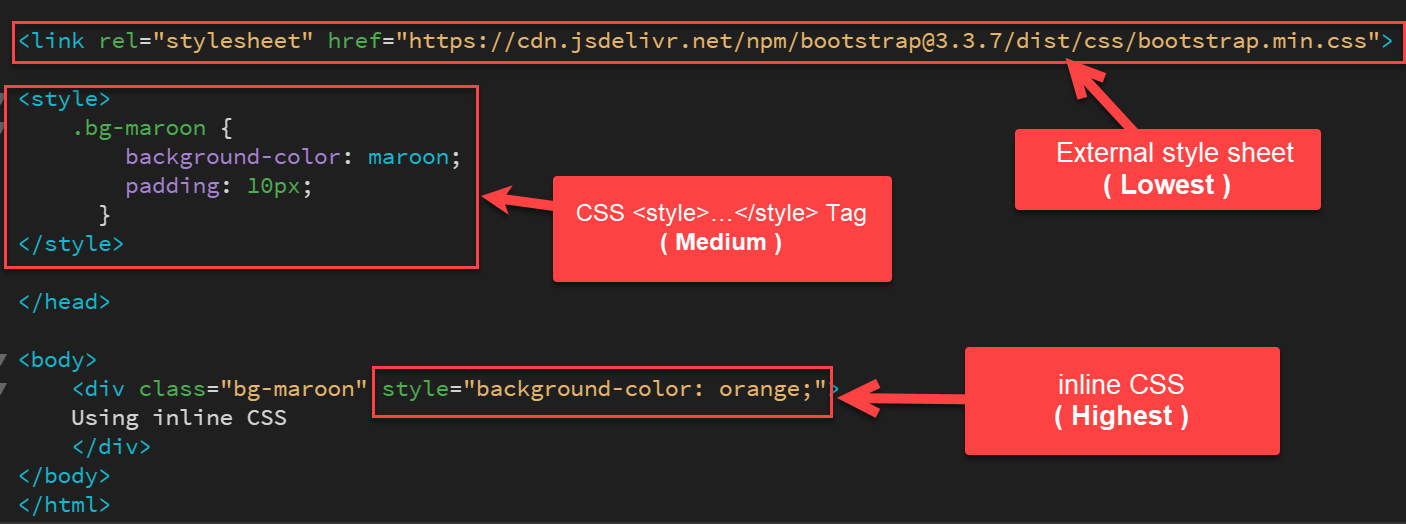
The order of priority inline style is as follows:
inline stylesheet (highest) >>
tags >> external style sheet (lowest)
So, when there appears a conflict between two or more CSS styles under the same HTML element, the last style that users will use will take precedence.
The below two rules will make users clear about the concept:
- Users must place the inline styles inside the HTML tag of the HTML document. While they must place the embedded style sheets inside the HTML tag of the HTML document so that the browser uses the inline styles as the last used ones and take precedence.
- In an HTML document, the internal style sheets take a higher priority than external ones. It is only because the browser will always consider the external style sheets or linked style sheets to come before the internal style sheets or embedded sheets, even if users use them or put them after.
Let us look at the different overriding styles in CSS:
Method 1: Overriding CSS style with the ID selector:
.demo < color: maroon; font-weight: normal; >#sample1 It is an example of CSS class overriding where we are using an ID selector to override.
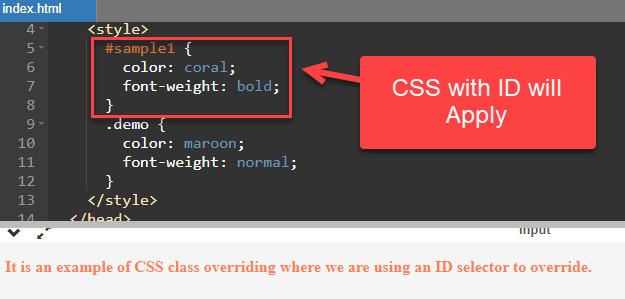
Explanation:
In the above code snippet, we can see that the ID gets precedence when we place the class after the ID. We can only use this when we set the ID and the CSS class under the same HTML element.
Method 2 Overriding CSS style with the Class selector:
#sample1 < color: #786435; font-style: italic; background-color: green; >.demo It is an example of CSS class overriding where we use an CSS selector to override. 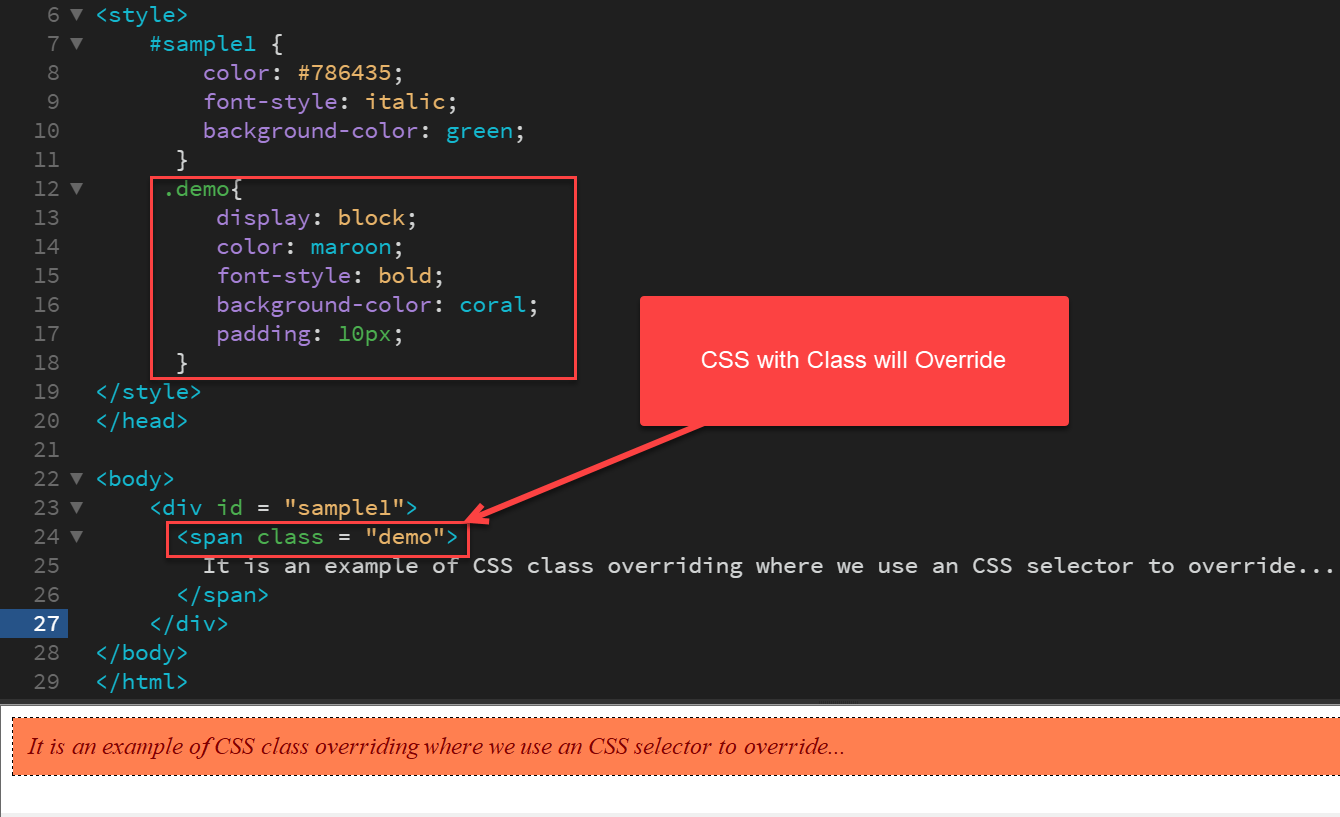
Explanation:
As we have discussed, when we use the Class selector and the ID selector under the same HTML element, the ID selector will have precedence. But in the above code example, we used the Class selector in the last; it will override the ID selector.
Method 3: Creating CSS class with different property
There are other techniques to override CSS style. Users can apply using one CSS class over another. Let us learn how users can use CSS to override one CSS class over another using the code snippets.
Code Snippet:
.bg-maroon < background-color: maroon; padding: 10px; >.bg-orange Overwriting by redeclaring second Class with different property 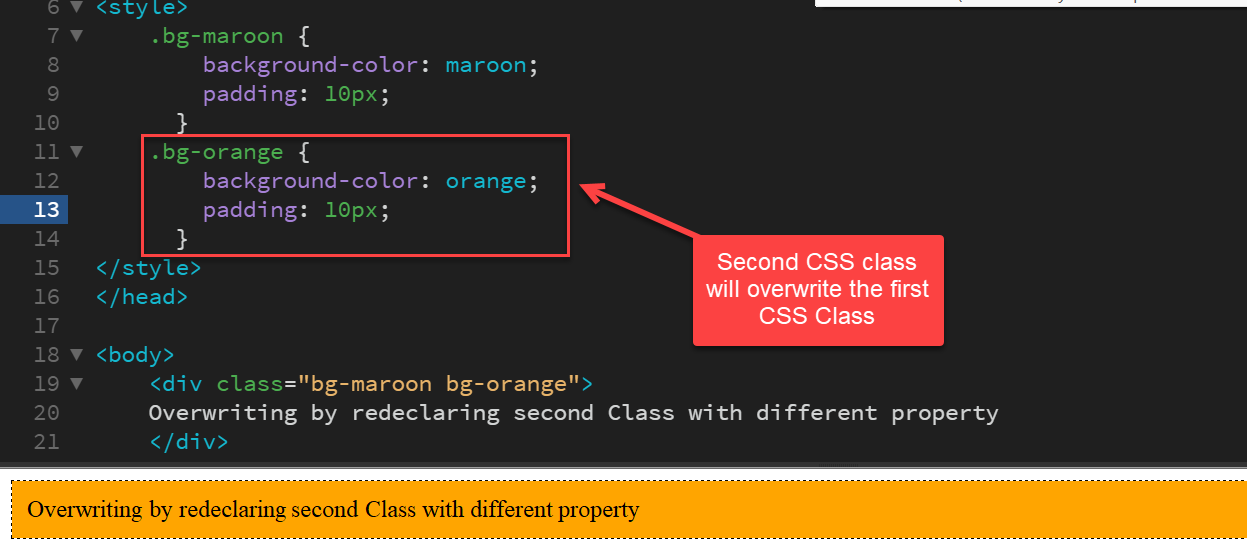
Explanation:
Users can use the dot operator to specify a CSS class name, i.e., .class_name <> . Here, in this example, we have used two CSS classes, namely bg-maroon and bg-orange. In the second class, i.e., inside the CSS class bg-orange, we defined the background color and padding of the text with a value of orange and 60 px. The text inside the HTML tag will refer to the second class.
Note: Users can also change the property of the tag by changing the style in the CSS class itself.
Method 4: Using Inline CSS
As we know inline CSS is the highest weight so it will overwrite all other CSS class
.bg-maroon Using inline CSS 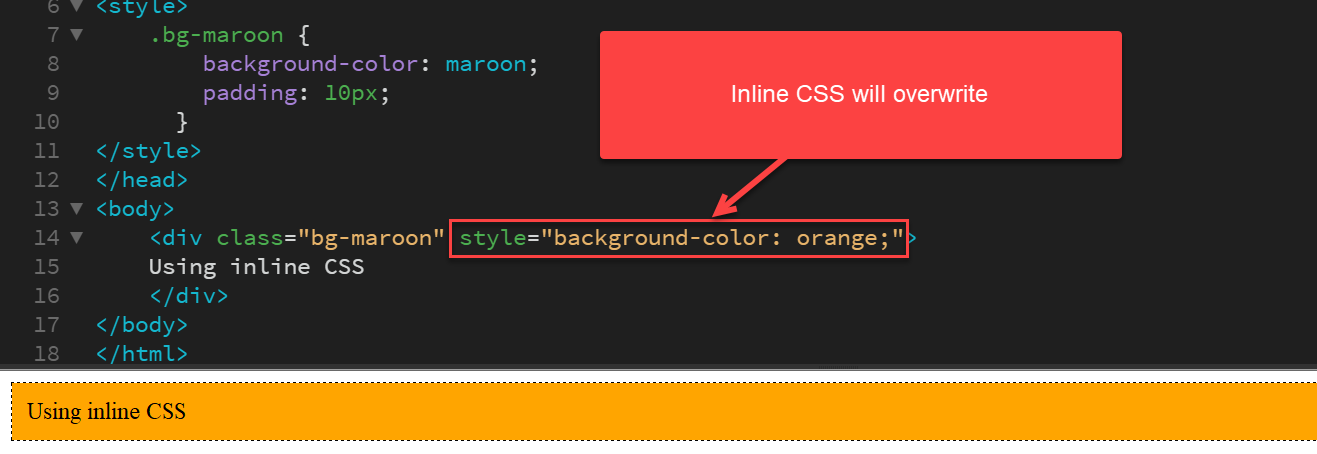
Note: Not recommended, Not Supported in AMP pages
Method 5: Using !important directive
The last method involves one of the most crucial techniques in CSS to override style is the !important directive. To declare a class with the !Important directive is an excellent way to override the styles users want.
When users use any essential rule on the CSS style declaration, this declaration will override the other CSS styles.
Let us see how !important directive works:
Code Snippet:
.bg-maroon < background-color: maroon !important; padding: 10px; color: white; >.bg-orange !important directive 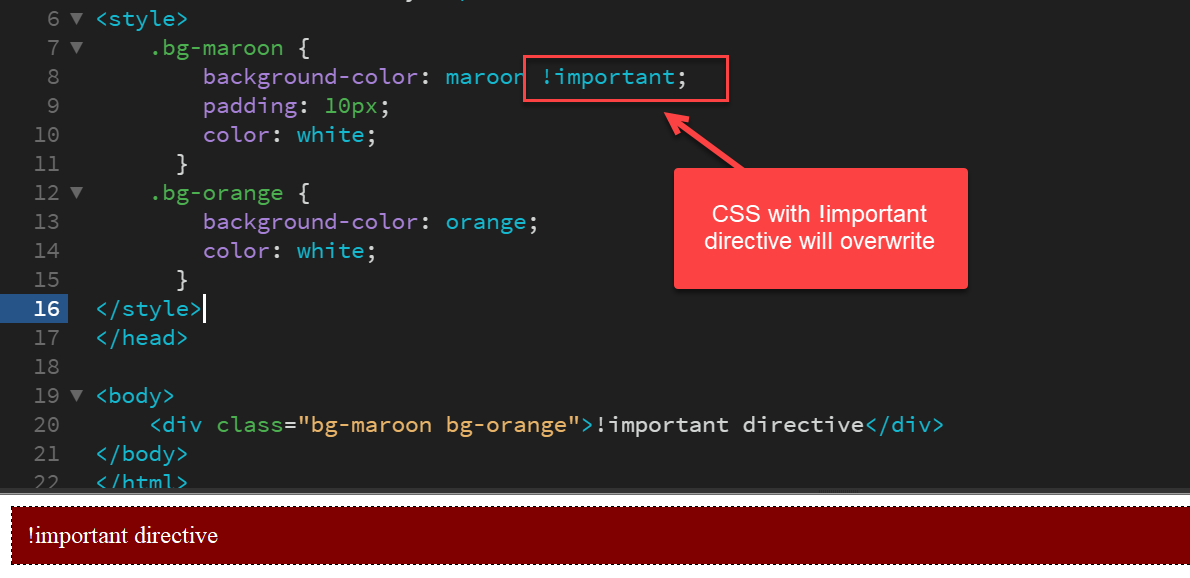
Note: Not recommended, Not Supported in AMP pages
Explanation:
The directive prioritizes that CSS style property with which users will add the » !important .» It indicates the style is important and can override the inline styling. In the code lines, we have added the «!important» at the end of the styling instruction line.
Conclusion:
When users use a CSS style inside an HTML element, they can change its property by changing or adding a new property in that class. Also; alternatively, they can add a new CSS class with a new property. Overriding a CSS class is easy, efficient, and can save time. We hope all the above techniques in this article help you with CSS style overriding.
- ASCII Values in C
- Typescript vs JavaScript
- MBR vs GPT
- Bitdefender vs Avast
- Difference between AC and DC
- AWS vs Azure
- Agile vs Waterfall
- Deadlock in OS
- Difference between System Software and Application Software
- Difference between Marketing and Selling
- Gmail server error #007
- Types of Servers
- Difference between SAP and SAS
- Differences between Malloc and Calloc Functions in C Language
- Mutex vs Semaphore
- Difference between SQL and PLSQL
- Kotlin vs Java
- Difference between Process and Thread
- Difference between SRAM and DRAM
- OLTP vs OLAP