- How to change XAMPP PHP version on Windows
- In-depth tutorial on how to replace XAMPP PHP version on Windows.
- Table of Contents
- Why replacing XAMPP PHP version?
- Tutorial Starts Changing XAMP PHP version: Step by step
- 1. Stop XAMPP Apache process
- 2. Download new PHP version
- Okay, so, what to download?
- 3. Extract new PHP version to XAMPP
- 4. Configure XAMPP to run with new PHP version
- 4.1. Replace the same major PHP version (eg. 7.4.24 to 7.4.25)
- 4.2. Upgrade/Downgrade major PHP version (eg. 7.4.24 to 8.0.1)
- 4.2.1. Edit LoadFile on php DLL file
- 4.2.2. Edit LoadModule on Apache DLL file
- 4.2.3. Edit IfModule
- 5. Verify that everything works
- Also with the PHP on Windows series
- Update PHP in XAMPP and Composer in 1 minute (2023)
- 3 simple steps to update PHP 7 to PHP 8 in XAMPP:
- Download PHP from the latest Xampp:
- Configure httpd-xampp.conf
- Fix Composer after XAMPP PHP update
- Fix PhpMyAdmin Error
How to change XAMPP PHP version on Windows
In-depth tutorial on how to replace XAMPP PHP version on Windows.
Table of Contents
- Why replacing XAMPP PHP version?
- Changing XAMP PHP version: Step by step
- 1. Stop XAMPP Apache process
- 2. Download new PHP version
- Okay, so, what to download?
- 3. Extract new PHP version to XAMPP
- 4. Configure XAMPP to run with new PHP version
- 4.1. Replace the same major PHP version (eg. 7.4.24 to 7.4.25)
- 4.2. Upgrade/Downgrade major PHP version (eg. 7.4.24 to 8.0.1)
- 4.2.1. Edit LoadFile on php DLL file
- 4.2.2. Edit LoadModule on Apache DLL file
- 4.2.3. Edit IfModule
- 5. Verify that everything works
- Also with the PHP on Windows series
- The PHP platform you are developing requires a newer OR older PHP version to run properly;
- The current PHP platform is outdated , or containing security vulnerabilities ;
- You want to test for newer PHP features on a newer PHP version;
- You don’t want to download another XAMPP package again (with different PHP version) and have to reconfigure everything .
- For PHP version number, this page only list the latest stable versions (at the time of this article, 7.4.30, 8.0.23 and 8.1.10). If you want to download older versions (eg. PHP5), head to the PHP.net for Windows Archive page:
https://windows.php.net/downloads/releases/archives/
Here you will see the old PHP versions, by the format of either .msi (installation package), .zip (extractable package), a lot right? If you’re confused by this archive page, hang on, we’ll point the right package selection shortly, after the next section: - For PHP thread support type, in short, here is the quick guide on what to pick:
- If you use native Apache (with LoadModule, or Apache Handler) or IIS , choose the Thread Safe version.
- If you use Apache with FastCGI or IIS with FastCGI, choose the Non Thread Safe version.
It is recommended to use Apache with FastCGI (fcgi) for handling multiple PHP processes in Windows, however, by default , in XAMPP’s Apache configuration, it uses the native Apache Handler to serve PHP . So, to keep it quick and we assume that people will mostly use default Apache configuration in XAMPP, we will pick the thread safe version.
*If you are already using non thread safe version on your XAMPP, just continue to pick the non thread safe version.
Okay, so, what to download?
After picking the PHP version number and the thread support type that you want, follow this guide to choose what to download:

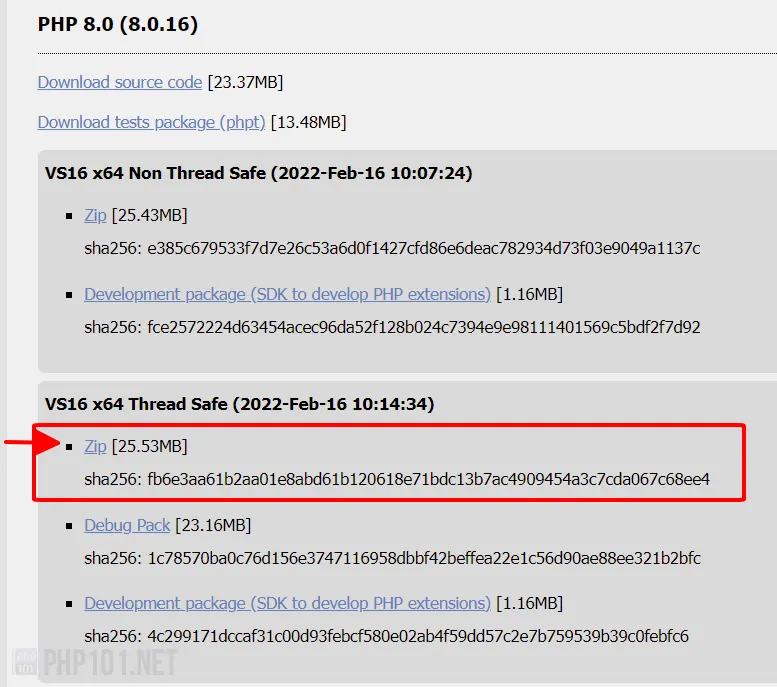
- If you use newer, stable versions (7.4, 8.0 and 8.1), just locate it on the right panel of the download page, and download the Zip package with the right thread support version.
For example, if we choose PHP 8.0.16 + thread safe version:
- If you use older, archived versions (mainly PHP 5), on the archive page, do a search on the page with this syntax:
After seeing the highlighted results, here are the guides to pick the right version:
- Non thread safe version will have the nts text in the package name, while thread safe version does not have the nts text in the name.
- 32-bit or 64-bit version will have the x86 or x64 text in the package name
- Don’t download the package with the src in the package name (it’s the source codes, we don’t need that)
For example, if we want to pick PHP 5.6.40, thread safe, 64-bit version, this is the one to download:

We could finally picked the right PHP package to download! Next, let’s get XAMPP PHP version to be updated.
3. Extract new PHP version to XAMPP
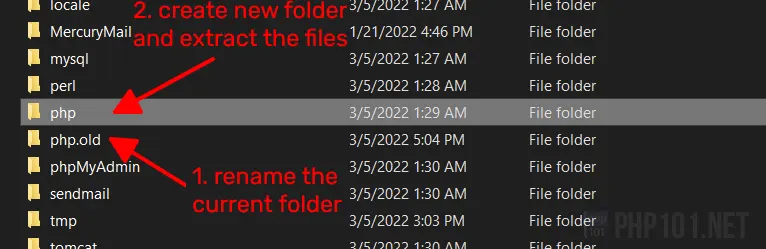
After downloading the PHP package, extract the copy the files into the XAMPP’s php directory.
We recommend backing up the old php directory by renaming the old php directory (to, like php.old ) and create a new one to extract the downloaded files into it, so we can quickly revert the version. For example:

4. Configure XAMPP to run with new PHP version
The most important step is to configure XAMPP, or more precisely, configure XAMPP’s Apache for it to work with the PHP version we downloaded. Depends on the major PHP version you want to replace, there are different ways to do that to make it work properly.
4.1. Replace the same major PHP version (eg. 7.4.24 to 7.4.25)
In most cases, changing PHP with the same major version will not require any Apache configuration. This assumes that the thread support version is still the same , and XAMPP has been running properly.
In this case, you can just replace the PHP package files (or backup the old directory and create a new one – like the previous step) into XAMPP’s php directory, and it will just work.
4.2. Upgrade/Downgrade major PHP version (eg. 7.4.24 to 8.0.1)
To switch major XAMPP PHP version, some Apache configuration of XAMPP has to be adjusted. Fortunately, this is very easy and straight forward to do.
*One more time, assuming that the PHP thread support version you are replacing is the same.
Open this file in any Windows text editor (Notepad, VSCode, etc. we preferred VSCode):
[XAMPP Directory]\apache\conf\extra\httpd-xampp.conf*Again, you should backup the file first by copying it to another location. Do not back it up by duplicate the file in the same directory and leave the same .conf file extension, it will cause error when Apache starts (duplicated configuration).
4.2.1. Edit LoadFile on php DLL file
In this section, you will see various LoadFile lines, but the main line to pay attention to is the file loading the php[version]ts.dll , for example, this line with PHP 7:
LoadFile "E:/xampp/php/php7ts.dll"*The path can be different depends on where XAMPP is installed on your computer.
Edit this line, change the DLL file name to the PHP version you already downloaded.
For example, upgrading from PHP 7 to PHP 8:LoadFile "E:/xampp/php/php8ts.dll"-OR- Downgrading from PHP 7 to PHP 5:
LoadFile "E:/xampp/php/php5ts.dll"4.2.2. Edit LoadModule on Apache DLL file
Then, the next edit is the line nearby with LoadModule , this will be diffrent based on XAMPP version.
For XAMPP with different major PHP version bundled, the lines will be different:// With XAMPP PHP 5 LoadModule php5_module "E:/xampp/php/php5apache2_4.dll" // With XAMPP PHP 7 LoadModule php7_module "E:/xampp/php/php7apache2_4.dll" // With XAMPP PHP 8 LoadModule php_module "E:/xampp/php/php8apache2_4.dll"*The path will be different based on your system.
Edit this line, replace all php[version]_module into php_module . So with php5_module and php7_module , they will be edited to php_module as well. This is for making us easier to replace major PHP version by simply changing the DLL file name, rather than having to editing the php module name.
The later part is the DLL file to edit based on version, with the syntax of php[version]apache2_4.dll . You can simply change it to your version.
For example, downgrading from PHP 7 to 5:
LoadModule php_module "E:/xampp/php/php5apache2_4.dll"-OR- upgrading from PHP 7 to 8:
LoadModule php_module "E:/xampp/php/php8apache2_4.dll"4.2.3. Edit IfModule
- With XAMPP having PHP 8 , you don’t have to edit these lines because they are already correct.
- With XAMPP having PHP 5 , the line to lookup is
- With PHP 7 ,
Edit them all to:
That’s all we need to edit on this file. Save the file and move on to the next step.
5. Verify that everything works
To check if the adjustments are fully working, start Apache in XAMPP.
Open the XAMPP Control Panel by the notification bar icon, or by the [XAMPP Directory]\xampp-control.exe file. Then, click Start on the Actions panel of the Apache line. If there are no errors showing, we are nearly done.
Next, create a PHP file inside XAMPP’s htdocs folder, put this content into it:
Save the file, and open it on the browser using localhost URL. Check if the PHP version is updated properly. If yes, congratulation! You have done all of the steps properly to change XAMPP PHP version on Windows.
If there are errors showing, double check the steps and file adjustments to make sure everything is applied correctly. We are going to release an article on how to debug PHP errors on XAMPP soon.
This tutorial is now over. Thanks for reading and hopefully it’s helpful for you.
Also with the PHP on Windows series
Update PHP in XAMPP and Composer in 1 minute (2023)

Do you know that you can update PHP in the XAMPP server within a few minutes? This article tells you how to update PHP for Xampp and composer.
I was trying to make a new build of Laravel with laravel new project-name but the composer was making it with the old version 8.
As Laravel 9 requires PHP 8, my composer was linked to PHP 7.
So, even after running the composer global update didn’t update the overall packages.
Then, I figured out that it could be the issue of PHP of my xampp with the composer.
3 simple steps to update PHP 7 to PHP 8 in XAMPP:
Before moving forward make sure to take backup (Optional but just in case if something went wrong).
Download PHP from the latest Xampp:
You can download source code of xampp windows from source forge.

Extract the folder and copy php folder from the latest xampp.
Now, go to your existing xampp folder and rename the current PHP folder to php7 or whatever you want.
Then paste the new php folder in the existing xampp.
That’s it! You have finally put the latest php inside Xampp.
But, the process does not end here.
Let’s move to the next step.
Configure httpd-xampp.conf
Open xampp control panel. Go to the apache config and select httpd-xampp.conf.

Here you need to update the following:
Turn php7 to php 8

Turn php7_module to php_module


Save it! Now, if you will try to run apache. It will work fine.
If you go to localhost/dashboard/phpinfo.php, you will see the latest php version.
But, when you try to run composer. It will fail and will give tons of errors.
Let’s move to the final step.
Fix Composer after XAMPP PHP update
Go to xampp control panel, click on apache config and go to php.ini.

Inside php.ini, set the absolute paths like \xampp\php to F:\xampp\php
F: (Where you have installed directory of xampp, in my case it’s F)
Find \xampp\php inside php.ini and change all paths from relative to absolute.
Click save and then go to the command line.
Type composer you will see the output of Composer instead of errors.
Fix PhpMyAdmin Error
After the above process, if your phpmyadmin is broken then follow the steps mentioned below.
You copied the PHP folder and placed it inside your existing xampp. Just like that, you will need to copy the PhpMyAdmin from the new xampp to your existing one.
But, before that make sure to get the backup of the existing config.inc.php file which is inside PhpMyAdmin in xampp, and then replace the complete folder with the new one.
Now, replace the config.inc.php file with the old one.

Re-run your xampp’s Apache and MySQL. After that visit the phpmyadmin dashboard.
The Errors should be gone.
That’s it! In a nutshell, you learned:
- How to download the source code of xampp
- How to change php version in xampp
- How to update PHP7 to PHP8
- How to fix the composer issue after the update to PHP8.
- How to fix PhpMyAdmin Error
If you want to become smart in web development make sure to subscribe to our newsletter and don’t forget to share with others.
Why replacing XAMPP PHP version?
If you are using XAMPP for PHP development on Windows, there are high chances that you will need to change, upgrade, or even downgrade your XAMPP PHP version to satisfy the compatibility of the PHP package your are developing.
Some example cases requiring XAMPP PHP version replacement including:
This tutorial will guide you on how to replace the PHP version of XAMPP on Windows.
*Note: This is for completely replacing the PHP version in XAMPP. To run XAMPP on multiple PHP versions , we will have another in-depth tutorial on how to do that.
Tutorial Starts Changing XAMP PHP version: Step by step
Here are the steps to change the primary PHP version in XAMPP on Windows.
*We assume that you already have XAMPP running properly.
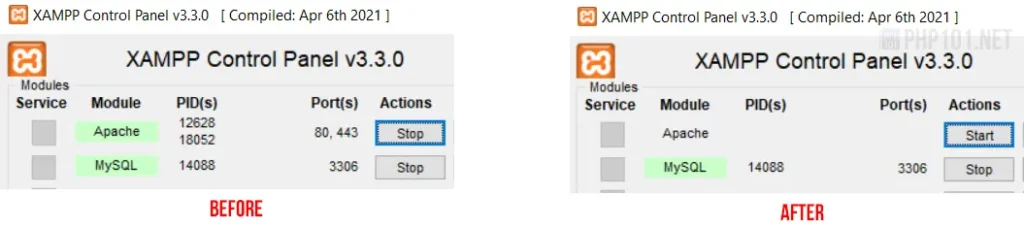
1. Stop XAMPP Apache process
First, we need to stop the Apache process on XAMPP. To do that, you can locate the XAMPP icon under Windows notification area. Then, double click the icon:
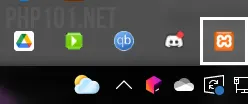
On the XAMPP Control Panel dialog, click Stop at the Actions area on Apache to stop the process. The process is stopped when it doesn’t have the light green background anymore.
If for some reasons, the XAMPP icon doesn’t appear on the notification area, you can stop the Apache process using Windows taskkill command. Open Run dialog (Windows + R), type in this command and press Enter (or the OK button):
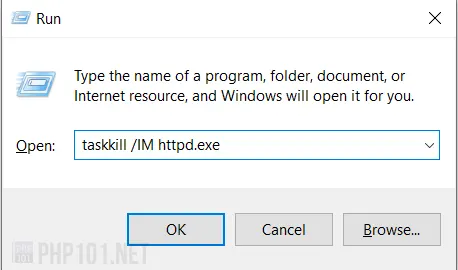
Then the Apache process will be stopped.
2. Download new PHP version
Navigate to this official PHP.net Windows download page:
On the right panel, pick the PHP version number + thread support type you want to download.