- How to install the Java Runtime Environment from Java.com
- 1. Java i386 JRE and plugin
- 2. Java x86_64 JRE and plugin
- 3. Test browser
- 4. Remove old versions
- How to Install Java 11 & 12 on CentOS 7
- Java Versions
- Install Java On CentOS
- Install OpenJDK 11
- Install OpenJRE 11
- Install Oracle Java 11
- Verify Java is Installed on Your System
- Install Specific Version of Java
- Install JDK 8
- Install JRE 8
- Install Oracle Java 12
- How to Set Default Java Version
- How to Set JAVA_HOME Environment Variable
- How to Uninstall Java on CentOS
How to install the Java Runtime Environment from Java.com
If a browser plugin and Java runtime are all that is required, as opposed to a full Java development environment, the Oracle (formerly Sun) Java Runtime Environment (JRE) RPMs work for all currently supported CentOS versions, and are arguably the most compatible with web pages that require a Java plugin. The Java versions shown below are current as of this writing. Always use the latest available version for your architecture (i386 32-bit or x86_64/amd64 64-bit) and adjust accordingly.
1. Java i386 JRE and plugin
Download the latest Linux RPM (self-extracting file), currently jre-6u30-linux-i586-rpm.bin, from java.com then as root install and configure the alternatives system and plugins.
# cd [download directory] # sh ./jre-6u30-linux-i586-rpm.bin # alternatives --config java There are 2 programs which provide 'java'. Selection Command ----------------------------------------------- *+ 1 /usr/lib/jvm/jre-1.6.0-openjdk/bin/java 2 /usr/lib/jvm/jre-1.5.0-gcj/bin/java Enter to keep the current selection[+], or type selection number:
Note number of versions, N, and use N+1 (if there is no output from the previous command, just imagine that N=0) — For example, if 2 versions were installed then:
# alternatives --install /usr/bin/java java /usr/java/latest/bin/java 3 # alternatives --config java There are 3 programs which provide 'java'. Selection Command ----------------------------------------------- *+ 1 /usr/lib/jvm/jre-1.6.0-openjdk/bin/java 2 /usr/lib/jvm/jre-1.5.0-gcj/bin/java 3 /usr/java/latest/bin/java Enter to keep the current selection[+], or type selection number: 3 # java -version java version "1.6.0_30" Java(TM) SE Runtime Environment (build 1.6.0_30) Java HotSpot(TM) Client VM (build 20.1-b02, mixed mode, sharing)
Create links in the Mozilla Plugins directory so Java will work in supported browsers such as Firefox.
# cd /usr/lib/mozilla/plugins/ # ln -fs /usr/java/latest/lib/i386/libnpjp2.so
Skip to the section on testing the browser plugin.
2. Java x86_64 JRE and plugin
Download the latest Linux RPM (self-extracting file), currently jre-6u30-linux-x64-rpm.bin, from java.com then as root install and configure the alternatives system and plugins:
# cd [download directory] # sh ./jre-6u30-linux-x64-rpm.bin # alternatives --config java There are 4 programs which provide 'java'. Selection Command ----------------------------------------------- 1 /usr/lib/jvm/jre-1.4.2-gcj/bin/java 2 /usr/java/jre1.6.0_13/bin/java 3 /usr/java/jre1.6.0_18/bin/java *+ 4 /usr/lib/jvm/jre-1.6.0-openjdk.x86_64/bin/java Enter to keep the current selection[+], or type selection number:
Note number of versions, N, and use N+1 (if there is no output from the previous command, just imagine that N=0) — For example, if 4 versions were installed then:
# alternatives --install /usr/bin/java java /usr/java/latest/bin/java 5 # alternatives --config java There are 5 programs which provide 'java'. Selection Command ----------------------------------------------- 1 /usr/lib/jvm/jre-1.4.2-gcj/bin/java 2 /usr/java/jre1.6.0_13/bin/java 3 /usr/java/jre1.6.0_18/bin/java *+ 4 /usr/lib/jvm/jre-1.6.0-openjdk.x86_64/bin/java 5 /usr/java/latest/bin/java Enter to keep the current selection[+], or type selection number: 5 # java -version java version "1.6.0_26" Java(TM) SE Runtime Environment (build 1.6.0_30) Java HotSpot(TM) 64-Bit Server VM (build 20.1-b02, mixed mode)
Create links in the Mozilla Plugins directory so Java will work in supported browsers such as Firefox.
# cd /usr/lib64/mozilla/plugins/ # ln -fs /usr/java/latest/lib/amd64/libnpjp2.so
3. Test browser
Exit Firefox if it is running and [re]start Firefox. Type «about:plugins» in the URL field. It should show Java enabled.
4. Remove old versions
Oracle recommends removing old Java versions as they represent a security risk if left installed. By default, the installation procedure above will not remove old versions so we must do this manually:
# rpm -qa jre\* jre-1.6.0_13-fcs.x86_64 jre-1.6.0_18-fcs.x86_64 jre-1.6.0_30-fcs.x86_64 # rpm -e jre-1.6.0_18-fcs.x86_64 jre-1.6.0_13-fcs.x86_64
- This page created and maintained by PhilSchaffner. Other Wiki contributors are invited to make corrections, additions, or modifications.
HowTos/JavaRuntimeEnvironment (последним исправлял пользователь анонимно 2019-12-09 09:11:16)
How to Install Java 11 & 12 on CentOS 7
As a highly popular programming language, Java is used for developing anything from lightweight mobile to desktop applications.
This step-by-step guide will show you how to install Java on CentOS 7.
Note: These installation instructions apply for CentOS7 as well as versions 6 and 6.5, RHEL, and recent Fedora releases. For a dedicated Fedora guide, please refer to How To Install Java On Fedora.
And for other systems, check our tutorial on how to install Java on Windows.
- A user account with sudo privileges
- Access to the command-line/terminal window
- The yum package manager, included by default
Java Versions
Currently, there are four Java platforms available:
In this document, we look at different packages within the Java SE.
There are two (2), open-source Java packages, Java Development Kit (Open JDK) and Java Runtime Environment (Open JRE). You use JRE for running Java-based applications, while JDK is for developing and programming with Java.
Also available is Java Oracle, another SE implementation, which has additional commercial features. You can find the official Oracle JDK through a third-party repository or on the official Oracle webpage. However, bear in mind its license only allows non-commercial use of the software.
Install Java On CentOS
You can install one or several Java packages on your machine. You can also decide which version you want on your system by installing a specific version number. The current default, Long-Term-Support (LTS) version is Java 11.
Install OpenJDK 11
1. Update the package repository to ensure you download the latest software:
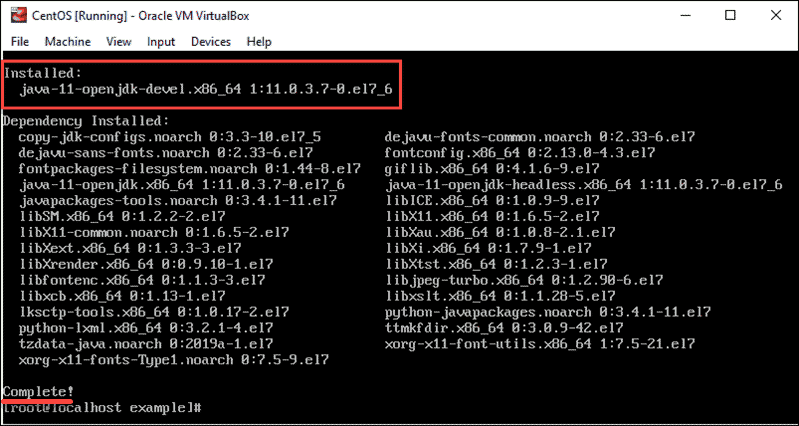
2. Then, install the Java Development Kit with the following command:
sudo yum install java-11-openjdk-develThe output displays the downloaded and installed JDK, as in the image below:
Install OpenJRE 11
Java Runtime Environment 11 (Open JRE 11) is a subset of OpenJDK. Therefore, both packages are included in the command:
sudo yum install java-11-openjdkInstall Oracle Java 11
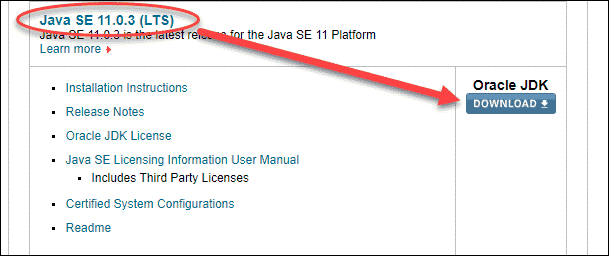
1. The official Oracle JDK is not available for download from the local repository. You have to download the .rpm package from the Java SE Downloads page.
2. The latest release is Java SE 12. However, Oracle Java 11 is LTS, meaning it is the latest stable version.
Locate Java SE 11.0.3 (LTS) on the webpage and click on DOWNLOAD.
3. After the download is complete, you can install the package with the command:
sudo yum localinstall jre-VERSION-linux-x64.rpmVerify Java is Installed on Your System
The following command shows which Java release you have and confirms installation was successful:
If Java was successfully downloaded and installed, the output details should match the image below:

Install Specific Version of Java
You can also install any of the other versions of Java by changing the version number in the command.
Install JDK 8
You may decide to use Open JDK 8, instead of the default OpenJDK 11.
To do so, type in the following command in the terminal:
sudo yum install java-1.8.0-openjdk-develInstall JRE 8
As a subset of Open JDK 8, you can install Open JRE 8 by typing in the command:
sudo yum install java-1.8.0-openjdkInstall Oracle Java 12
As previously mentioned, you have to download Oracle Java from its official page.
To install the newest version, simply download the appropriate package from their webpage and continue with the installation.
How to Set Default Java Version
Since you can have multiple versions of Java installed on your system, you can decide which one is the default one. To do so;
Run a command that shows all the installed versions on your computer:
sudo alternatives --config java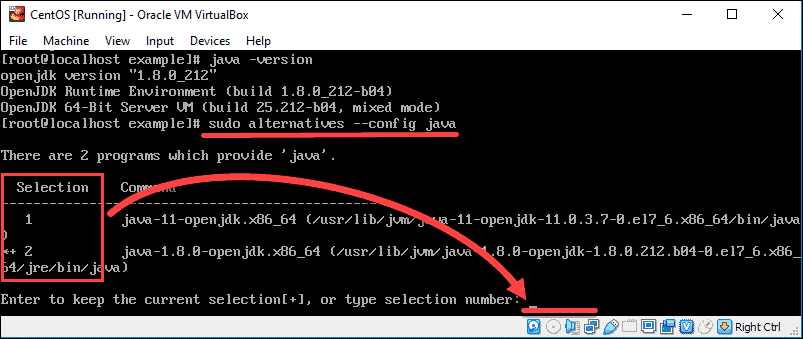
The image above shows that there are two alternatives to this system. These choices are represented by numbers 1 (Java 11) and 2 (Java 8).
To change the default version, type the associated number (in this case, 1 or 2) and press Enter.
How to Set JAVA_HOME Environment Variable
Setting the JAVA_HOME environment variable helps other applications compiled in this programming language to access Java’s installation path easily.
1. First, locate where Java is installed:
sudo update-alternatives --config java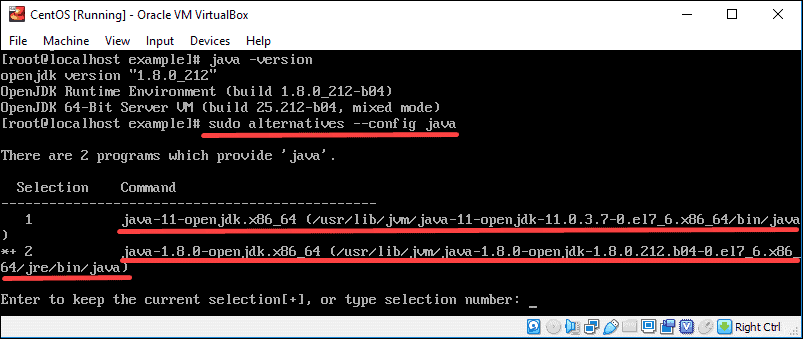
In the output, you can find the path for each Java package installed on the system.
- /usr/lib/jvm/java-11-openjdk-11.0.3.7-0.el7_6.x86_64/bin/java (where OpenJDK 11 is located)
- /usr/lib/jvm/java-1.8.0-openjdk-1.8.0.212.b04-0.el7_6.x86_64/jre/bin/java (where OpenJDK 8 is located)
2. Once you see all the paths, copy the one of your preferred Java version.
3. Then, open the .bash_profile with any text editor. In this example, we use vim:
4. At the bottom of the file, add a line which specifies the location of JAVA_HOME in the following manner:
JAVA_HOME=”/your/installation/path/”For example, if we copy the installation path for Java 11 in the previous step, the added line in the text editor will be:
/usr/lib/jvm/java-11-openjdk-11.0.3.7-0.el7_6.x86_64/bin/javaHow to Uninstall Java on CentOS
In case you need to remove any of the Java packages installed, use the yum remove command.
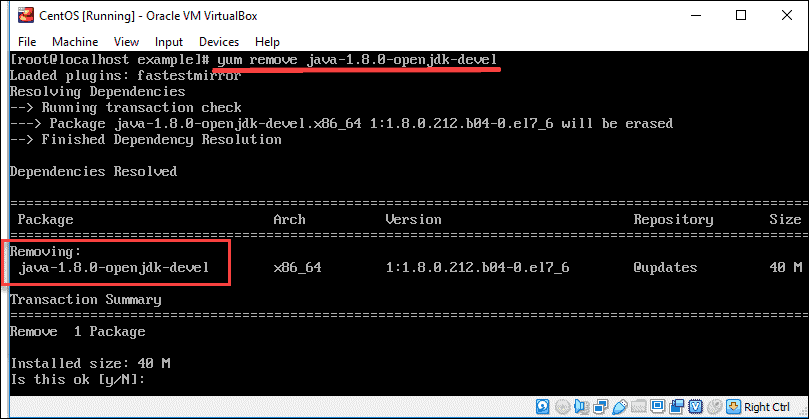
For example, to remove Open JDK 8 use the following command:
sudo yum remove java-1.8.0-openjdk-develConfirm the process by pressing y (yes), and it will uninstall the package from CentOS, as in the image below:
In this tutorial, you have learned how to install Java on CentOS 7.
We also covered changing the default version and setting the home environment variable. You are now ready to get started with Java!
If you are using a newer version of CentOS, check out our article on how to install Java 8 & 11 on Centos 8.