- How to give space between two buttons in CSS?
- Give Space using the Margin Property
- Example:
- Give Space Using HTML’s nbsp Entity
- Give Space Between Multiple Buttons using CSS Flexbox
- Conclusion
- Related posts:
- Center Align CSS Button
- 1. By placing a text-align property of body tag to the center (text-align: center)
- 1.1 By setting text-align property of parent div tag to the center (text-align: center)
- 2. Center CSS Button by using margin auto (margin: auto)
- 3. Center Button Vertically AND Horizontally
- 3.1: By setting the text-align property of the parent div tag to the center
- 3.2: By setting position property to 50% from top and bottom
- 3.3: By setting margin property to auto
- 4. Center CSS Button using Position fixed
- 5. By setting the display property to flex (display: flex)
- 6. By setting the display property to the grid (display: grid)
- 7. Using CSS Bootstrap
How to give space between two buttons in CSS?
In HTML, a button is an interactive element that allows a user to interact with the web page. The user can submit a form, open or close a dialog, animate an element, and so on based on the action associated with the button click.
In HTML, every element has a default display type. These display types are block, inline-block, and inline. Each button has a default display type of inline-block .
Therefore, when you create a button, it only takes as much space as it needs. So, if there are multiple buttons in a single line, they by default sit very close to each other(depending on your browser).
In such situations, we have to explicitly give some space between the buttons for a better user experience. This article will guide you through different ways of giving space between two or more buttons.
Give Space using the Margin Property
The simplest and most commonly used approach to give space between two buttons in CSS is to use the margin property.
The margin property is used to create space around elements. It specifies the margin of all four sides(top, right, bottom & left) of the element in various CSS units such as px, em, rem, etc.
As we want to give only horizontal space between the buttons, therefore, we will use only the margin-left and margin-right properties.
The margin-left property specifies the margin of the left side, whereas, the margin-right property specifies the margin of the right side of the element.
So, if you want to give space between two buttons using margin , you have three options. First, apply only margin-right on the first button, second, apply only margin-left on the second button, and third, apply margin-right on the first button and margin-left on the second button.
Let’s say we have two buttons in our HTML file, button1 & button2:
we want to give a space of 20px between these two buttons.
So, we can apply a margin-right of 20px on the first button. This will push the second button 20px away from it.
/*Give a right margin of 20px*/ .btn1
A similar 20px space we can also create by applying a margin-left of 20px on the second button. This will push the first button 20px away from it.
/*Give a left margin of 20px*/ .btn2
The third approach could be to split the 20px space between the margin-left and the margin-right. That is, apply 10px margin-right on the first button and 10px margin-left on the second button. This will push both buttons 20px away from each other.
/*Give a right margin of 10px*/ .btn1 < margin-right: 10px; >/*Give a left margin of 10px*/ .btn2
All three approaches would create a space of 20px between the two buttons.
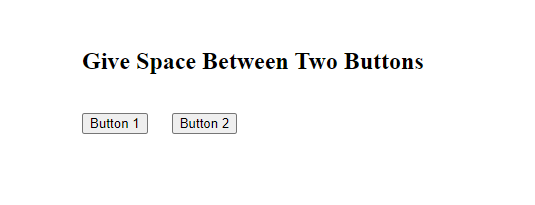
After running the above code, it will produce the following output:
You can also run the above example in our live Html editor by clicking the try it now button and start practicing there.
Example:
Give Space Using HTML’s nbsp Entity
This method is generally used when we want to give a very small amount of space between two elements. In this method, we use HTML’s entity.
The stands for non-breaking space. A non-breaking space is a space that does not break onto a new line even if enough space is not available.
The creates a blank space equal to a space character and you can use any number of between elements.
The following example will create a non-breaking space same as three space characters between the button1 & button2 as we have used three
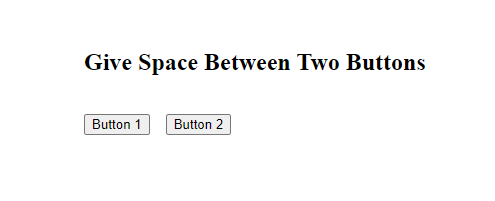
Sample output after running the above code:
Give Space Between Multiple Buttons using CSS Flexbox
If there are multiple buttons in a single line and you want to give space between them, you can either set the margin for each button individually, or you can use CSS flexbox.
CSS flexbox is a flexible layout module that lets you design responsive layouts without using float or positioning.
Let’s say we have three buttons in our HTML document. We want to give 20px space between these buttons using the flexbox module.
For that, we have to first put these buttons inside a parent div element.
Button 1
Now, to make this div flexible, set its display property to flex . The display: flex; will make the parent div a flex container and all its children (buttons) will start behaving as flex children.
Now, to set a gap between the buttons, use the column-gap property. The column-gap property sets the specified gap between all flex children.
In our case, we have to set the column-gap property to 20px, as we want a gap of 20px among all buttons.
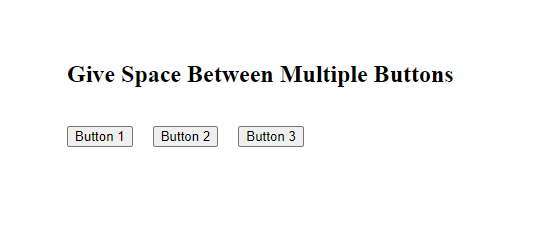
Below is the outcome of the above code:
Conclusion
In this article, we learned three different ways to give space between two or more buttons using CSS.
The first approach is to use the margin-left or the margin-right property. The margin-left property sets the margin of the left side while the margin-right property sets the margin of the right side of the element.
The second approach is to use the entity. The sets a non-breaking space of one space character. It is only used when we want to give a small amount of space.
The third approach is to use the column-gap property of the flexible module to set the gap between two or more buttons.
Related posts:
Center Align CSS Button
Styling and formatting are what all web developers and designers want to apply to their web pages and application to look attractive. It is up to the creator how they want to use Cascading Style Sheets and Hypertext Transfer Protocol to provide the best style for their web page and application.
Users specifically use CSS to add the best attractive look to their web pages and specify the arrangements of the page elements in a systematic order. This article will discuss how to center a button in the HTML page using CSS.
You can Center Align CSS Button using the following method:
- text-align: center — By setting th text-align property of the parent div tag to the center
- margin: auto — By setting margin property to auto
- Center Button Vertically AND Horizontally
- By setting th text-align property of the parent div tag to the center
- By setting position property to 50% from top and bottom
- By setting margin property to auto
1. By placing a text-align property of body tag to the center (text-align: center)
In this example, we are using `text-align` center property on the tag, so everything inside the tag will be center-aligned automatically.
body
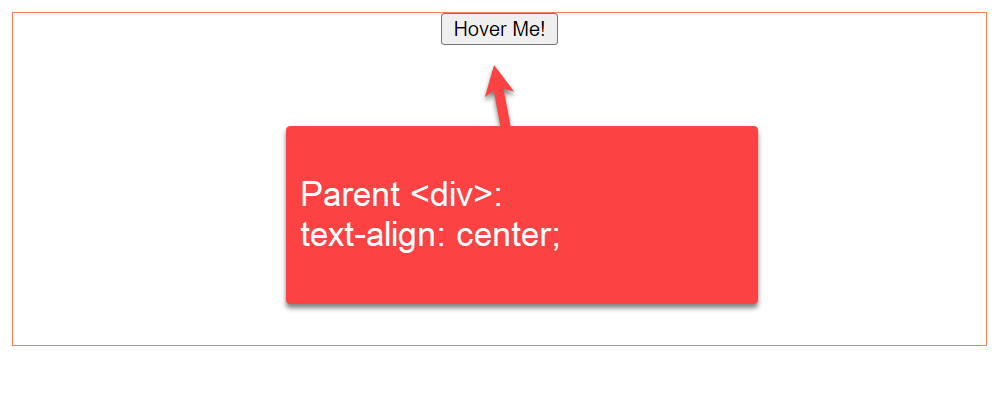
1.1 By setting text-align property of parent div tag to the center (text-align: center)
In this example below, we are using `text-align` center property on tag with a class ( button-container-div ) so everything inside this will be center-aligned automatically.
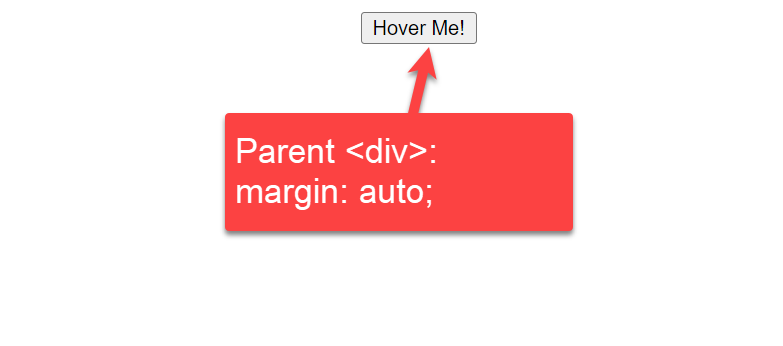
.button-container-div2. Center CSS Button by using margin auto (margin: auto)
In this example, we are using the `margin` auto property. Margin auto moves the div to the center of the screen.
.button-container-div3. Center Button Vertically AND Horizontally
3.1: By setting the text-align property of the parent div tag to the center
We use the text-align property with the parent div tag to align the button to the center. Let us grab a look at this CSS code snippet and understand how to align the button to the center of the HTML page using CSS
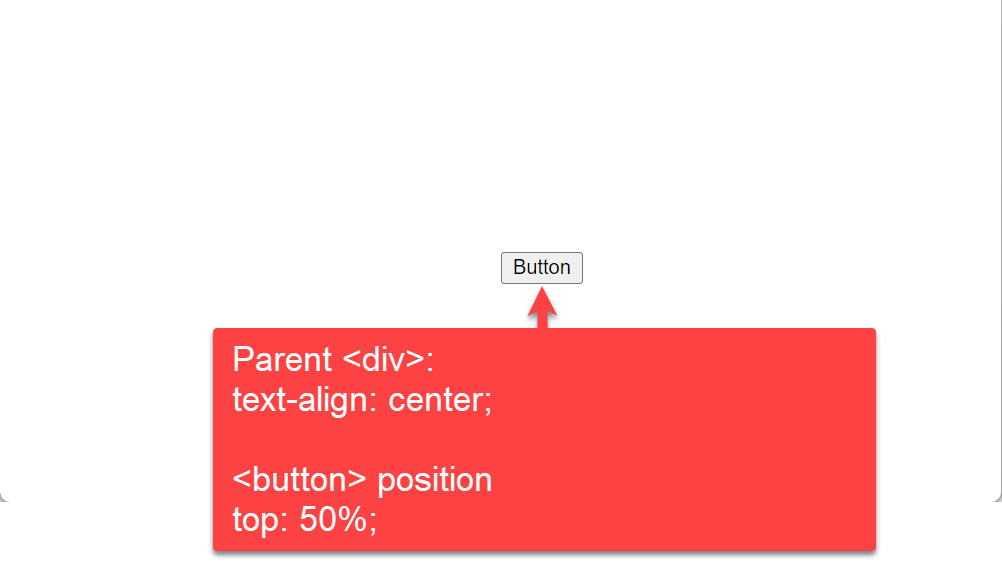
In this example, we are using text-align: center property to the parent div and button position 50% from top «top: 50%;«.
.button-container-div < text-align: center; >.buttonIn this example, we have used HTML and CSS to align the button on the web page to the center. Here, we discuss the code block in detail:
We have assigned the style information of the button using the HTML tag. The text-align property of CSS aligns the inline-level content (here button) to a horizontal alignment. In this example, we used text-align: center property to the parent div and button position 50% from top «top: 50%;».
Then, we used the HTML tag that acts as a container of the CSS text-align property. Lastly, we added a button on the web page using the HTML tag. The web page will look like this:
3.2: By setting position property to 50% from top and bottom
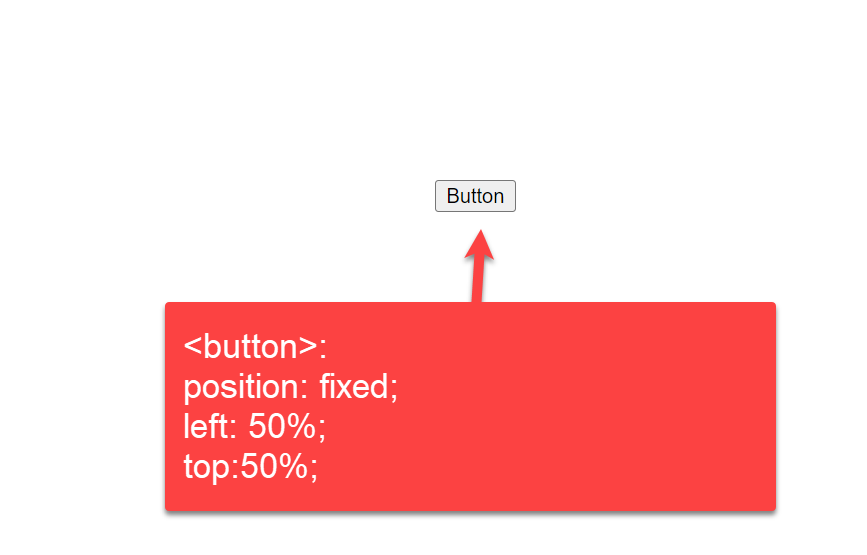
We assigned only one property to the button element in the earlier example. This example will show two positions for the top and bottom. We use position property to tag with left: 50% & top: 50%
.buttonExplanation:
The above example shows how to align the button in the HTML page using two position properties of the CSS element. Here, we set the position property as «fixed» and align the button to the center using two properties, namely left and top — to 50%. Finally, we used the HTML button> tag inside the tag to create the main page button.
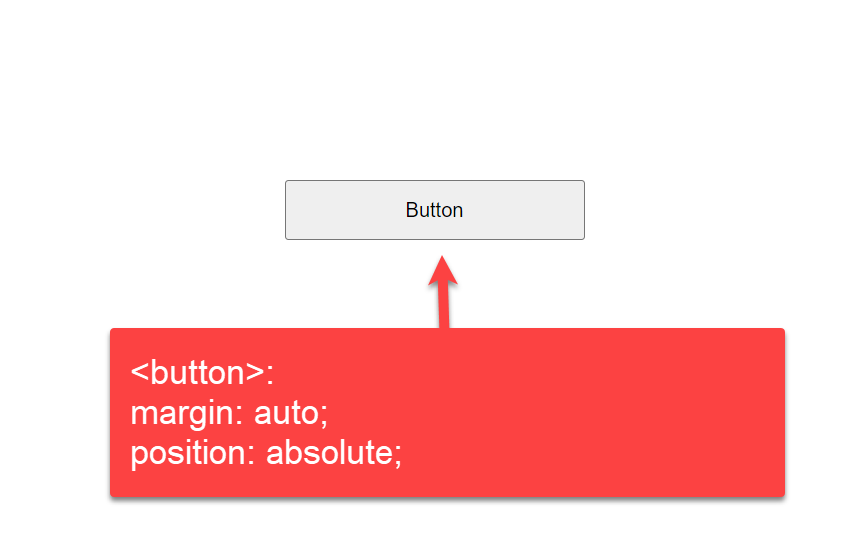
3.3: By setting margin property to auto
In this example, we are using margin: auto CSS property to tag
.buttonExplanation:
In this example, we are using margin: auto CSS property to tag. This property will set the alignment of the CSS button with white spaces. The margin property creates spaces around elements, and we are assigning it to «auto.» Inside the button element of the tag, we add some styles using properties like height, width, top, bottom, left, right, and position that define the button alignment. Finally, we add the HTML tag inside the tag to create the main page button.
4. Center CSS Button using Position fixed
In this example, we are giving a 50% margin from the left side of the page, and then we are taking the position: fixed so it will adjust the position on the center of the body.
button5. By setting the display property to flex (display: flex)
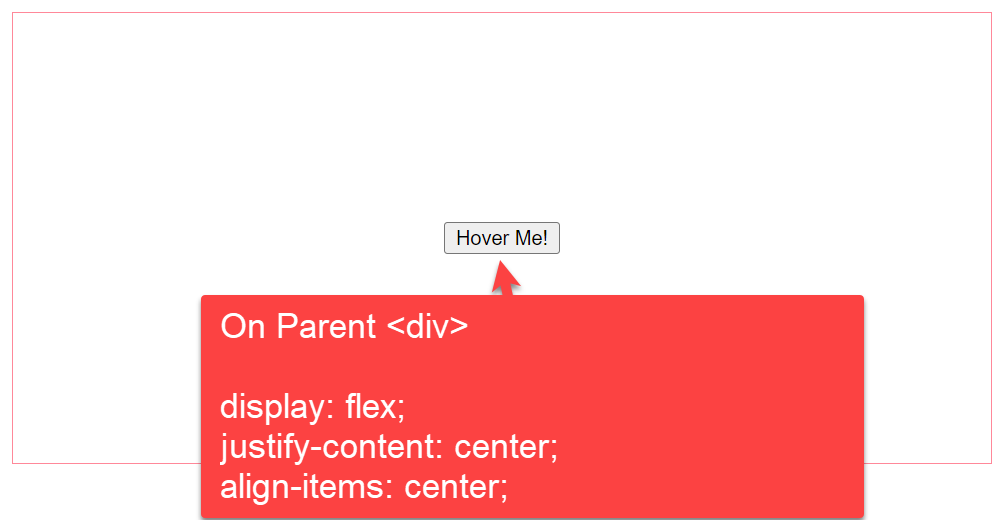
In this example we are using `display` flex property, `justify-content` and `align-items` to the parent tag with class (button-container-div). The button inside will take place in the center of vertical and horizontal position.
- Display flex will move it to the center vertically.
- Justify-content will move the button to the center horizontally.
- Align-items center keeps it in the center; otherwise, it will start from the div and go at the bottom of the div.
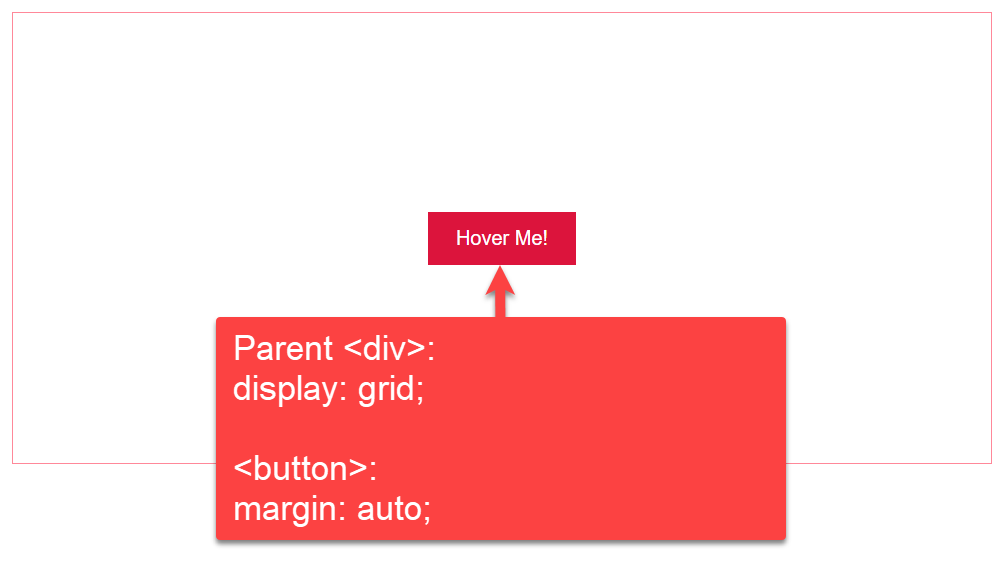
.button-container-div6. By setting the display property to the grid (display: grid)
In this example, we are using `display` grid property on the tag with class ( button-container-div ). The button inside will take place in the center of vertical and horizontal positions.
.button-container-div < width: 100%; height: 300px; border: 1px solid #ff8899; display: grid; >button7. Using CSS Bootstrap
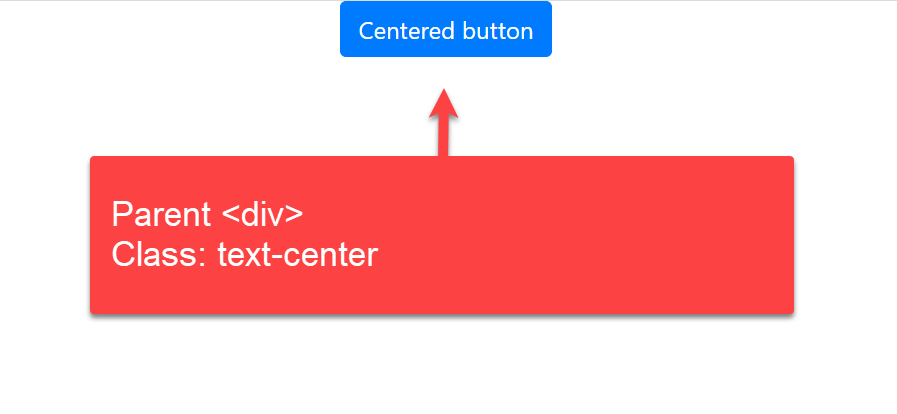
In CSS Bootstrap we can use class «text-center» as given in the example
Explanation:
We will see how to use the CSS Bootstrap with the class «text-center» in this last example. Inside the button, we used the tag with type and class attributes. The rel attribute of the tag defines the relation between the current and the linked document.
The integrity attribute allows the browser to check the fetched script, and the crossorigin attribute sets the request mode to an HTTP CORS Request.
We hope this article has given a crisp idea of how to align the button in the HTML page using different approaches to CSS. We have shown alignment vertically and horizontally using text-align, margin, and position properties of the tag in HTML and CSS Bootstrap.
- Difference between Sensor and Transducer
- BitTorrent vs Utorrent
- Difference between GSM and CDMA
- Difference between NSE and BSE
- HTML Button Link
- HMO vs. PPO
- Diploma vs. Degree
- Difference between FOR and WHILE Loop
- Woocommerce vs Shopify
- Difference between Structure and Union in C
- Difference between StringBuffer and String
- Difference between Money Market and Savings
- Difference between Marketing and Selling
- Arduino vs Raspberry Pi
- Difference between Data and Information
- Differences between Malloc and Calloc Functions in C Language
- Visa vs Mastercard
- Mutex vs Semaphore
- Difference between Analog and Digital Signal
- Difference between Microprocessor and Microcontroller
.png)