Hello Guys! Welcome to Coding Torque. In this blog, I’m going to explain to you how to make a custom calendar using HTML, CSS, and JavaScript. This will be a step-by-step guide including HTML and CSS. Let’s get started 🚀.
Let’s cover HTML Part
We use HTML to make the skeleton of a website. HTML is a markup language. Now let’s import the font awesome CDN in our HTML
tag. fontawesome is a library that is used for icons in a website.
Этот виджет календаря не требует внешних библиотек, поскольку он написан исключительно на JavaScript, CSS и HTML. Из внешних источников используется только Font Awesome CSS для клавиш навигации, но при желании их тоже можно заменить на собственные.
Структура HTML
В HTML загрузите Reset CSS , чтобы очистить форматирование HTML-элементов в браузере по умолчанию. Аналогичным образом загрузите Font Awesome CSS для значков, добавив следующие ссылки CDN в тег заголовка вашей веб-страницы.
Нам нужен элемент div , в котором календарь будет отображаться динамически. Создайте элемент div с именем класса calendar-wrapper , разместите кнопки смены месяца «следующий/предыдущий» и элемент div с идентификатором divCal .
Не забудьте добавить ссылку на будущий файл .js , где будет основной функционал.
Вы можете разместить приведенную выше HTML-структуру в любом месте вашей веб-страницы/приложения, где вы хотите создать виджет календаря.
Создание стилей CSS
После создания оболочки в HTML пришло время настроить макет календаря. Выберите класс calendar-wrapper и определите его ширину, поля, отступы и свойства границы следующим образом. Вы можете установить собственный цвет фона по вашему выбору.
Функция календаря генерирует даты, расположенные в виде таблицы. Таким образом, вы можете легко настроить макет календаря, выбрав элемент таблицы. Ниже приведены стили по умолчанию, вы можете изменить их в соответствии с вашими потребностями.
Класс not-current для элемента td указывает отключенные даты в календаре. Если вы хотите скрыть эти даты, вы можете использовать свойство видимости CSS со «скрытым» значением.
Если вы хотите настроить текущую дату, вы можете выбрать today класс и определить для него стили CSS.
В календаре используется значок Font Awesome внутри кнопок. Эти кнопки навигации по календарю можно настроить, выбрав их по идентификатору. Вы можете установить собственный цвет фона, размер шрифта и значок для этих кнопок в соответствии с вашими потребностями.
Также вы можете определить стиль наведения для кнопок «следующая/предыдущая».
#btnPrev:hover, #btnNext:hover
Добавляем JavaScript
На этом этапе мы можем перейти к главному и добавить функцию JavaScript календаря в свой проект перед закрытием тега body .
var Cal = function(divId) < //Сохраняем идентификатор div this.divId = divId; // Дни недели с понедельника this.DaysOfWeek = [ 'Пн', 'Вт', 'Ср', 'Чтв', 'Птн', 'Суб', 'Вск' ]; // Месяцы начиная с января this.Months =['Январь', 'Февраль', 'Март', 'Апрель', 'Май', 'Июнь', 'Июль', 'Август', 'Сентябрь', 'Октябрь', 'Ноябрь', 'Декабрь']; //Устанавливаем текущий месяц, год var d = new Date(); this.currMonth = d.getMonth(); this.currYear = d.getFullYear(); this.currDay = d.getDate(); >; // Переход к следующему месяцу Cal.prototype.nextMonth = function() < if ( this.currMonth == 11 ) < this.currMonth = 0; this.currYear = this.currYear + 1; >else < this.currMonth = this.currMonth + 1; >this.showcurr(); >; // Переход к предыдущему месяцу Cal.prototype.previousMonth = function() < if ( this.currMonth == 0 ) < this.currMonth = 11; this.currYear = this.currYear - 1; >else < this.currMonth = this.currMonth - 1; >this.showcurr(); >; // Показать текущий месяц Cal.prototype.showcurr = function() < this.showMonth(this.currYear, this.currMonth); >; // Показать месяц (год, месяц) Cal.prototype.showMonth = function(y, m) < var d = new Date() // Первый день недели в выбранном месяце , firstDayOfMonth = new Date(y, m, 7).getDay() // Последний день выбранного месяца , lastDateOfMonth = new Date(y, m+1, 0).getDate() // Последний день предыдущего месяца , lastDayOfLastMonth = m == 0 ? new Date(y-1, 11, 0).getDate() : new Date(y, m, 0).getDate(); var html = '
'; // Запись выбранного месяца и года html += '
'; html += '
' + this.Months[m] + ' ' + y + '
'; html += '
'; // заголовок дней недели html += '
'; > html += '
'; // Записываем дни var i=1; do < var dow = new Date(y, m, i).getDay(); // Начать новую строку в понедельник if ( dow == 1 ) < html += '
'; > // Если первый день недели не понедельник показать последние дни предыдущего месяца else if ( i == 1 ) < html += '
'; var k = lastDayOfLastMonth - firstDayOfMonth+1; for(var j=0; j < firstDayOfMonth; j++) < html += '
'; k++; > > // Записываем текущий день в цикл var chk = new Date(); var chkY = chk.getFullYear(); var chkM = chk.getMonth(); if (chkY == this.currYear && chkM == this.currMonth && i == this.currDay) < html += '
'; > else < html += '
'; > // закрыть строку в воскресенье if ( dow == 0 ) < html += '
'; > // Если последний день месяца не воскресенье, показать первые дни следующего месяца else if ( i == lastDateOfMonth ) < var k=1; for(dow; dow < 7; dow++) < html += '
'; k++; > > i++; >while(i '; // Записываем HTML в div document.getElementById(this.divId).innerHTML = html; >; // При загрузке окна window.onload = function() < // Начать календарь var c = new Cal("divCal"); c.showcurr(); // Привязываем кнопки «Следующий» и «Предыдущий» getId('btnNext').onclick = function() < c.nextMonth(); >; getId('btnPrev').onclick = function() < c.previousMonth(); >; > // Получить элемент по id function getId(id)
Если вам нужно добавить больше функциональности, вы можете соответствующим образом изменить код. Назначение каждой переменной, объекта и функции прокомментировано, поэтому вы можете легко понять, что делает функция календаря.
Заключение
Ну вот мы наконец и перевернули наш календарь. Это довольно простой, но в то же время гибкий пример использования JS в веб-разработке. Виджет написан на чистом JS. При желании вы даже можете исключить из него Font Awesome CSS, чтобы убрать весь внешний код. Это никак не повлияет на функционал. Оформление можно сделать любым на усмотрение, а функционал календаря расширить, добавив собственные функции на ваше усмотрение.
How To Create Calendar Using HTML, CSS & Javascript?
Dear Coders! In this lesson, we’ll use HTML, CSS, and JavaScript to build our Own Calendar. Every day, we consult a calendar to confirm the day and date. Can you, however, conceive of a way we could create our own calendar using HTML, CSS, and JavaScript? Using HTML, CSS, and JavaScript, we will learn how to make our own calendar in this article today.
Do you want to learn HTML to JavaScript? 🔥
If yes, then here is our Master Frontend: Zero to Hero eBook! 📚 In this eBook, you’ll learn complete HTML, CSS, Bootstrap, and JavaScript from beginner to advance level. 💪 It includes 450 Projects with source code.
This project is simple enough for beginners to comprehend right away if they simply read the article. You will have an understanding of how to use javascript to add style to our structure and calendar concept. Simply copy the code into your IDE if you want to save time. We advise you to create separate files for HTML, CSS, and Javascript.
Javascript is the main component of our calendar project.
Let’s now begin to structure our calendar.
Step1: Adding Some Basic HTML.
HTML stands for HyperText Markup Language. This is a markup language. Its main job is to give our project structure. We will provide our project structure by utilizing this markup language. So let’s look at our HTML code.
We have used minimum HTML code to add the basic structure to our calendar. First of all, we have added the external file link to our head section in order to add styling to our project.
The styling for our calendar will be added utilizing the div block level tag that we have now introduced. Even when viewing the project output, you will only see a blank page without any styling, thus we have inserted some placeholder text to make it clearer to you that we have added structure to our webpage.
Now we added a basic structure to our webpage. Now using the CSS will be adding our main style to our webpage.
We’ll utilize some simple CSS code. It will be simple for you to understand and attempt to incorporate your style, which will assist you to clarify your concepts. The CSS will be explained step by step.
Step1: First, we’ll import some Google Fonts using some Google Font Links so that we may use them later to give our project some flair.
Now using the root selector we will be defining some styling to our root element so that we can inherit our style from the root selector.
Step2: Now we will add padding and margin as “zero” to our element using the universal (*) selector.
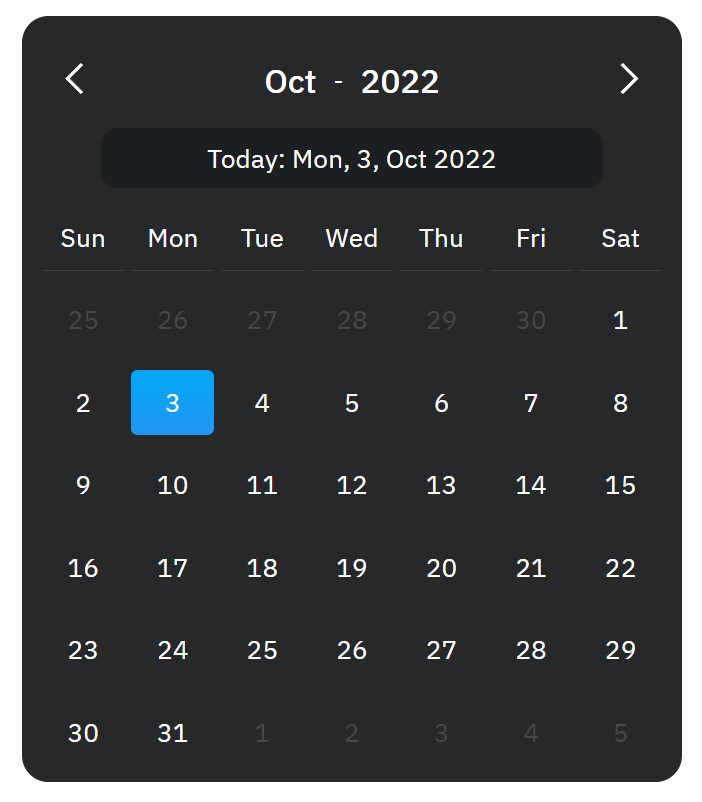
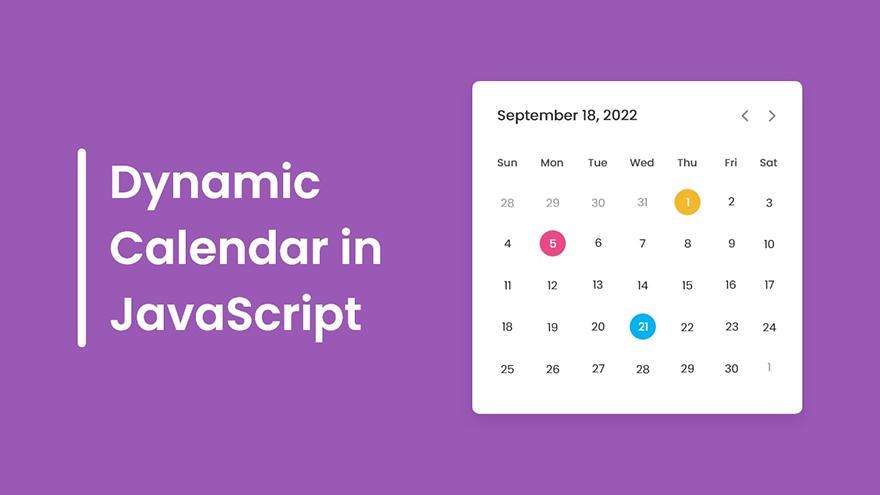
Build a Dynamic Calendar using HTML5, CSS3 & JavaScript
In this tutorial, I will teach you how to make a dynamic calendar using HTML5, CSS3, and JavaScript. The full source code of the JavaScript calendar is given below.
HTML5, CSS3, JavaScript Calendar Source Code
index.html
script.js
const daysTag = document.querySelector(".days"), currentDate = document.querySelector(".current-date"), prevNextIcon = document.querySelectorAll(".icons span"); // getting new date, current year and month let date = new Date(), currYear = date.getFullYear(), currMonth = date.getMonth(); // storing full name of all months in array const months = ["January", "February", "March", "April", "May", "June", "July", "August", "September", "October", "November", "December"]; const renderCalendar = () => < let firstDayofMonth = new Date(currYear, currMonth, 1).getDay(), // getting first day of month lastDateofMonth = new Date(currYear, currMonth + 1, 0).getDate(), // getting last date of month lastDayofMonth = new Date(currYear, currMonth, lastDateofMonth).getDay(), // getting last day of month lastDateofLastMonth = new Date(currYear, currMonth, 0).getDate(); // getting last date of previous month let liTag = ""; for (let i = firstDayofMonth; i >0; i--) < // creating li of previous month last days liTag += ` `; >for (let i = 1; i for (let i = lastDayofMonth; i < 6; i++) < // creating li of next month first days liTag += ` ` >currentDate.innerText = `$ $`; // passing current mon and yr as currentDate text daysTag.innerHTML = liTag; > renderCalendar(); prevNextIcon.forEach(icon => < // getting prev and next icons icon.addEventListener("click", () => < // adding click event on both icons // if clicked icon is previous icon then decrement current month by 1 else increment it by 1 currMonth = icon.id === "prev" ? currMonth - 1 : currMonth + 1; if(currMonth < 0 || currMonth >11) < // if current month is less than 0 or greater than 11 // creating a new date of current year & month and pass it as date value date = new Date(currYear, currMonth); currYear = date.getFullYear(); // updating current year with new date year currMonth = date.getMonth(); // updating current month with new date month >else < date = new Date(); // pass the current date as date value >renderCalendar(); // calling renderCalendar function >); >);