- ESP32: Simple web server using micropython.
- Recent Posts
- MicroPyServer простой HTTP сервер для ESP8266 и ESP32
- Что такое MicroPyServer?
- Список методов MicroPyServer
- Примеры
- Hello world
- Простой пример настройки роутинга и управления выводом GPIO
- Вывод информации с датчика DHT в JSON
- Опыт использования
- Saved searches
- Use saved searches to filter your results more quickly
- License
- devil557/esp32-micropython-server
- Name already in use
- Sign In Required
- Launching GitHub Desktop
- Launching GitHub Desktop
- Launching Xcode
- Launching Visual Studio Code
- Latest commit
- Git stats
- Files
- README.md
- About
ESP32: Simple web server using micropython.
ESP32 is a low cost microcontroller that comes with Wi-Fi and Bluetooth connectivity interfaces. We can develop programs for ESP32 using Arduino and ESP-IDF frameworks. We have explained how to develop a simple LED blink program using ESP-IDF in our previous blog https://c2plabs.com/blog/2021/12/31/esp32-led-blink-tutorial-using-esp-idf-freertos-framework/. In addition to these frameworks ESP32 also supports Micropython. ESP32 micropython supports different Microcontroller peripherals like GPIOS, I2C, SPI etc, and also supports Wi-Fi connectivity and socket programming. In this blog post we will show how to develop a simple Web Server program using micropython. We are using ESP32 NodeMCU and Ubuntu Linux host for this demo. Thonny python IDE is used for Micropython application development
Micropython firmware for ESP32 NodeMCU is available at https://micropython.org/download/esp32/ for download. Once the the firmware is downloaded, flash to NodeMCU using below commands
epstool.py –chip esp32 –port /dev/ttyUSB0 erase_flash
esptool.py –chip esp32 –port /dev/ttyUSB0 –baud 115200 write_flash -z 0x1000
Once the Micropython firmware download is completed, launch Thonny IDE and connect to ESP32 board.
Micro-python’s machine library required for using GPIOs, ADC etc, network library is required to establish Wi-Fi connection, python socket library is used to TCP/IP socket communication, import all these required libraries
from machine import Pin, ADC
from utime import sleep_ms
import network
import socket
import esp32
Setup Wi-Fi connection:
ESP32 can be configured as Wi-Fi station or soft AP using micropython. In this example we are configuring esp32 as Wi-Fi station using
station = network.WLAN(network.STA_IF) #network.AP_IF is used to configure as Soft AP.
station.active(True) # This method activates Wi-Fi stack of ESP32
Connect to Wi-Fi access point using credentials station.connect(ssid, password) and check IP print the IP address.
Http Server:
Once ESP32 is connected to Wi-Fi network create TCP/IP socket using python socket library
sock = socket.socket(socket.AF_INET, socket.SOCK_STREAM), bind this socket with local IP and port 80 which is the port for http protocol. After the socket is bind to local IP, start listening for new client connections. Start While loop for accepting new client connection and respond with html string which creates a simple web page which updates temperature sensor value connected to ADC3 pin and esp32 on-board hall effect sensor value.
Simple HTML Page:
The html page we are sending contains meta tag for refreshing browser for every 2 seconds.
and Temperature sensor value is read using the read_temp() function which returns temperature value from simple LM35 sensor connected to ADC3 pin.
Temperature in Celcius: “”” + read_temp() + “””
Along with temperature value, this html page contains hall effect sensor reading
Magnetic field: ””” + str(esp32.hall_sensor()) + “””
We can see browser keep refreshing for every two seconds and sensor values getting displayed on webpage.
Complete working code is give below.
from machine import Pin, ADC import network import socket import esp32 import esp esp.osdebug(None) import gc gc.collect() ssid = 'myssid' password = 'wifipasswd' temp_adc = ADC(Pin(34)) temp_adc.atten(ADC.ATTN_11DB) def setup_wifi(): station = network.WLAN(network.STA_IF) station.active(True) station.connect(ssid, password) while station.isconnected() == False: pass print('Connection successful') print(station.ifconfig()) def http_server(): sock = socket.socket(socket.AF_INET, socket.SOCK_STREAM) sock.bind(('', 80)) sock.listen(5) while True: client, addr = sock.accept() print('Client %s is connected' % str(addr)) request = client.recv(1024) request = str(request) response = web_page() client.send('HTTP/1.1 200 OK\n') client.send('Content-Type: text/html\n') client.send('Connection: close\n\n') client.sendall(response) client.close() def read_temp(): temp_dig=temp_adc.read() print(temp_dig) temp_c = str((temp_dig/4096) * 330) return temp_c def web_page(): html_str=""" C2PLABS Demo
Temperature in Celcius: """ + read_temp() + """
Magnetic field: """ + str(esp32.hall_sensor()) + """
html """ return html_str def main(): setup_wifi() http_server() if __name__ == "__main__": main() Recent Posts
MicroPyServer простой HTTP сервер для ESP8266 и ESP32
Хочу рассказать о библиотеке MicroPyServer написанной на Python, которая позволяет взаимодействовать с устройствами ESP8266 и ESP32 посредством простого HTTP сервера.
Что такое MicroPyServer?
MicroPyServer это простой HTTP сервер предназначенный для проектов написанных на Micropython.
Основная концепция работы с библиотекой — это перехватывание запросов к устройству при помощи создания роутов (route) и функций обработчиков (handler).
Основные действия с библиотекой:
def do_something(request): pass() srv.add_route("/url_path", do_something)def do_something(request): srv.send("OK")Список методов MicroPyServer
Конструктор — srv = MicroPyServer(host=»0.0.0.0″, port=80)
Запустить сервер — srv.start()
Добавление роута — srv.add_route(path, handler, method=»GET»)
Отправить ответ — srv.send(response, status=200, content_type=»Content-Type: text/plain», extra_headers=[])
Отправить 404-ю ошибку — srv.not_found()
Отправить 500-ю ошибку — srv.internal_error(error)
Примеры
Рассмотрим несколько небольших примеров работы с библиотекой MicroPyServer.
Hello world
Классический пример hello world.
from micropyserver import MicroPyServer import esp import network ''' Код подключения к WiFi ''' wlan_id = "Your WiFi" wlan_pass = "Your WiFi password" wlan = network.WLAN(network.STA_IF) wlan.active(True) if wlan.isconnected() == False: wlan.connect(wlan_id, wlan_pass) while wlan.isconnected() == False: time.sleep(1) print('Device IP:', wlan.ifconfig()[0]) def show_message(request): ''' request handler ''' server.send("HELLO WORLD!") server = MicroPyServer() ''' add request handler ''' server.add_route("/", show_message) ''' start server ''' server.start()Набрав у браузере адрес http://IP_вашего_устройства/ вы получите сообщение «HELLO WORLD!»
Простой пример настройки роутинга и управления выводом GPIO
В данном примере настроим обработку двух урлов которые будут делать: «включение» (/on) и «выключение» (/off) светодиода подключенного к выходу D7 ESP8266.

from machine import Pin from micropyserver import MicroPyServer ''' Тут должен быть код подключения к WiFi ''' def do_on(request): ''' on request handler ''' pin.value(1) server.send("ON") def do_off(request): ''' off request handler ''' pin.value(0) server.send("OFF") pin = machine.Pin(13, machine.Pin.OUT) server = MicroPyServer() ''' add request handlers ''' server.add_route("/on", do_on) server.add_route("/off", do_off) ''' start server ''' server.start()В итоге набрав у браузере адрес http://IP_вашего_устройства/on вы включите подключенный к выходу D7 светодиод и в браузере выведется сообщение «ON». Соответственно набрав у браузере адрес http://IP_вашего_устройства/off вы выключите светодиод.
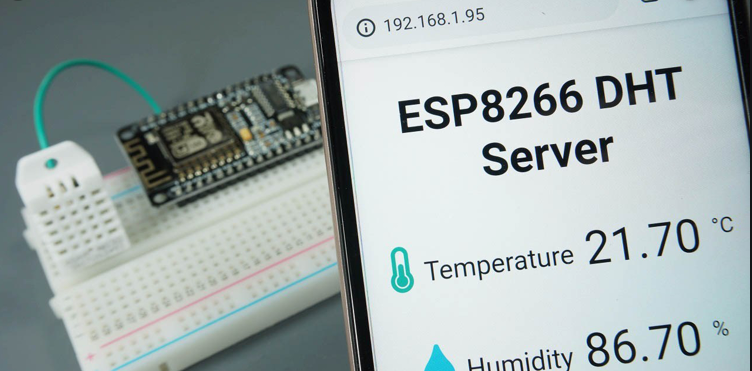
Вывод информации с датчика DHT в JSON
В данном примере показано как получить данные с датчика влажности и температуры DHT22 в виде JSON.
import json import dht from machine import Pin from micropyserver import MicroPyServer ''' Тут должен быть код подключения к WiFi ''' def show_data(request): ''' request handler ''' d = dht.DHT22(machine.Pin(4)) d.measure() data = json_str = json.dumps(data) server.send(json_str, content_type="Content-Type: application/json") server = MicroPyServer() ''' add request handler ''' server.add_route("/data", show_data) ''' start server ''' server.start()Набрав у браузере адрес http://IP_вашего_устройства/data получим JSON строку с данными
Опыт использования
Данная библиотека используется в нескольких моих устройствах, которые работают в режиме 24/7 уже более полугода. На данный момент никаких проблем с сервером я не обнаружил и надеюсь, что в будущем код сервера будет работать также без проблем как и сейчас.
Saved searches
Use saved searches to filter your results more quickly
You signed in with another tab or window. Reload to refresh your session. You signed out in another tab or window. Reload to refresh your session. You switched accounts on another tab or window. Reload to refresh your session.
This is an asynchronous ESP32 web server with the DHT11 that displays temperature and humidity using esp32 using MicroPython Code.
License
devil557/esp32-micropython-server
This commit does not belong to any branch on this repository, and may belong to a fork outside of the repository.
Name already in use
A tag already exists with the provided branch name. Many Git commands accept both tag and branch names, so creating this branch may cause unexpected behavior. Are you sure you want to create this branch?
Sign In Required
Please sign in to use Codespaces.
Launching GitHub Desktop
If nothing happens, download GitHub Desktop and try again.
Launching GitHub Desktop
If nothing happens, download GitHub Desktop and try again.
Launching Xcode
If nothing happens, download Xcode and try again.
Launching Visual Studio Code
Your codespace will open once ready.
There was a problem preparing your codespace, please try again.
Latest commit
Git stats
Files
Failed to load latest commit information.
README.md
ESP32: Micropython Web server with SYSTEM control panel + Weather Station
" Connecting world ,down to Earth" 
This is an asynchronous ESP32 web server with the DHT11 that displays temperature and humidity using esp32 using MicroPython Code. We will first interface the Sensor with ESP32 only and check the temperature and humidity reading in Shell Window. Similarly, we will add extra 0.96″/1.3″ I2C oled display to the same circuit and display the Humidity Temperature reading on OLED Screen.


-User are able to control , system remotely - system reboot, deep sleep ,led on ,led off, send mail. -User will get email that contain device data. -The web server we’ll build updates the readings automatically with the need to refresh the web page. -Display the Humidity Temperature reading on OLED Screen. 
-ESP32 ESP-32S Development Board (ESP-WROOM-32) -DHT11 Humidity Temperature Sensor -Jumper Wires -Breadboard - Oled 
DHT11 Humidity Temperature Sensor


The DHT11 is a basic, ultra low-cost digital temperature and humidity sensor. It uses a capacitive humidity sensor and a thermistor to measure the surrounding air, and spits out a digital signal on the data pin (no analog input pins needed).
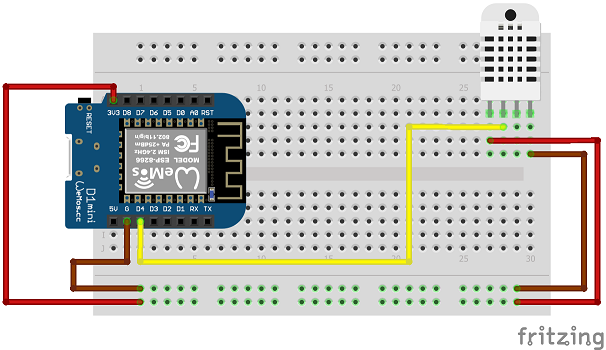
Interfacing DHT11 Sensor with ESP32 using MicroPython Code DHT11 Sensor & ESP32 & start with MicroPython Code for measuring Humidity & Temperature. The connection is fairly simple. Connect the DHT11 VCC & GND pin to ESP32 3.3V Pin & GND Pin. Connect the digital output pin to ESP32 GPIO5 Pin.


ESP32 DHT11 MicroPython Code
from machine import Pin from time import sleep import dht sensor = dht.DHT11(Pin(5)) while True: try: sleep(2) sensor.measure() t = sensor.temperature() h = sensor.humidity() print('Temperature: %3.1f C' %t) print('Humidity: %3.1f %%' %h) except OSError as e: print('Sensor Reading Failed') Monitor DHT11 Humidity Temperature Data on OLED with MicroPython Code Here is the connection diagram. The OLED Display is an I2C Module. So connect the SDA & SCL pin of OLED Display to ESP32 D26 & D25 Pin respectively.


Open a browser and type the ESP32 IP address. Your web server should display the latest sensor readings.


About
This is an asynchronous ESP32 web server with the DHT11 that displays temperature and humidity using esp32 using MicroPython Code.