- Builder Design Pattern
- Кофе-брейк #124. Паттерн проектирования Builder. Как работает сериализация и десериализация в Java
- Зачем нам нужен паттерн проектирования Builder?
- Что такое паттерн проектирования Builder?
- Как реализовать паттерн проектирования Builder в Java?
- Пример:
- Как работает сериализация и десериализация в Java
- Что такое сериализация и десериализация
- Пример сериализации и десериализации
- Сериализация
- Десериализация
Builder Design Pattern
The builder pattern, as the name implies, is an alternative way to construct complex objects. This pattern should be used when we want to build different immutable objects using the same object building process.
1. The GoF Builder Pattern
Before starting the discussion, I want to make it clear that the builder pattern which we are going to discuss in this post, is slightly different from what is mentioned in GangOfFour “Design Patterns” book. The book says:
The builder pattern is a design pattern that allows for the step-by-step creation of complex objects using the correct sequence of actions. The construction is controlled by a director object that only needs to know the type of object it is to create.
And the book gives examples like below:
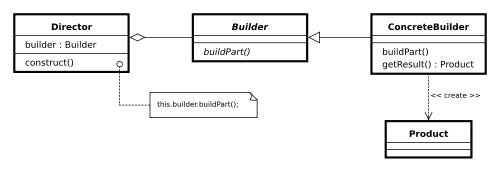
I find it hard to use the above example in real-life programming and applications. The above process is very much similar (not exactly) to the abstract factory pattern, where we find a factory (or builder) for a specific type of object, and then the factory gives us a concrete instance of that object.
The only big difference between the builder pattern and the abstract factory pattern is that builder provides us more control over the object creation process, and that’s it. Apart from it, there are no major differences.
In one sentence, abstract factory pattern is the answer to «WHAT» and the builder pattern to «HOW» .
Now from here, we will start discussing the builder pattern in the way I find it useful especially in practical cases.
2. Definition of Builder Pattern
Let’s start by giving a definition of the builder pattern:
Builder pattern aims to “Separate the construction of a complex object from its representation so that the same construction process can create multiple different representations.”
A builder pattern should be more like a fluent interface. A fluent interface is normally implemented by using method cascading (or method chaining) as we see it in lambda expressions.
3. Where do we require the Builder Pattern?
We already know the benefits of immutability and immutable instances in an application. If you have any questions about it, let me remind you of the String class in Java. And as I already said, the builder pattern helps us in creating immutable classes with a large set of state attributes.
Let’s discuss a common problem in our application. The primary entity in any user management module is User , let’s say. Ideally and practically as well, once a User object is fully created, we will not want to change its state. It simply does not make sense, right?
Now, let’s assume our User object has the following 5 attributes i.e. firstName , lastName , age , phone and address .
In normal practice, if we want to make an immutable User class, then we must pass all five pieces of information as parameters to the constructor. It will look like this:
public User (String firstName, String lastName, int age, String phone, String address)
Very good. Now what if only firstName and lastName are mandatory, and the rest 3 fields are optional. Problem !! We need more constructors. This problem is called the telescoping constructors problem.
public User (String firstName, String lastName, int age, String phone) < . >public User (String firstName, String lastName, String phone, String address) < . >public User (String firstName, String lastName, int age) < . >public User (String firstName, String lastName)
We will need some more like the above. Still can manage? Now let’s introduce our sixth attribute i.e. salary. Now it is problem.
One way is to create more constructors, and another is to lose the immutability and introduce setter methods. You choose any of both options, and you lose something, right?
Here, the builder pattern will help you to consume additional attributes while retaining the immutability of the User class.
4. Implementing Builder Pattern
Lombok’s @Builder annotation is a useful technique to implement the builder pattern.
Let’s solve the above problem in code. The given solution uses an additional class UserBuilder which helps us in building desired User instance with all mandatory attributes and a combination of optional attributes without losing the immutability.
public class User < //All final attributes private final String firstName; // required private final String lastName; // required private final int age; // optional private final String phone; // optional private final String address; // optional private User(UserBuilder builder) < this.firstName = builder.firstName; this.lastName = builder.lastName; this.age = builder.age; this.phone = builder.phone; this.address = builder.address; >//All getter, and NO setter to provde immutability public String getFirstName() < return firstName; >public String getLastName() < return lastName; >public int getAge() < return age; >public String getPhone() < return phone; >public String getAddress() < return address; >@Override public String toString() < return "User: "+this.firstName+", "+this.lastName+", "+this.age+", "+this.phone+", "+this.address; >public static class UserBuilder < private final String firstName; private final String lastName; private int age; private String phone; private String address; public UserBuilder(String firstName, String lastName) < this.firstName = firstName; this.lastName = lastName; >public UserBuilder age(int age) < this.age = age; return this; >public UserBuilder phone(String phone) < this.phone = phone; return this; >public UserBuilder address(String address) < this.address = address; return this; >//Return the finally consrcuted User object public User build() < User user = new User(this); validateUserObject(user); return user; >private void validateUserObject(User user) < //Do some basic validations to check //if user object does not break any assumption of system >> >And below is the way we will use the UserBuilder in our code:
public static void main(String[] args) < User user1 = new User.UserBuilder("Lokesh", "Gupta") .age(30) .phone("1234567") .address("Fake address 1234") .build(); System.out.println(user1); User user2 = new User.UserBuilder("Jack", "Reacher") .age(40) .phone("5655") //no address .build(); System.out.println(user2); User user3 = new User.UserBuilder("Super", "Man") //No age //No phone //no address .build(); System.out.println(user3); >Please note that the above-created User object does not have any setter method, so its state can not be changed once it has been built. This provides the desired immutability.
Sometimes developers may forget to add a few attributes to the User class. While adding a new attribute and containing the source code changes to a single class (SRP), we should enclose the builder inside the class (as in the above example). It makes the change more obvious to the developer that there is a relevant builder that needs to be updated too.
Sometimes I think there should be a destroyer pattern (opposite to builder) that should tear down certain attributes from a complex object in a systematic manner. What do you think?
5. Existing Implementations in JDK
All implementations of java.lang.Appendable are infact good examples of the use of Builder pattern in java. e.g.
- java.lang.StringBuilder#append() [Unsynchronized class]
- java.lang.StringBuffer#append() [Synchronized class]
- java.nio.ByteBuffer#put() (also on CharBuffer, ShortBuffer, IntBuffer, LongBuffer, FloatBuffer and DoubleBuffer)
- Another use can be found in javax.swing.GroupLayout.Group#addComponent().
Look how similar these implementations look to what we discussed above.
StringBuilder builder = new StringBuilder("Temp"); String data = builder.append(1) .append(true) .append("friend") .toString();Undoubtedly, the number of lines of code increases at least to double in the builder pattern, but the effort pays off in terms of design flexibility and much more readable code.
The parameters to the constructor are reduced and are provided in highly readable chained method calls. This way there is no need to pass in null for optional parameters to the constructor while creating the instance of a class.
Another advantage is that an instance is always instantiated in a complete state rather than sitting in an incomplete state until the developer calls (if ever calls) the appropriate “setter” method to set additional fields.
And finally, we can build immutable objects without much complex logic in the object building process.
Though the Builder pattern reduces some lines of code by eliminating the need for setter methods, still it doubles up total lines by introducing the builder object. Furthermore, although client code is more readable, the client code is also more verbose. Though for me, readability weighs more than lines of code.
That’s the only disadvantage I can think of.
Кофе-брейк #124. Паттерн проектирования Builder. Как работает сериализация и десериализация в Java


Источник: Medium В этой статье мы узнаем, как проектировать и создавать объекты для класса, используя паттерн проектирования Builder .
Зачем нам нужен паттерн проектирования Builder?
- Наличие слишком многих аргументов для передачи из клиентской программы в класс Factory может приводить к возникновению ошибок, поскольку в большинстве случаев тип аргументов здесь один и тот же, а со стороны клиента трудно поддерживать порядок аргументов.
- Некоторые параметры могут быть необязательными, но в паттерне Factory мы вынуждены отправлять все параметры, а необязательные параметры необходимо отправлять как файлы NULL.
- Если объект “тяжелый” и со сложной разработкой, то все эти трудности станут частью классов Factory, что часто приводит к путанице.
Что такое паттерн проектирования Builder?
Паттерн Builder решает проблему с большим количеством необязательных параметров и непоследовательных состояний, предоставляя способ пошагового создания объекта. Для этого используется метод, который фактически возвращает окончательный объект.
Как реализовать паттерн проектирования Builder в Java?
- Создайте статический вложенный класс ( static nested class ) как класс Builder , а затем скопируйте все поля из внешнего класса в класс Builder . Мы должны следовать соглашению об именах, поэтому если имя класса Person , то класс Builder должен называться как PersonBuilder .
- Класс Builder должен иметь общедоступный конструктор со всеми необходимыми полями в качестве параметров.
- Класс Builder должен иметь методы для установки необязательных параметров, и он должен возвращать тот же объект Builder после установки необязательного поля.
- Последним шагом является предоставление метода build() в классе Builder , который будет возвращать объект, необходимый клиентской программе. Для этого нам нужно иметь частный конструктор в основном классе с классом Builder в качестве аргумента.
Пример:
public class Employee < private String name; private String company; private boolean hasCar;//optional private boolean hasBike;//optional private Employee(EmployeeBuilder employeeBuilder) < name = employeeBuilder.name; company = employeeBuilder.company; hasCar = employeeBuilder.hasCar; hasBike = employeeBuilder.hasBike; >public String getName() < return name; >public String getCompany() < return company; >public boolean isHasCar() < return hasCar; >public boolean isHasBike() < return hasBike; >public static class EmployeeBuilder < private String name; private String company; private boolean hasCar;//optional private boolean hasBike;//optional //constructor for required fields public EmployeeBuilder(String name, String company) < this.name = name; this.company = company; >//setter methods for optional fields public EmployeeBuilder setHasCar(boolean hasCar) < this.hasCar = hasCar; return this; >public EmployeeBuilder setHasBike(boolean hasBike) < this.hasBike = hasBike; return this; >//Build the Employee object public Employee build() < return new Employee(this); >> > class TestBuilder < public static void main(String[] args) < //Building the object of Employee thru the build() method provided in EmployeeBuilder class. Employee employee = new Employee.EmployeeBuilder("Vikram", "ABC").setHasBike(false).setHasBike(true).build(); >> Пример шаблона Builder : в java.lang.StringBuilder и java.lang.StringBuffer использовали шаблон Builder для построения объектов.
Как работает сериализация и десериализация в Java
Источник: Medium Я перешел на Java в январе этого года после стажировки. До этого я в основном писал на PHP и немного на JavaScript. Ранее мне не приходилось сталкиваться с сериализацией, хотя на самом деле сериализация существует и в PHP. Правда, в Java она используется намного чаще. Сегодня я познакомлю вас, как работает сериализация и десериализация в Java и расскажу о нескольких способах их применения.
Что такое сериализация и десериализация
Сериализация — это преобразование объекта из класса в последовательность байтов на виртуальной машине Java (JVM) для передачи на другую виртуальную машину Java. Если виртуальная машина Java воссоздает объект из байтов, то этот процесс называется десериализацией.
Пример сериализации и десериализации
Сериализация
import java.io.*; public class Person implements Serializable < int name = "empty"; public Person(int identity, String nomenclature) < name = nomenclature; id = identity; >> Класс Person реализует Serializable , чтобы его объект можно было сериализовать/десериализовать. Класс Person имеет два поля: идентификатор и имя, которые изменяются от значения по умолчанию при создании экземпляра класса. В пакет Java.io были импортированы интерфейс Serializable и другие классы, используемые в программе.
public static void main(String[] args) throws FileNotFoundException, IOException < String filename = "filename here"; Person person = new Person(1, "John"); // serialization ObjectOutputStream out = new ObjectOutputStream(new FileOutputStream(filename)); try < out.writeObject(person); System.out.println("Success"); >catch(Exception e) < System.out.println("Unsuccessful"); >finally < if(out != null) < out.close(); >> > Как вы знаете, основной метод запускает сериализацию и выводит сообщение об успешном результате, в противном случае печатается сообщение об ошибке. Для сериализации объектов мы используем ObjectOutputStream и метод writeObject .
Десериализация
public static void main(String[] args) throws FileNotFoundException, IOException < String filename = "filename here"; Person person = new Person(1, "John"); // Deserialization ObjectInputStream in = new ObjectInputStream(new FileInputStream(filename)); try < Person personObj = (Person)in.readObject(); System.out.println("Person Id is " +personObj.id + " while name is " + personObj.name); >catch (Exception e) < e.printStackTrace(); >finally < if(in != null) < in.close(); >> > Десериализация является обратным действием по отношению к сериализации. Для восстановления объекта из последовательности байтов используется ObjectInputStream и метод readObject . Заметьте, что для обеспечения доступа к полям в классе Person объект приведен к типу данных Person . Объект класса, который не реализует интерфейс сериализации, не может быть сериализован. Поэтому любой класс, который ссылается на класс, реализующий интерфейс сериализации, должен сам реализовывать интерфейс сериализации, иначе будет выдано исключение. Сериализация не зависит от платформы, то есть сериализуемый поток байтов может десериализоваться другой виртуальной машиной Java. Статические и переходные поля не сериализуются, поэтому если у вас есть поле, которое вы не хотите сериализовать, сделайте его временным или статическим. В случае статического поля оно не сериализуется, потому что статическое поле принадлежит классу, а не объекту. Из-за этого переходное состояние предотвращает сериализацию поля. Сериализация применяется в Hibernate, JPA и RMI. Сериализацию также можно настроить. Это называется пользовательской сериализацией.