- HTML Links
- HTML Links — Hyperlinks
- HTML Links — Syntax
- Example
- HTML Links — The target Attribute
- Example
- Absolute URLs vs. Relative URLs
- Example
- Absolute URLs
- Relative URLs
- HTML Links — Use an Image as a Link
- Example
- Link to an Email Address
- Example
- Button as a Link
- Example
- Link Titles
- Using Browser Link in Visual Studio 2013
- Browser Refresh
- Viewing the Browser Link Dashboard
- Enabling Browser Link for Static HTML Files
- Disabling Browser Link
- How Does It Work?
- Использование ссылки на браузер в Visual Studio 2013
- Обновление браузера
- Просмотр панели мониторинга ссылок в браузере
- Включение ссылки в браузере для статических HTML-файлов
- Отключение ссылки в браузере
- Как это работает?
HTML Links
Links are found in nearly all web pages. Links allow users to click their way from page to page.
HTML Links — Hyperlinks
HTML links are hyperlinks.
You can click on a link and jump to another document.
When you move the mouse over a link, the mouse arrow will turn into a little hand.
Note: A link does not have to be text. A link can be an image or any other HTML element!
HTML Links — Syntax
The link text is the part that will be visible to the reader.
Clicking on the link text, will send the reader to the specified URL address.
Example
This example shows how to create a link to W3Schools.com:
By default, links will appear as follows in all browsers:
- An unvisited link is underlined and blue
- A visited link is underlined and purple
- An active link is underlined and red
Tip: Links can of course be styled with CSS, to get another look!
HTML Links — The target Attribute
By default, the linked page will be displayed in the current browser window. To change this, you must specify another target for the link.
The target attribute specifies where to open the linked document.
The target attribute can have one of the following values:
- _self — Default. Opens the document in the same window/tab as it was clicked
- _blank — Opens the document in a new window or tab
- _parent — Opens the document in the parent frame
- _top — Opens the document in the full body of the window
Example
Use target=»_blank» to open the linked document in a new browser window or tab:
Absolute URLs vs. Relative URLs
Both examples above are using an absolute URL (a full web address) in the href attribute.
A local link (a link to a page within the same website) is specified with a relative URL (without the «https://www» part):
Example
Absolute URLs
W3C
Relative URLs
HTML Images
CSS Tutorial
HTML Links — Use an Image as a Link
To use an image as a link, just put the tag inside the tag:
Example
Link to an Email Address
Use mailto: inside the href attribute to create a link that opens the user’s email program (to let them send a new email):
Example
Button as a Link
To use an HTML button as a link, you have to add some JavaScript code.
JavaScript allows you to specify what happens at certain events, such as a click of a button:
Example
Tip: Learn more about JavaScript in our JavaScript Tutorial.
Link Titles
The title attribute specifies extra information about an element. The information is most often shown as a tooltip text when the mouse moves over the element.
Using Browser Link in Visual Studio 2013
Browser Link is a new feature in Visual Studio 2013 that creates a communication channel between the development environment and one or more web browsers. You can use Browser Link to refresh your web application in several browsers at once, which is useful for cross-browser testing.
Browser Refresh
With Browser Refresh, you can refresh multiple browsers that are connected to Visual Studio through Browser Link.
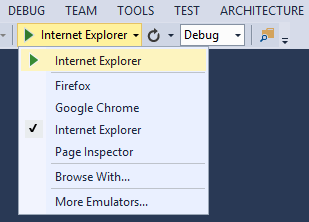
To use Browser Refresh, first create an ASP.NET application, using any of the project templates. Debug the application by pressing F5 or clicking the arrow icon in the toolbar:

You can also use the dropdown to select a specific browser for debugging.
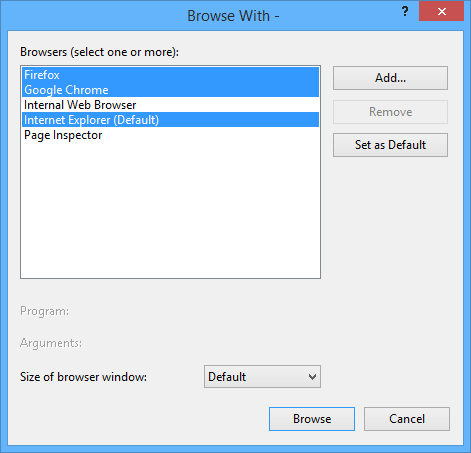
To debug with multiple browsers, select Browse With. In the Browse With dialog, hold down the CTRL key to select more than one browser. Click Browse to debug with the selected browsers. Browser Link also works if you launch a browser from outside Visual Studio and navigate to the application URL.
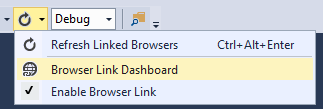
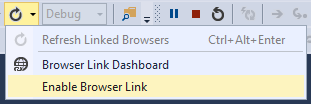
The Browser Link controls are located in the dropdown with the circular arrow icon. The arrow icon is the Refresh button.

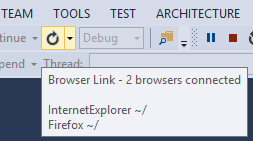
To see which browsers are connected, hover the mouse over the Refresh button while debugging. The connected browsers are shown in a ToolTip window.
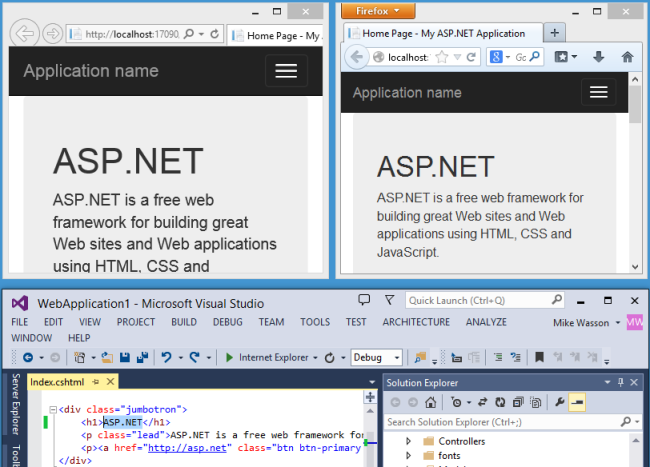
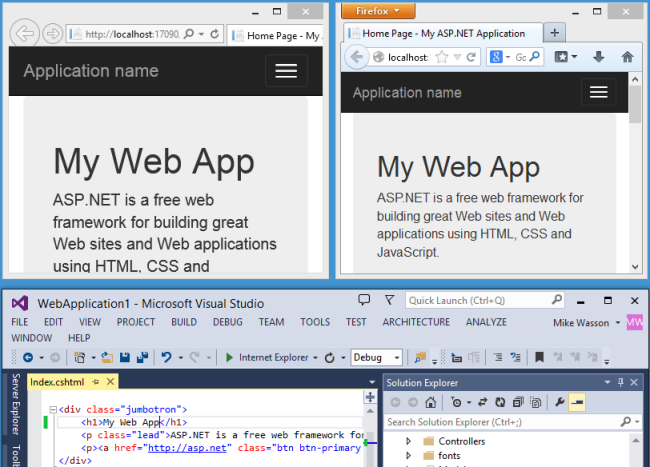
To refresh the connected browsers, click the Refresh button or press CTRL+ALT+ENTER. For example, the following screenshot shows an ASP.NET project, which I created using the MVC 5 project template. You can see the application running in two browsers at the top. At the bottom, the project is open in Visual Studio.

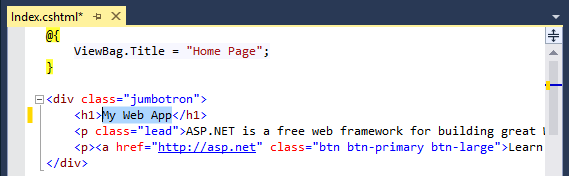
In Visual Studio, I changed the heading for the home page:

When I clicked the Refresh button, the change appeared in both browser windows:

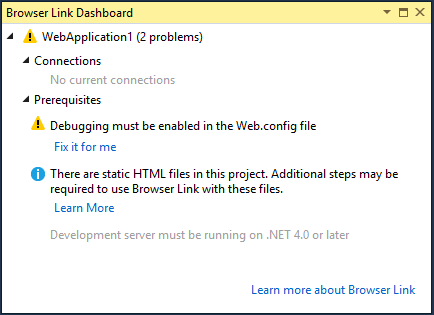
Viewing the Browser Link Dashboard
The Browser Link dashboard shows information about the Browser Link connections. To view the dashboard, select the Browser Link dropdown menu (the small arrow next to the Refresh button). Then click Browser Link Dashboard.

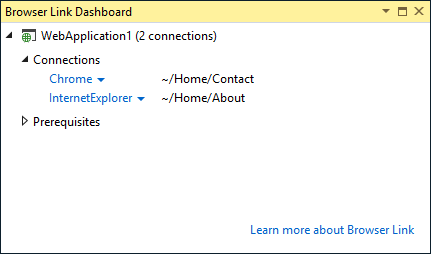
The dashboard lists the connected Browsers and the URL to which each browser has navigated.

The Prerequisites section shows any steps needed to enable Browser Link for that project. For example, the following screenshot shows a project where «debug» is set to false in the Web.config file.

Enabling Browser Link for Static HTML Files
To enable Browser Link for static HTML files, add the following to your Web.config file.
For performance reasons, remove this setting when you publish your project.
Disabling Browser Link
Browser Link is enabled by default. There are several ways to disable it:

- In the Browser Link dropdown menu, uncheck Enable Browser Link.
- In the Web.config file, add a key named «vs:EnableBrowserLink» with the value «false» in the appSettings section.
How Does It Work?
Browser Link uses SignalR to create a communication channel between Visual Studio and the browser. When Browser Link is enabled, Visual Studio acts as a SignalR server that multiple clients (browsers) can connect to. Browser Link also registers an HTTP module with ASP.NET. This module injects special references into every page request from the server. You can see the script references by selecting «View source» in the browser.

Your source files are not modified. The HTTP module injects the script references dynamically.
Because the browser-side code is all JavaScript, it works on all browsers that SignalR supports, without requiring any browser plug-in.
Использование ссылки на браузер в Visual Studio 2013
Ссылка на браузер — это новая функция в Visual Studio 2013, которая создает канал связи между средой разработки и одним или несколькими веб-браузерами. Вы можете использовать ссылку на браузер для одновременного обновления веб-приложения в нескольких браузерах, что удобно для тестирования в разных браузерах.
Обновление браузера
С помощью обновления браузера можно обновить несколько браузеров, подключенных к Visual Studio с помощью ссылки на браузер.
Чтобы использовать обновление браузера, сначала создайте приложение ASP.NET, используя любой из шаблонов проектов. Выполните отладку приложения, нажав клавишу F5 или щелкнув значок стрелки на панели инструментов:

Вы также можете использовать раскрывающийся список, чтобы выбрать конкретный браузер для отладки.

Чтобы выполнить отладку в нескольких браузерах, выберите Обзор с помощью. В диалоговом окне Обзор с помощью выберите несколько браузеров, удерживая нажатой клавишу CTRL. Нажмите кнопку Обзор , чтобы выполнить отладку с выбранными браузерами. Ссылка на браузер также работает, если вы запускаете браузер за пределами Visual Studio и переходите по URL-адресу приложения.

Элементы управления Browser Link находятся в раскрывающемся списке со значком круговой стрелки. Значок стрелки — это кнопка Обновить .

Чтобы узнать, какие браузеры подключены, наведите указатель мыши на кнопку Обновить во время отладки. Подключенные браузеры отображаются в окне подсказки.

Чтобы обновить подключенные браузеры, нажмите кнопку Обновить или нажмите клавиши CTRL+ALT+ВВОД. Например, на следующем снимку экрана показан проект ASP.NET, созданный с помощью шаблона проекта MVC 5. Приложение работает в двух браузерах в верхней части. В нижней части проекта открыт в Visual Studio.
В Visual Studio я изменил заголовок для домашней страницы:
При нажатии кнопки Обновить изменения появились в обоих окнах браузера:
Просмотр панели мониторинга ссылок в браузере
На панели мониторинга Связь браузера отображаются сведения о подключениях к браузеру. Чтобы просмотреть панель мониторинга, выберите раскрывающееся меню Ссылка на браузер (небольшая стрелка рядом с кнопкой Обновить ). Затем щелкните Панель мониторинга ссылок в браузере.
На панели мониторинга перечислены подключенные браузеры и URL-адрес, по которым переходил каждый браузер.
В разделе Предварительные требования показаны все действия, необходимые для включения ссылки на браузер для этого проекта. Например, на следующем снимке экрана показан проект, в котором для debug задано значение false в файле Web.config.
Включение ссылки в браузере для статических HTML-файлов
Чтобы включить ссылку на браузер для статических HTML-файлов, добавьте следующую команду в файл Web.config.
Для повышения производительности удалите этот параметр при публикации проекта.
Отключение ссылки в браузере
Ссылка на браузер включена по умолчанию. Отключить его можно несколькими способами.
- В раскрывающемся меню Ссылка на браузер снимите флажок Включить ссылку на браузер.
- В файле Web.config добавьте ключ vs:EnableBrowserLink со значением false в разделе appSettings.
Как это работает?
Browser Link использует SignalR для создания канала связи между Visual Studio и браузером. Если включена ссылка на браузер, Visual Studio выступает в качестве сервера SignalR, к которому могут подключаться несколько клиентов (браузеров). Browser Link также регистрирует модуль HTTP с ASP.NET. Этот модуль внедряет специальные в каждый запрос страницы с сервера. Чтобы просмотреть ссылки на скрипты, выберите «Просмотреть источник» в браузере.
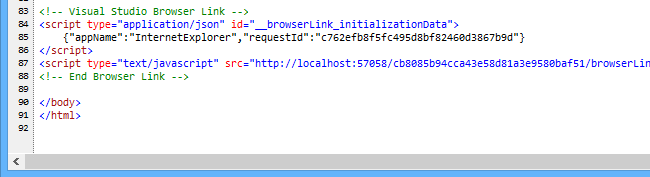
Исходные файлы не изменяются. Модуль HTTP динамически внедряет ссылки на скрипт.
Так как код на стороне браузера — это javaScript, он работает во всех браузерах, поддерживаемых SignalR, без необходимости использования подключаемого модуля браузера.