- WordPress – Simple CSS Text Boxes In Posts
- Using Inline CSS
- Using External CSS
- Creating a Quicktag button for your text box style
- Next article: Rounded Corners
- 65 responses on “ WordPress – Simple CSS Text Boxes In Posts ”
- Create A Box Around Text In HTML (The Easy Way)
- TLDR – QUICK SLIDES
- TABLE OF CONTENTS
- DOWNLOAD & NOTES
- QUICK NOTES
- EXAMPLE CODE DOWNLOAD
- CREATING BOXES
- EXAMPLE 1) BOX BASICS – THE BOX MODEL
- HMTL & CSS
- THE EXPLANATION
- EXAMPLE 2) CSS CLASSES – SOMETHING LIKE TEMPLATES
- HMTL & CSS
- THE EXPLANATION
- EXTRA) ADDING ICONS
- HMTL & CSS
- THE EXPLANATION
- EXTRA) ROUNDED CORNERS
- HMTL & CSS
- THE EXPLANATION
- EXTRA BITS & LINKS
- LINKS & REFERENCES
- INFOGRAPHIC CHEAT SHEET
- THE END
- CSS Box Model
- Example
- Width and Height of an Element
- Example
WordPress – Simple CSS Text Boxes In Posts
In this article, I outline how to create simple text boxes using both inline and external CSS and how to set up a quicktag button so you can use them with the minimum of effort. You’ll be surprised at how easy it is to do!
I often have information that I want to include in a post, without it being part of the main body of the article. For example, additional information that may be useful to readers, but that disrupts the flow of the post.
The ideal way to include this sort of information is in a text box with formatting that sets it apart.
The information is available, but the formatting separates it from the main body of the post in the reader’s mind.
Books and websites often use this technique, so why not inside posts? It’s possible to use blockquotes for this purpose, but I wanted to keep that for quoting other people, so I decided to create text boxes using CSS.
If you’re interested in text boxes with rounded corners, this is a little more difficult (but so much cooler). I don’t cover that in this article, as it would make it too long, but you can read about it in my Rounded Text Boxes in Posts article.
Using Inline CSS
It is simple to use inline CSS to create a box around a paragraph.
First, use the default WordPress Editor (ie the Visual tab page) to write the entire post, including the text you want displayed in a text box. When you are finished, go to the Code tab page and locate the paragraph to go in the box. Add:
immediately before the text and
immediately after it. Save this and you should get a text box similar to this one:
Note, if you are using the Visual Editor, with the default settings, you cannot use instead of . If you do, WordPress converts it to anyway and may break the code in the process! Unfortunately this means that this method only works for one paragraph – see my rounded text boxes in posts”>Rounded Text Boxes in Posts article for boxes with more than one paragraph.
You can change the style of the text box (ie the colours, font, size, border, etc), simply by changing the CSS in the style=»» section. This requires a basic knowledge of CSS, which is beyond the scope of this article, but an Internet search will reveal many sites with information on CSS.
Note: I now created have a Colour Selector, which can create the appropriate code for you. This works for simple text boxes (inline CSS or external CSS) as outlined in this post or for rounded text boxes.
Using External CSS
If you want your text boxes to have a common style across your site, use external, rather than internal, CSS. You set up the style information once, in your external CSS file and reference it each time you add a text box.
If you want to change the style, you only need to change it in one place (the external CSS file) and it will automatically change in every post using this style. With inline CSS you would have to manually change each post.
The external CSS file for the theme you are using is normally style.css in the wp-content/themes/yourtheme folder. Download this file using an FTP program, make a copy of it in case you make a mistake, then use a text editor to add the following to the end of style.css :
The style information can be changed to suit your needs. When finished, save the file, then ftp it back up to the server, overwriting the original.
To create a text box, simply reference the new class (textbox) in a
tag. Use the Visual Editor to write the entire post, go to the Code tab page, locate the paragraph to go in the box and add:
immediately before the text and
immediately after it.
WORDPRESS.COM Users
Apparently wordpress.com does not allow any inline CSS and charges extra for external CSS. If so, the inline CSS solution above will not work for you. If you have purchased the CSS Editing upgrade, the external CSS solution above should work.
There are other options that don’t use CSS, as outlined by Lorelle VanFossen, but be warned: these techniques are considered out of date by most people, including Lorrelle who is providing them as as workaround to wordpress.com’s CSS policy.
Creating a Quicktag button for your text box style
If you are going to use text boxes often, you can set up a quicktag button for either the internal or external CSS method. This means you don’t even need to type the line calling the text box style. Simply go the Code tab page, select the paragraph you want and click the quicktag. Easy!
I found an excellent tutorial on setting up quicktags by Podz, and a useful article by Lorelle VanFossen. Note Lorelle’s advice on making a copy of your changes so you can add them again if lost when upgrading WordPress.
To set up a quick tag for the text box styles outlined above, you need to change the quicktags.js file in the wp-includes/js folder. Download this file using an ftp program, make a copy of it and open the original with a text editor. Find the following section (at about line 126):
and add this on the line after it (if using the inline CSS method):
[php]edButtons[edButtons.length] =new edButton(‘ed_textbox’
,’textbox’
,’<p style=»padding:2px 6px 4px 6px; color: #555555; background-color: #eeeeee; border: #dddddd 2px solid»>’
,’</p>’
,”
);[/php]
If you are using the external CSS method, you need to add this instead:
[php]edButtons[edButtons.length] =new edButton(‘ed_textbox’
,’textbox’
,’<p/> ,’</p>’
,”
);[/php]
When you are finished, save the file, then ftp it back up to the server, overwriting the original file.
You’re done! You should now have a textbox quicktag in the Code tab page of the editor, which will add the appropriate code when you select the paragraph and click the quicktag.
Next article: Rounded Corners
As you can see, simple square text boxes are easy and effective. However, what I really want are text boxes with rounded corners. I explain how to create these in my Rounded Text Boxes in Posts article.
Note: I now created have a Colour Selector, which can create the appropriate code for you. This works for simple text boxes (inline CSS or external CSS) as outlined in this post or for rounded text boxes.
65 responses on “ WordPress – Simple CSS Text Boxes In Posts ”
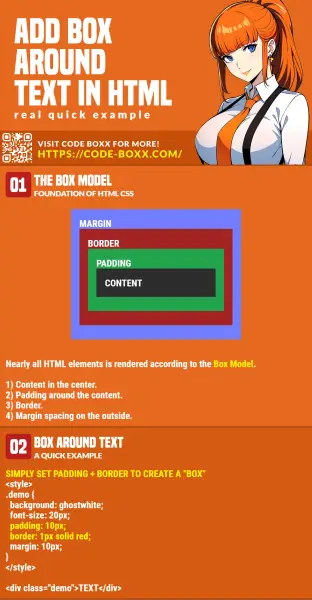
Create A Box Around Text In HTML (The Easy Way)
Welcome to a beginner’s tutorial on how to create a box around the text in HTML. New to HTML and want to quickly create your own notification or information box?
An easy way to create a box around text is to simply add padding and border. For example,
TEXT
That’s it. But rather than leaving you guys clueless as to what just happened, we will walk through more examples in this guide – Read on!
ⓘ I have included a zip file with all the example source code at the start of this tutorial, so you don’t have to copy-paste everything… Or if you just want to dive straight in.
TLDR – QUICK SLIDES

TABLE OF CONTENTS
DOWNLOAD & NOTES
Firstly, here is the download link to the example code as promised.
QUICK NOTES
If you spot a bug, feel free to comment below. I try to answer short questions too, but it is one person versus the entire world… If you need answers urgently, please check out my list of websites to get help with programming.
EXAMPLE CODE DOWNLOAD
Click here to download the source code, I have released it under the MIT license, so feel free to build on top of it or use it in your own project.
CREATING BOXES
All right, let us now get into the details of creating boxes with HTML and CSS.
EXAMPLE 1) BOX BASICS – THE BOX MODEL
HMTL & CSS
THE EXPLANATION
Just what are all those background, font-size, padding, border, margin ? Simply put, HTML renders each element based on something called “the box model” – Which is something like layers of an onion.
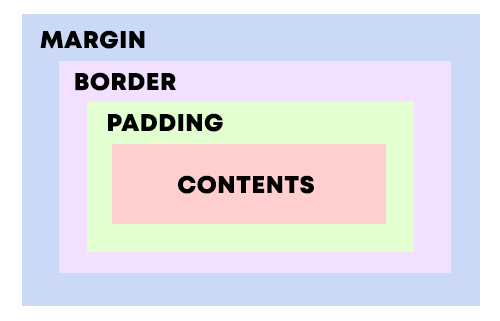
- At the center of the box, we have the content (text, image, or video).
- The text can be controlled with various properties – font-size, font-weight, font-familiy, text-decoration, color … Which should be pretty self-explanatory.
- We can also set the background color or use a background-image .
- Followed by a layer of padding .
- Next, we can set a border .
- Finally, margin on the outside. This is simply an “empty transparent space” around the box.
Well, the best is to test it hands-on. Go ahead, download the example above, edit each property and see for yourself.
EXAMPLE 2) CSS CLASSES – SOMETHING LIKE TEMPLATES
HMTL & CSS
/* (A) SHARED CLASS */ .box < margin: 10px; padding: 10px; font-size: 18px; >/* (B) BOX VARIATIONS */ /* (B1) INFORMATION BOX */ .info < color: brown; background: cornsilk; border: 1px solid burlywood; >/* (B2) WARNING BOX */ .warn < color: darkmagenta; background: lightpink; border: 1px solid darkred; >/* (B3) SUCCESS */ .ok ⓘ Information box. ⚠ Warning icon. ⓘ Successful! THE EXPLANATION
- First, we create a tag in the section.
- Then define the CSS classes .CLASS-NAME < STYLES-TO-APPLY >in the tag .
- Finally, simply attach the CSS classes to the HTML elements – .
Yep, it’s that simple, and it should save you a lot of time from copy-pasting the same style property all over the place. This will also make it easier for future updates – Just change the class styles in the section once, and all the rest will follow.
EXTRA) ADDING ICONS
HMTL & CSS
 ⓘ Information icon.
⚠ Warning icon.
❤ Heart icon.
💡 Bulb icon.
THE EXPLANATION
Just what are those &#ABCD ? Those are called “HTML symbols”, and they are native to HTML. We don’t need to download any images nor use any extra third-party libraries to spice up the boxes. HTML actually has a ton of symbols, and I will leave a link in the extras section below for the complete list of symbols.
EXTRA) ROUNDED CORNERS
HMTL & CSS
THE EXPLANATION
Yep, just add border-radius to round the corners. If we define border-radius: 50% , which will literally turn the box into a circle or oval.
EXTRA BITS & LINKS
That’s all for this tutorial, and here is a small section on some extras and links that may be useful to you.
LINKS & REFERENCES
INFOGRAPHIC CHEAT SHEET
THE END
Thank you for reading, and we have come to the end of this guide. I hope that it has helped you with your project, and if you want to share anything with this guide, please feel free to comment below. Good luck and happy coding!
CSS Box Model
In CSS, the term «box model» is used when talking about design and layout.
The CSS box model is essentially a box that wraps around every HTML element. It consists of: margins, borders, padding, and the actual content. The image below illustrates the box model:
Explanation of the different parts:
- Content — The content of the box, where text and images appear
- Padding — Clears an area around the content. The padding is transparent
- Border — A border that goes around the padding and content
- Margin — Clears an area outside the border. The margin is transparent
The box model allows us to add a border around elements, and to define space between elements.
Example
Demonstration of the box model:
Width and Height of an Element
In order to set the width and height of an element correctly in all browsers, you need to know how the box model works.
Important: When you set the width and height properties of an element with CSS, you just set the width and height of the content area. To calculate the full size of an element, you must also add padding, borders and margins.
Example
This element will have a total width of 350px:
320px (width)
+ 20px (left + right padding)
+ 10px (left + right border)
+ 0px (left + right margin)
= 350px
The total width of an element should be calculated like this:
Total element width = width + left padding + right padding + left border + right border + left margin + right margin
The total height of an element should be calculated like this:
Total element height = height + top padding + bottom padding + top border + bottom border + top margin + bottom margin