- border-color
- Синтаксис
- Значения
- Объектная модель
- Браузеры
- CSS по категориям
- Селекторы
- How to Add Border to Image in CSS
- Create HTML
- Add CSS
- Example of adding a border to the image:
- Result
- How to Add Styling to the Border Image
- Example of adding a double border to the image:
- Example of styling the double border of the image:
- Example of framing an image with a colored background:
- Example of adding a caption:
- Example of specifying borders separately:
- Example of styling the border image with the border-style property:
- How to Specify Each Corner and Create Circle Borders
- Example of specifying each corner of the image border:
- Example of adding a circle border to the image:
- How to Add a Drop Shadow Under the Image Border
- Example of adding a drop shadow:
- Two different border styles:
- Here’s the result:
- Рамка вокруг изображений
- См. также
border-color
Устанавливает цвет границы на разных сторонах элемента. Свойство позволяет задать цвет границы сразу для всех сторон элемента или только для указанных.
Синтаксис
border-color: [цвет | transparent] | inherit
Значения
transparent Устанавливает прозрачный цвет. inherit Наследует значение родителя.
Разрешается использовать одно, два, три или четыре значения, разделяя их между собой пробелом. Результат зависит от количества и указан в табл. 1.
| Число значений | Результат |
|---|---|
| 1 | Цвет границы будет установлен для всех сторон элемента. |
| 2 | Первое значение устанавливает цвет верхней и нижней границы, второе — левой и правой. |
| 3 | Первое значение задает цвет верхней границы, второе — одновременно левой и правой границы, а третье — нижней границы. |
| 4 | Поочередно устанавливается цвет верхней, правой, нижней и левой границы. |
HTML5 CSS2.1 CSS3 IE Cr Op Sa Fx
Lorem ipsum dolor sit amet
Lorem ipsum dolor sit amet, consectetuer adipiscing elit, sed diem nonummy nibh euismod tincidunt ut lacreet dolore magna aliguam erat volutpat.
Результат данного примера показан на рис. 1.
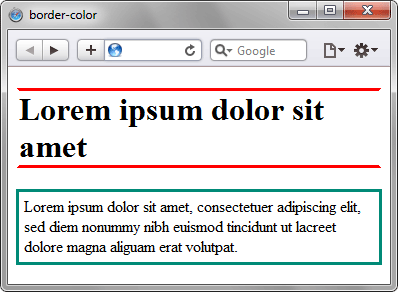
Рис. 1. Использование свойства border-color
Объектная модель
[window.]document.getElementById(» elementID «).style.borderColorБраузеры
Internet Explorer 6 не поддерживает значение transparent . Браузер Internet Explorer до версии 7.0 включительно не поддерживает inherit .
Цвет границы в разных браузерах может несколько различаться при использовании значений стиля groove , ridge , inset или outset .
Не выкладывайте свой код напрямую в комментариях, он отображается некорректно. Воспользуйтесь сервисом cssdeck.com или jsfiddle.net, сохраните код и в комментариях дайте на него ссылку. Так и результат сразу увидят.
CSS по категориям

Поля

Анимация

Градиент

Скруглённые уголки

Изображения

Псевдоэлементы

Псевдоклассы

Печать

Контент

Интерфейс

Таблица

Отступы

Список

Текст

Шрифт

Форматирование

Размеры

Позиционирование

Границы

Цвет и фон
Селекторы
- Селекторы тегов
- Идентификаторы
- Классы
- Мультиклассы
- Универсальный селектор
- Вложенные селекторы
- Дочерние селекторы
- Соседние селекторы
- Родственные селекторы
- [атрибут|=»значение»]
- Селекторы атрибутов
- [атрибут=»значение»]
- [атрибут^=»значение»]
- [атрибут$=»значение»]
- [атрибут*=»значение»]
- [атрибут~=»значение»]
How to Add Border to Image in CSS
Images with borders or frames make the image look more influential and differ from the other content on the page. In this snippet, we will show how to add a border to the image.
Create HTML
img src="/uploads/media/default/0001/01/b408569013c0bb32b2afb0f0d45e93e982347951.jpeg" alt="Nature">Add CSS
- Add style to your
element.
- Define the width of the image.
- Define the width, style, and color of the border with the help of the border property.
img < width: 270px; border: 1px solid black; >Example of adding a border to the image:
html> html> head> title>Title of the document title> style> img < width: 270px; border: 1px solid black; > style> head> body> img src="/uploads/media/default/0001/01/b408569013c0bb32b2afb0f0d45e93e982347951.jpeg" alt="Nature"> body> html>Result

How to Add Styling to the Border Image
To change the border color, you can add the CSS color property. If you want to create a double border, you need to add the padding property to the style of your image.
Example of adding a double border to the image:
html> html> head> title>Title of the document title> style> img < width: 650px; padding: 1px; border: 1px solid #021a40; > style> head> body> h2>Double Border Example h2> img src="/uploads/media/default/0001/01/b408569013c0bb32b2afb0f0d45e93e982347951.jpeg" alt="Nature"> body> html>It is also possible to have a double border with different inside border color. For that purpose, add the background-color property.
Example of styling the double border of the image:
html> html> head> title>Title of the document title> style> img < width: 650px; padding: 5px; border: 8px solid #999999; background-color: #e6e6e6; > style> head> body> img src="/uploads/media/default/0001/01/b408569013c0bb32b2afb0f0d45e93e982347951.jpeg" alt="Nature"> body> html>In our next example, we add a border to the image and use a colored background. If you want to increase the width of the frame, add more padding.
Example of framing an image with a colored background:
html> html> head> title>Title of the document title> style> .nature < background: #b0afac; padding: 12px; border: 1px solid #999; > style> head> body> img src="/uploads/media/default/0001/02/7f55a71df52da6d26ef4963f78aed38d64a7874c.jpeg" height="256" alt="Nature" class="nature"> body> html>It is also possible to frame an image with a caption.
Example of adding a caption:
html> html> head> title>Title of the document title> style> .img-frame-cap < width: 200px; background: #fff; padding: 18px 18px 2px 18px; border: 1px solid #999; > .caption < text-align: center; margin-top: 4px; font-size: 12px; > style> head> body> div class="img-frame-cap"> img src="/uploads/media/default/0001/02/7f55a71df52da6d26ef4963f78aed38d64a7874c.jpeg" width="200" height="256" alt="Nature"> div class="caption">Nature div> div> body> html>You can also specify borders separately. For that purpose, use CSS border-bottom, border-top, border-left, and border-right properties and set different width values for each. Let’s see an example in which the border-bottom property is set to have an effect like a banner.
Example of specifying borders separately:
html> html> head> title>Title of the document title> style> img < width: 225px; border: 8px solid #ccc; border-bottom: 130px solid #ccc; > style> head> body> img src="/uploads/media/default/0001/02/7f55a71df52da6d26ef4963f78aed38d64a7874c.jpeg" alt="Nature"> body> html>To add styling to your image border, add the border-style property to the element.
Example of styling the border image with the border-style property:
html> html> head> title>Title of the document title> style> img < width: 650px; padding: 5px; border: 12px #1c87c9; border-style: dashed; background-color: #eee; > style> head> body> img src="/uploads/media/default/0001/01/b408569013c0bb32b2afb0f0d45e93e982347951.jpeg" alt="Nature"> body> html>How to Specify Each Corner and Create Circle Borders
To specify each corner of the border, you need to use the CSS border-radius property. The border-radius property can have one to four values. Let’s see an example with four values.
Remember that the first value applies to the top-left corner, the second value applies to the top-right edge, the third value refers to the bottom-right corner, and the fourth value applies to the bottom-left corner.
Example of specifying each corner of the image border:
html> html> head> title>Title of the document title> style> img < width: 650px; padding: 2px; border: 3px solid #1c87c9; border-radius: 15px 50px 800px 5px; > style> head> body> img src="/uploads/media/default/0001/01/b408569013c0bb32b2afb0f0d45e93e982347951.jpeg" alt="Nature"> body> html>Instead of trying to nest the image inside another element, or editing every image in photoshop to achieve a proper look for your image border, you need to set the value of the border-radius property to «50%» or «999em». Set the same width and height values.
Example of adding a circle border to the image:
html> html> head> title>Title of the document title> style> div.imageborder < border-radius: 999em; width: 350px; height: 350px; padding: 5px; line-height: 0; border: 10px solid #000; background-color: #eee; > img < border-radius: 999em; height: 100%; width: 100%; margin: 0; > style> head> body> h2>Circle Border Example h2> div class="imageborder"> img src="/uploads/media/default/0001/01/4982c4f43023330a662b9baed5a407e391ae6161.jpeg" height="350" width="350" alt="iceland"/> div> body> html>How to Add a Drop Shadow Under the Image Border
To add a drop shadow, we need to use the box-shadow property. Also, set the display property to «block».
Example of adding a drop shadow:
html> html> head> title>Title of the document title> style> .nature < display: block; background: transparent; padding: 8px; border: 1px solid #ccc; box-shadow: 10px 10px 10px #999; > style> head> body> img src="/uploads/media/default/0001/02/7f55a71df52da6d26ef4963f78aed38d64a7874c.jpeg" alt="Nature" class="nature"> body> html>Two different border styles:
Let’s get into another cool example. Here we’ll make two different border styles for our image. To this, we’ll use the box-shadow, border, and outline properties.
html> html lang="en"> head> title>Document title> head> style> .container < padding: 20px; > #nature-image < border: 5px solid violet; /* inner border */ outline: 3px dotted tomato; /* outer border */ outline-offset: 10px; /* gives some space between two borders */ > style> body> div class="container"> img src="https://i.ibb.co/fMTGnRz/pexels-photo-572897.jpg" alt="snow-nature" height="300px" width="300px" id="nature-image" /> div> body> html>Here’s the result:
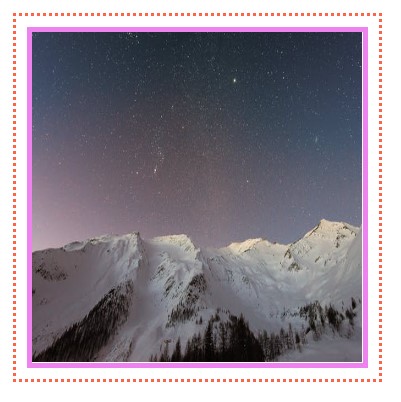
It’s pretty self-explanatory. We used an image tag id and selected it in our CSS. Then we used the border for the inner border and an outline for the outer border around our image. And finally, by using outline-offset , we make room between two borders.
Another way of having two borders around an image is by using the box-shadow property. It’s pretty straightforward, and just one line of code and, in some cases, is so helpful.
html> html lang="en"> head> title>Document title> head> style> .container < padding: 20px; > #nature-image < box-shadow: 0 0 0 5px violet, 0 0 0 10px tomato; /* add this line, values are inset | offset-x | offset-y | color , we just use the color */ > style> body> div class="container"> img src="https://i.ibb.co/fMTGnRz/pexels-photo-572897.jpg" alt="snow-nature" height="300px" width="300px" id="nature-image" /> div> body> html>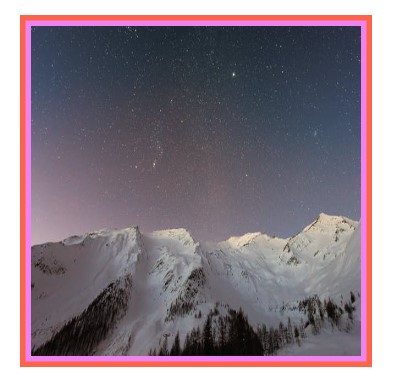
The tip is that the second colour size should be doubled if you want two equal-sized borders. For example, we have the violet-coloured border set to 5px, and then we set the tomato-coloured one to 10 px.
Hope you’ve enjoyed the examples.
Рамка вокруг изображений
Для добавления вокруг изображения цветной рамки применяется стилевое свойство border . В стилях добавляем это свойство к селектору img и указываем толщину рамки, её цвет и стиль. Тогда рамка добавится для всех изображений на странице. Для выбранных рисунков можно ввести собственный класс и писать его только для выбранных элементов (пример 1).
Пример 1. Добавление рамки

.border
В данном примере к двум изображениям добавляется класс border , через который устанавливается зелёная рамка (рис. 1).

Рис. 1. Рамка вокруг фотографий
Рамку можно добавлять и при наведении курсора на изображение через псевдокласс :hover . Но это ожидаемо приведёт к сдвигу картинки, поскольку свойство border влияет на общую ширину и высоту элемента. Чтобы избежать такого поведения к селектору img предварительно добавляется невидимая рамка, как показано в примере 2.
Пример 2. Рамка вокруг изображений


Другой способ добавления рамки — использование свойства outline . Оно, в отличие от border , не влияет на размеры элемента, поэтому прозрачная рамка уже не нужна.
Несмотря на схожесть этих свойств, у них есть небольшие различия:
- outline выводится вокруг элемента ( border внутри);
- outline не влияет на размеры элемента ( border добавляется к ширине и высоте элемента);
- outline можно установить только вокруг элемента целиком, но никак не на отдельных сторонах ( border можно использовать для любой стороны или всех сразу);
- на outline не действует радиус скругления, заданный свойством border-radius (на border действует).
Ещё один способ создания рамки заключается в добавлении фона к . Сам фон сразу не виден, поэтому надо установить ещё свойство padding , его значением выступает толщина рамки (пример 3).
Пример 3. Использование background и padding
Сюда же можно включить свойство border и получить новый вид рамки. Вообще, комбинируя padding , border , outline и background можно сделать множество самых разнообразных рамок.