- Telegram OAuth Authorization for Your Site
- Redirect Users to Telegram’s OAuth URL
- Handle Telegram’s OAuth Callback
- PHP Example:
- Node.js Example:
- Golang Example:
- Авторизация/Регистрация пользователя через Telegram
- Telegram Login Widget
- Setting up a bot
- Linking your domain to the bot
- Widget configuration
- Receiving authorization data
- Checking authorization
- Sample implementation
Telegram OAuth Authorization for Your Site
You can make authorization via Telegram another way. It works. But today we want to do the classic OAuth Authorization.
Before you begin, you need to create a Telegram bot and obtain your bot token. You can do this in @BotFather in Telegram. For more information on initiating a bot, read the Telegram Bot API documentation: https://core.telegram.org/bots
Redirect Users to Telegram’s OAuth URL
https://oauth.telegram.org/auth?bot_id=YOUR_BOT_ID&scope=YOUR_SCOPE&public_key=YOUR_PUBLIC_KEY&nonce=YOUR_NONCE You have to replace YOUR_BOT_ID , YOUR_SCOPE , YOUR_PUBLIC_KEY , and YOUR_NONCE with your bot’s specific information. The nonce is a unique, randomly generated string that you’ll need to store for later validation.
Handle Telegram’s OAuth Callback
After the user authorizes your application, Telegram will redirect them back to your site with a URL that contains a hash and a payload. You’ll need to verify the hash, parse the payload, and store the user’s information.
That’s it! I could wrap up this article. But ok, I am going to add the examples in languages that I use: PHP, Node.js, and Golang.
PHP Example:
// Your bot token and public key $botToken = 'YOUR_BOT_TOKEN'; $publicKey = 'YOUR_PUBLIC_KEY'; // Extracting the hash and payload from the request $hash = $_GET['hash']; $payload = json_decode(base64_decode($_GET['payload']), true); // Verifying the hash $secretKey = hash('sha256', $botToken . $publicKey, true); $checkHash = hash_hmac('sha256', $payload, $secretKey); if ($hash !== $checkHash) die('Invalid hash.'); > // Extracting user information from the payload $user = $payload['user']; $userId = $user['id']; $firstName = $user['first_name']; $lastName = $user['last_name']; $username = $user['username']; // Store user information in your database // . ?> Node.js Example:
const crypto = require('crypto'); const url = require('url'); const querystring = require('querystring'); const botToken = 'YOUR_BOT_TOKEN'; const publicKey = 'YOUR_PUBLIC_KEY'; const handleTelegramOAuthCallback = (req, res) => const parsedUrl = url.parse(req.url); const queryParams = querystring.parse(parsedUrl.query); const hash = queryParams.hash; const payload = JSON.parse(Buffer.from(queryParams.payload, 'base64').toString()); const secretKey = crypto.createHash('sha256').update(botToken + publicKey).digest(); const checkHash = crypto.createHmac('sha256', secretKey).update(queryParams.payload).digest('hex'); if (hash !== checkHash) res.status(400).send('Invalid hash'); return; > const user = payload.user; const userId = user.id; const firstName = user.first_name; const lastName = user.last_name; const username = user.username; // Store user information in your database // . >; // Use the handleTelegramOAuthCallback function as a request handler in your web server Golang Example:
package main import ( "crypto/hmac" "crypto/sha256" "encoding/base64" "encoding/hex" "encoding/json" "log" "net/http" ) const ( botToken = "YOUR_BOT_TOKEN" publicKey = "YOUR_PUBLIC_KEY" ) type User struct Id int64 `json:"id"` FirstName string `json:"first_name"` LastName string `json:"last_name"` Username string `json:"username"` > type Payload struct User User `json:"user"` > func handleTelegramOAuthCallback(w http.ResponseWriter, r *http.Request) hash := r.URL.Query().Get("hash") payloadB64 := r .URL.Query().Get("payload") payloadBytes, err := base64.StdEncoding.DecodeString(payloadB64) if err != nil http.Error(w, "Invalid payload", http.StatusBadRequest) return > var payload Payload err = json.Unmarshal(payloadBytes, &payload) if err != nil http.Error(w, "Invalid payload", http.StatusBadRequest) return > h := hmac.New(sha256.New, []byte(botToken+publicKey)) h.Write([]byte(payloadB64)) checkHash := hex.EncodeToString(h.Sum(nil)) if hash != checkHash http.Error(w, "Invalid hash", http.StatusBadRequest) return > user := payload.User userId := user.Id firstName := user.FirstName lastName := user.LastName username := user.Username // Store user information in your database // . > func main() http.HandleFunc("/telegram-oauth-callback", handleTelegramOAuthCallback) log.Fatal(http.ListenAndServe(":8080", nil)) > It’s very easy, isn’t it?
Of course, these are not the best blocks of code ever, but they help to understand how to work with it.
Авторизация/Регистрация пользователя через Telegram
В данном топике хочу описать дополнительный, а для некоторых сервисов возможно и основной способ авторизации и регистрации пользователя через Telegram, подобно OAuth авторизации через социальные сети и web-сервисы.
Допустим, у Вас есть некий сервис, который предлагает пользователям вход через Telegram. На странице авторизации пользователю предлагается ввести его Username в Telegram. После ввода Username, на аккаунт пользователя приходит сообщение с кодом подтверждения, который он вводит на странице авторизации.
В первую очередь нам потребуется «живой» аккаунт в Telegram, то есть аккаунт который зарегистрирован на мобильный номер телефона. В данном случае боты не подходят для данной задачи, так как боты не могут писать сообщения первыми.
Теперь что касается серверной стороны.
На странице приложений Telegram есть не официальное приложение telegram-cli. Оно и будет выполнять функцию приложения которое будет взаимодействовать с сервером Telegram.
Для упрощения примера telegram-cli будем ставить в каталог /usr/local/src/:
cd /usr/local/src/
Клонируем репозиторий:
git clone —recursive https://github.com/vysheng/tg.git && cd tg
Ставим необходимые пакеты:
sudo apt-get install libreadline-dev libconfig-dev libssl-dev lua5.2 liblua5.2-dev libevent-dev libjansson-dev python-dev
Собираем telegram-cli:
./configure make
При первом запуске, приложение попросит ввести номер телефона нашего «живого» аккаунта. После ввода номера, будет выслан код подтверждения по смс или в приложение если данный аккаунт сейчас активен на другом устройстве. После подтверждения, в вашем домашнем каталоге будет создана директория «.telegram-cli» в которой будут хранится файлы конфигураций для указанного аккаунта.
Запускаем:
/usr/local/src/tg/bin/telegram-cli -k /usr/local/src/tg/tg-server.pub
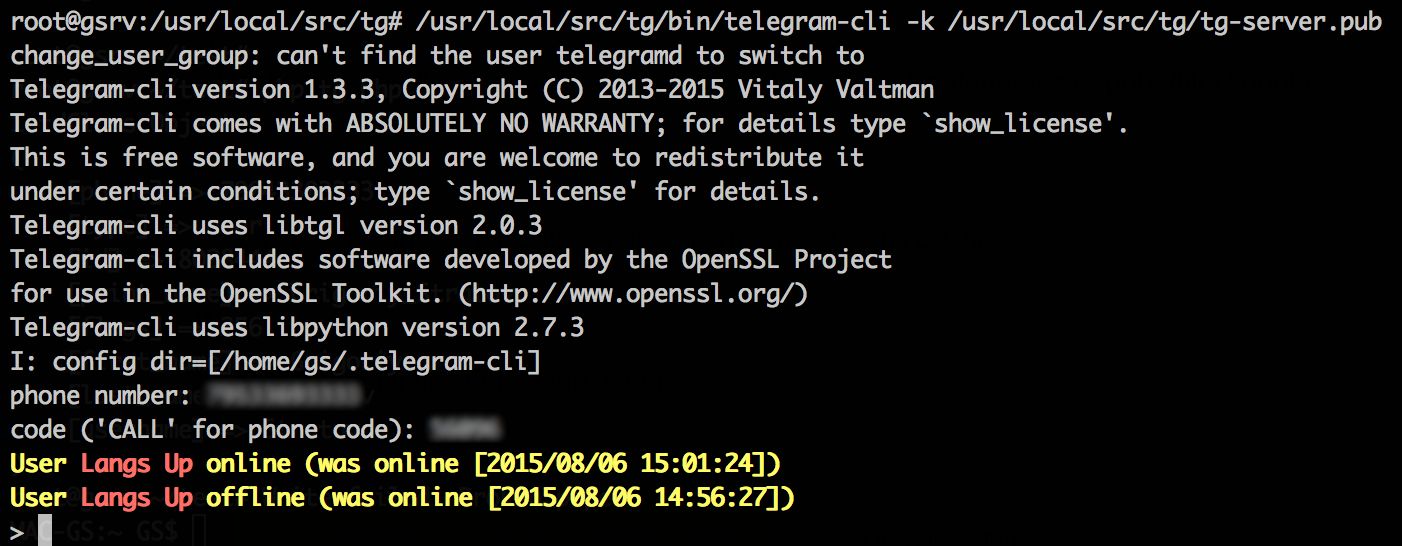
Видим следующую картину:
Выходим из приложения:
quit
Запускаем приложение как демон например на порту 8089:
/usr/local/src/tg/bin/telegram-cli —json -k /usr/local/src/tg/tg-server.pub -W -d -P 8089 &
Теперь нам необходим скрипт который будет взаимодействовать с telegram-cli.
По ключевым словам(telegram-cli php client) на GitHub было найдено готовое решение на PHP.
Создаем файл tg.php со следующим содержанием:
exec("resolve_username "))< if($user->type == 'user')< $code = mt_rand(10000, 99999); $message ; if($telegram->exec("msg user#id> ")) < echo "Send message: Success\r\n"; >else < echo "Send message: Error\r\n"; >> > else < echo "User not found.\r\n"; > В переменную $USERNAME вписываем username пользователя которому будет отправлено сообщение с кодом подтверждения.
Запускаем скрипт:
php tg.php
Если все прошло успешно, пользователю будет отправлено сообщение с кодом.
На базе данного примера можно легко реализовать регистрацию/авторизацию пользователей через Telegram.
Telegram Login Widget
The Telegram login widget is a simple way to authorize users on your website.
Check out this post for a general overview of the widget.
Setting up a bot
To use the login widget, you’ll need a Telegram bot.
We strongly recommend that the profile picture of the bot you use for authorization corresponds with your website‘s logo, and that the bot’s name reflects that connection.
Users will see this message when they log into your website:
It is more likely that users will log in if your bot has a name and logo they expect to see.
Linking your domain to the bot
Once you have chosen a bot, send the /setdomain command to @Botfather to link your website’s domain to the bot. Then configure your widget below and embed the code on your website.
Widget configuration
Receiving authorization data
After a successful authorization, the widget can return data in two ways:
- by redirecting the user to the URL specified in the data-auth-url attribute with the following parameters: id, first_name, last_name, username, photo_url, auth_date and hash;
- by calling the callback function data-onauth with the JSON-object containing id, first_name, last_name, username, photo_url, auth_date and hash fields.
Checking authorization
You can verify the authentication and the integrity of the data received by comparing the received hash parameter with the hexadecimal representation of the HMAC-SHA-256 signature of the data-check-string with the SHA256 hash of the bot’s token used as a secret key.
Data-check-string is a concatenation of all received fields, sorted in alphabetical order, in the format key= with a line feed character (‘\n’, 0x0A) used as separator – e.g., ‘auth_date=\nfirst_name=\nid=\nusername=’ .
The full check might look like:
data_check_string = . secret_key = SHA256() if (hex(HMAC_SHA256(data_check_string, secret_key)) == hash) < // data is from Telegram >To prevent the use of outdated data, you can additionally check the auth_date field, which contains a Unix timestamp when the authentication was received.
Sample implementation
You can find sample PHP code for checking authorization and receiving data about a logged in user on this page.