- PIP Install Git – A quick read
- Git Version Control
- Git Installation Prerequisites
- Git Installation
- First-Time Git Setup
- Set Your Git Identity
- Git Usage
- Pip Install Git Syntax
- Pip Install Git Branch – Example
- Pip Install Git Subdirectory
- Pip Install Git Version
- Pip Install Git Requirements.txt
- Git Clone – Syntax
- Github Desktop – Clone with SSH Option
- Pip Install Git With SSH
- A modern solution to Python package management – Try ActiveState’s Platform
- Python Package Management In Action
- Simplifying Python Development: A Step-by-Step Guide to Setting up a Python Project with Git and GitHub
- Install Python
- Install pyenv
- Use pyenv to install Python
- Install pip
- Create and activate a virtual environment
- Use Git to manage your project
- Install Git
- Start a local Git repository
- Add Python’s .gitgnore
- Install black to code formatting
- VS Code
- Create a requirements.txt file
- Create a GitHub repository
- Conclusion
PIP Install Git – A quick read
Try a faster and easier way to work with Python packages like Exchangelib. Use Python 3.9 by ActiveState and build your own runtime with the packages and dependencies you need. Get started for free by creating an account on the ActiveState Platform or logging in with your GitHub account.
Pip/pip3 is the official package manager for Python, and is the tool recommended by the Python Packing Authority (PyPA) for installing Python packages. The term ‘pip’ is used interchangeably with ‘pip3’ in this Quick Guide.
By default, pip installs packages and all their required dependencies from the Python Package Index (PyPI), using the command:
pip install .
However, pip doesn’t currently support dependency resolution, which can lead to corrupted environments. To avoid this, you may want to try the ActiveState Platform, which is the only Python package management solution that automatically resolves dependencies, flags conflicts, and will even suggest a manual workaround to resolve the conflict. Get started with the ActiveState Platform by signing up for a free account.
Git Version Control
Git is a Version Control System (VCS) for managing changes in source code, as well as other types of files (eg. html) and file structures in Git repositories. It allows developers to collaborate on projects without conflict.
A Git repository is a .git/ folder inside a software development project. You can deploy Git locally, or use it via a hosted service, such as Github, Gitlab or Bitbucket.
One of the advantages of using pip together with Git is to install the latest commits of unreleased Python packages as branches from Github. Some examples of this are provided below.
Git Installation Prerequisites
First determine whether you have up-to-date versions of Python, pip, and Git. You can check which version of Python (if any) is installed, by entering the following command in a terminal or command window:
Output should be similar to:
You can check if pip is already installed and up-to-date by entering the following command:
Output should be similar to:
pip 20.0.2 from C:\Python38\lib\site-packages\pip (python 3.8)
If either Python or pip is not installed or up-to-date, the simplest way to get an up-to-date Python version with pip for either Linux, MacOS or Windows, is to install Python 3.9 from ActiveState .
Git Installation
Before installing Git, you should first determine whether you have it installed by running the following git command:
Output should be similar to:
git version 2.32.0.windows.2
Most Linux platforms already have a basic Git installation by default, but they are generally not up-to-date. Git installation commands for various Linux platforms are listed here:
sudo apt install git-all
sudo dnf install git-all
Although MacOS comes with a command line tools installer that includes Git, Homebrew is the recommended option for macOS Git installation.
To install Homebrew, run the following script in your terminal:
/bin/bash -c "$(curl -fsSL https://raw.githubusercontent.com/Homebrew/install/HEAD/install.sh)"
Once Homebrew is installed, you can install Git with the following command:
To install Git for Windows, point your browser at https://git-scm.com/download/win . A download of the Windows Git installer will begin automatically. Once complete, you can double-click the installer and follow the steps.
First-Time Git Setup
Once Git is installed, your Git environment and configuration variables need to be customized with git config .
You can view your default Git configuration options with the following command:
Output should be similar to:
usage: git config [] .
Set Your Git Identity
Set your user name and email address. This is important because every Git commit uses this information:
git config --global user.name "John Doe" git config --global user.email johndoe@example.com
This only needs to be done once on each computer, if you include the –global option.
After you have set your user name and email address, you can check your settings with the following command:
Git Usage
Once your Git identity has been configured, you can begin using Git to install Github branches.
Pip Install Git Syntax
The following command syntax can be used to install the default branch of a github project:
pip install git+https://github.com// .git
Pip Install Git Branch – Example
To install the latest commit of the Exchangelib package, run:
pip install git+https://github.com/ecederstrand/exchangelib
Pip Install Git Subdirectory
This feature is not yet available.
Pip Install Git Version
To pip install a specific version of a repository branch, enter:
Pip Install Git Requirements.txt
To include Git dependencies and submodules dependencies, located at:
in a requirements.txt file:
# requirements.txt should include:
packageA== -e https://github.com// .git@ #egg=
# Install requirements.txt file with -r flag:
pip install -r requirements.txt
Git Clone – Syntax
The Git clone command is used in cloning or downloading a Git project without installing it.
First navigate to the directory where you to locate the cloned repository, then enter:
Github Desktop – Clone with SSH Option
Github Desktop is a Windows Github Git client for cloning. It has an SSH authentication option that requires a public SSH key. A link with directions is included.
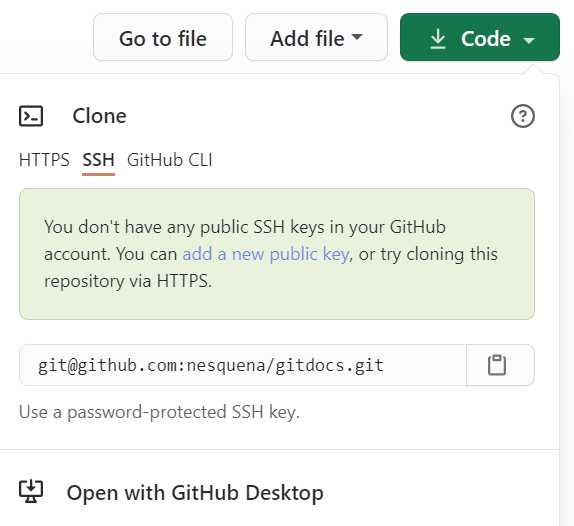
Figure 1. Github Desktop > Clone > SSH Option:
Pip Install Git With SSH
The following syntax will use SSH to install a Git repository that is not password protected:
pip install git+ssh://github.com/ /.git@ #egg=
A modern solution to Python package management – Try ActiveState’s Platform
Dependency resolution is at the core of the ActiveState Platform. When you create a project and start adding requirements, the Platforms tell you what dependencies those requirements have.
The ActiveState Platform is a cloud-based build tool for Python. It provides build automation and vulnerability remediation for:
- Python language cores, including Python 2.7 and Python 3.5+
- Python packages and their dependencies, including:
- Transitive dependencies (ie., dependencies of dependencies)
- Linked C and Fortran libraries, so you can build data science packages
- Operating system-level dependencies for Windows, Linux, and macOS
- Shared dependencies (ie., OpenSSL)
- Find, fix and automatically rebuild a secure version of Python packages like Django and environments in minutes
The ActiveState Platform aims to handle every dependency for every language. That means handling libraries down to the C/C++ level, external tools, and all the conditional dependencies that exist. To take things even further, our ultimate goal is to support multi-language projects. That means that you can create a project using both Python and Perl packages, and we’ll make sure that both languages are using the same (up to date) OpenSSL version.
Python Package Management In Action
Get a hands-on appreciation for how the ActiveState Platform can help you manage your dependencies for Python environments. Just run the following command to install Python 3.9 and our package manager, the State Tool:
powershell -Command "& $([scriptblock]::Create((New-Object Net.WebClient).DownloadString('https://platform.activestate.com/dl/cli/install.ps1'))) -activate-default ActiveState-Labs/Python-3.9Beta" Now you can run state install . Learn more about how to use the State Tool to manage your Python environment.
Let us know your experience in the ActiveState Community forum.
Watch this video to learn how to use the ActiveState Platform to create a Python 3.9 environment, and then use the Platform’s CLI (State Tool) to install and manage it.
Simplifying Python Development: A Step-by-Step Guide to Setting up a Python Project with Git and GitHub
The purpose of this article is to provide a clear path and understanding of how you would set up a Python environment on your machine. Keep in mind that the following content is written thinking on a Linux environment. If you use another OS, make the necessary changes.
Install Python
Install pyenv
GitHub — pyenv/pyenv: Simple Python version management This allows you to simply choose the Python version you want to use. It allows you to set the global version for the system or a local version for specific projects or directories.
Use pyenv to install Python
Once pyenv is installed, you can use it to install the version of Python you want to use. You can also use pyenv local command to set a local version of Python for a specific directory, this way you can have a different version of Python for different projects. To test your installation, you can open a terminal and run the following command:
This should print the version of Python you have installed, which should be the version you set using pyenv .
Install pip
pip is a package manager for Python that makes it easy to install and manage packages. It is included with Python 3.4 and later, so you don’t need to install it separately. If your python version is less than 3.4 then you need to install pip separately
Create and activate a virtual environment
A virtual environment is an isolated environment where you can install packages without interfering with the system-wide packages. To create a virtual environment, you can use the venv package. In your project’s directory, run the following command:
This will create a new directory called venv on your current working directory, where you can install your packages. To activate your virtual environment, you need to run the following command:
Once your virtual environment is active, you should see the name of the environment in the terminal prompt, indicating that it is active. Any packages you install while the environment is active will be installed in the venv directory and will not affect other projects or your system Python installation.
Use Git to manage your project
Install Git
The process to install Git on Linux can vary depending on the distribution you are using. You can use the package manager specific to your distribution to install Git. For example, on Ubuntu or Debian, you can use the apt-get command:
Start a local Git repository
This command will create a new .git directory in your project, which will store all the information about your repository, such as the history of commits and the current state of the project.
Add Python’s .gitgnore
wget https://raw.githubusercontent.com/github/gitignore/master/Python.gitignore -O .gitignore Now we can stage and commit the .gitignore file to our local repository by running these commands:
git add .gitignore git commit -m "chore: add .gitignore" It’s also a good practice to review the contents of the .gitignore file downloaded from Github and modify it as per your specific use case. You can also add additional files or directories that you want to ignore in your project by modifying the contents of the .gitignore file and then committing the changes to the repository. This way, you can ensure that the files you want to ignore are consistently excluded from your Git repository in all branches. You can use conventional commits in your Git repository to make it easier to understand and track the changes that have been made to the code. Conventional Commits
Install black to code formatting
VS Code
"python.formatting.provider": "black", "editor.formatOnSave": true > Create a requirements.txt file
pip freeze > requirements.txt This will create a file called requirements.txt in the current directory and list all the packages with versions that are installed in your environment. Add the requirements.txt file to the repository by running git add requirements.txt Commit the file to the repository by running git commit -m «chore: add requirements.txt»
Create a GitHub repository
Go to the GitHub website (https://github.com/) and sign in to your account. Click on the «+» button in the top right corner of the page, and select «New repository» from the menu. Give a name to your repository and an optional description and choose whether you want your repository to be public or private. Add the remote repository on GitHub using the command: git remote add origin git@github.com:yourusername/easy_python_project.git , replace yourusername with your github username. Finally, push your local repository to the newly created GitHub repository by running: git push -u origin main or any other branch name you want to push.
Conclusion
In conclusion, setting up a Python project with Git and GitHub is relatively easy to do. By following the steps outlined in this article, you’ll be able to set up a clean and organized environment for your Python projects, regardless of the operating system you’re using. The important thing to keep in mind is to review the steps and make any necessary adjustments depending on the operating system you are using. If you have any questions, suggestions or just want to say hi, feel free to reach out to me! Follow me on Twitter!