- How do I get Apache to display my PHP page?
- 5 Answers 5
- How to make Apache serve index.php instead of index.html?
- Apache server index php
- Запуск Apache
- Конфигурация веб-сервера
- Установка веб-сервера в качестве службы
- How To Change Default Index Page in Apache
- How To Change Default Index Page in Apache Web Server
- Change default index page using Apache Configuration
- Change default index page using .htaccess
How do I get Apache to display my PHP page?
I’m a total noob trying to create a website with PHP. I created a small test page that I want to use as the foundation of my grandiose project. I’m having a problem getting my page to display on my browser. This is my PHP document:
index.php index.htm index.html C:/Apache2/htdocs C:/My Documents/My Website . . . DocumentRoot "C:/Apache2/htdocs" . . . UserDir "My Documents/My Website" . . . WinLAMP, she installed successfully. @Fredahay — I might not be so simple. A walk through is required. Done this before. Ok. Forget PHP — Just get Apach to deliver a page.
Thanks Ed! I figured it out. The solution was a «D’oh!» moment. I merely had to type «localhost/index.php» to get my page to display. D’oh!
5 Answers 5
First, Make sure your apache server is on and running, it looks like you may have that part already if WinLamp is giving you a successful install message but just double check, I’m using a MAC as a server so I don’t use WinLamp. Next dial into your localhost and «/» into your .php doc.
** 8800 is the port number I’m using, it could be different for you.
You also need to have PHP installed.
Thanks. I figured it out ang got it to work. I had to put the name of my page after typing localhost. I.e. «localhost/mysite/index.php» I had assumed that typing just localhost would display index.php in htdocs. The Apache docs were rather vague about that little detail.
Yea if they arn’t in the root folder, you have to specify which folder to reference. Chalk it up to minor oversight
Have you made sure that your Apache configuration is running on port 80? If not your URL to access Apache will be «localhost:ApachePort/index.php», replacing ApachePort with the port specified in httpd.conf. Also, are you sure that PHP was installed with Apache?
Were those directories the default directory during your installation, or did you update it yourself in httpd.cnf? If the latter, you’ll need to restart Apache for it to pick up the updates.
The web page that you’re seeing when you go to http://localhost is located at C:/whereveryouinstalledWinLAMP/Apache2/htdocs/index.html . So if you just replace that index.html with your own index.html , you should get your php page to properly display at http://localhost
Also, your browser may have cached the default index.html for http://localhost so try refreshing after you replace the index.html file.
just makes a web-site with a title of Hello and doesn’t display anything on the page.
How to make Apache serve index.php instead of index.html?
As others have noted, most likely you don’t have .html set up to handle php code.
Having said that, if all you’re doing is using index.html to include index.php , your question should probably be ‘how do I use index.php as index document?
In which case, for Apache (httpd.conf), search for DirectoryIndex and replace the line with this (will only work if you have dir_module enabled, but that’s default on most installs):
If you use other directory indexes, list them in order of preference i.e.
DirectoryIndex index.php index.phtml index.html index.htm I dislike bubbling up such old (and well-answered) questions, but this solution is not working for me. As proven by «grep -ri ‘DirectoryIndex’ /etc/apache2/*» , my configuration includes only one DirectoryIndex index line. It is not commented, and the value is DirectoryIndex index.php index.html. And yet even after restart the server still offers the index.html file — I have to type hostname/index.php to get it to use that file. I will open an new question if necessary. UBUNTU-20.04 LTS
I’m having exactly this same issue and couldn’t find where teh DirectoryIndex is. Work around i did is rename my index.html file to index.html.org and next thing is my index.php got picked up by browser. i still like to know where is this DirectoryIndex line is. i remember seeing it in 000-default.conf in sites-available in older apache but its not in apache2 on ubuntu 20.04.
lol, i didn’t read the entire thread. DirectoryIndex is in dir.conf file in /etc/apache2/mods-available directory on ubuntu20.04
Apache server index php
Для работы с PHP нам потребуется веб-сервер. Обычно в связке с PHP применяется веб-сервер Apache. Официальный сайт проекта — https://httpd.apache.org/. Там же можно найти всю подробную информацию о релизах, скачать исходный код. Однако официальный сайт не предоставляет готовых сборок для ОС Windows.
Перед установкой Apache следует отметить, что если наша ОС Windows, то в системе должны быть установлен пакет для C++, который можно найти по адресу для 64-битной и для 32-битной.
Итак, если нашей ОС является Windows, перейдем на сайт http://www.apachelounge.com/, который предоставляет дистрибутивы Apache для Windows:
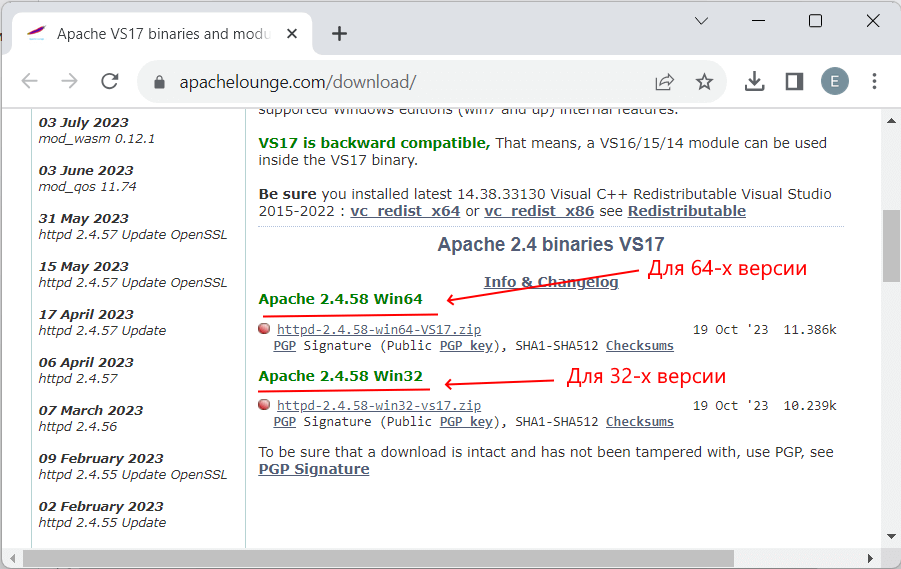
В подпункте Apache 2.4 binaries VS16 выберем последнюю версию дистрибутива сервера. На странице загрузок мы можем найти две версии пакета Apache — для 64-битных систем и для 32-битных.
После загрузки пакета с Apache распакуем загруженный архив. В нем найдем папку непосредственно с файлами веб-сервера — каталог Apache24 . Переместим данный каталог на диск C, чтобы полный путь к каталогу составлял C:/Apache24 .
Запуск Apache
В распакованном архиве в папке bin найдем файл httpd.exe
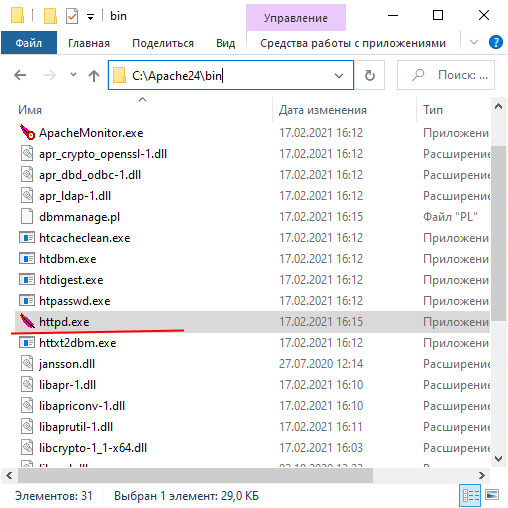
Это исполняемый файл сервера. Запустим его. Нам должна открыться следующая консоль:
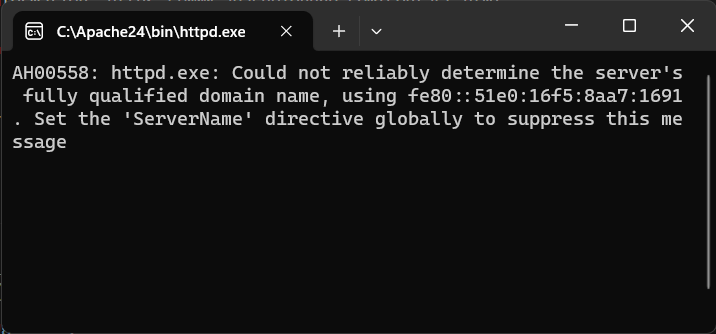
Пока работает это приложение, мы можем обращаться к серверу. Для его тестирования введем в веб-браузере адрес http:\localhost . После этого веб-браузер должен отобразить следующую страницу:

Эта страница символизирует, что наш веб-сервер работает, и мы можем с ним работать.
Конфигурация веб-сервера
Теперь проведем конфигурацию сервера, чтобы связать его с ранее установленным интерпретатором PHP.. Для этого найдем в папке веб-сервера в каталоге conf (то есть C:\Apache24\conf ) файл httpd.conf
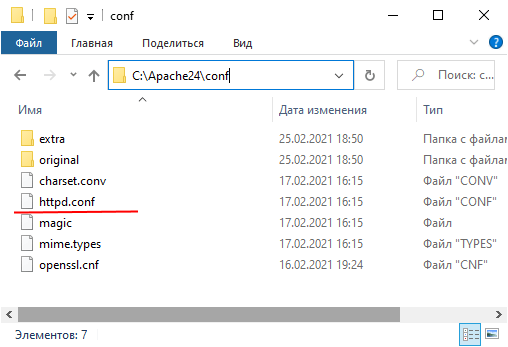
Откроем этот файл в текстовом редакторе. httpd.conf настраивает поведение веб-сервера. Мы не будем подобно затрагивать его описания, а только лишь произведем небольшие изменения, которые потребуются нам для работы с PHP.
Прежде всего подключим PHP. Для этого нам надо подключить модуль php, предназначенный для работы с apache. В частности, в папке php мы можем найти файл php8apache2_4.dll :
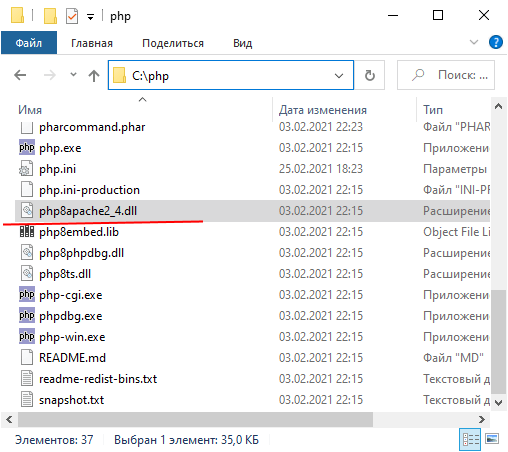
Для подключения php найдем в файле httpd.conf конец блока загрузки модулей LoadModule
//. #LoadModule vhost_alias_module modules/mod_vhost_alias.so #LoadModule watchdog_module modules/mod_watchdog.so #LoadModule xml2enc_module modules/mod_xml2enc.so
И в конце этого блока добавим строчки
LoadModule php_module "C:/php/php8apache2_4.dll" PHPIniDir "C:/php"
Далее укажем место, где у нас будут храниться сайты. Для этого создадим, например, на диске С каталог localhost . Затем найдем в файле httpd.conf строку
DocumentRoot "$/htdocs"
По умолчанию в качестве хранилища документов используется каталог «c:/Apache24/htdocs». Заменим эту строку на следующую:
Изменим пути файлам, в которые будут заноситься сведения об ошибках или посещении сайта. Для этого найдем строку
ErrorLog "c:/localhost/error.log"
CustomLog "logs/access.log" common
CustomLog "c:/localhost/access.log" common
Таким образом, файл error.log , в который записываются ошибки, и файл access.log , в который заносятся все данные о посещении веб-сайта, будут располагаться в папке c:/localhost.
#ServerName www.example.com:80
# # TypesConfig points to the file containing the list of mappings from # filename extension to MIME-type. # TypesConfig conf/mime.types
И под строкой добавим две строчки:
AddType application/x-httpd-php .php AddType application/x-httpd-php-source .phps
То есть должно получиться:
AddType application/x-httpd-php .php AddType application/x-httpd-php-source .phps # # TypesConfig points to the file containing the list of mappings from # filename extension to MIME-type. # TypesConfig conf/mime.types
В данном случае мы добавили поддержку для файлов с расширением .php и .phps .
И заменим его на следующий:
DirectoryIndex index.html index.php
В данном случае мы определяем файлы, которые будут выполняться при обращении к корню файла или каталога. То есть по сути определяем главные страницы веб-сайта: index.html и index.php.
Это минимально необходимая конфигурация, которая нужна для работы с PHP.
Теперь наша задача — убедиться, что php подключен и работает правильно. Для этого перейдем в папку c:/localhost , которую мы создали для хранения файлов веб-сервера, и добавим в нее обычный текстовый файл. Переименуем его в index.php и внесем в него следующее содержание:
В данном случае мы создали простейший скрипт, который выводит общую информацию о PHP.
Теперь заново запустим файл httpd.exe и обратимся к этому скрипту, набрав в строке браузера адрес http://localhost/index.php
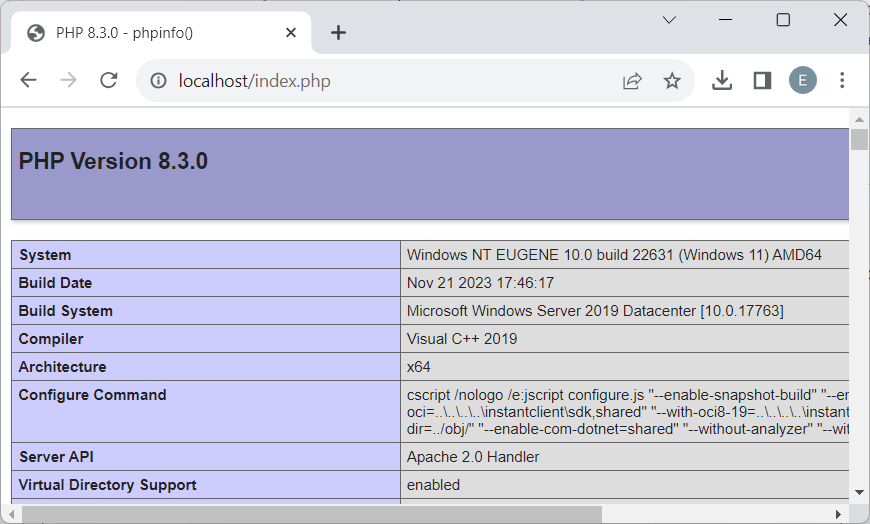
Что тут произошло? При обращении к сайту на локальной машине в качестве адреса указывается http://localhost . Затем указывается имя ресурса, к которому идет обращение. В данном случае в качестве ресурса используется файл index.php . И так как в файле httpd.conf в качестве хранилища документов веб-сервера указан каталог C:\localhost , то именно в этом каталоге и будет веб-сервер будет производить поиск нужных файлов.
И поскольку выше при конфигурировании мы указали, что в качестве главной страницы может использоваться файл index.php , то мы можем также обратиться к этому ресурсу просто http://localhost/
Таким образом, теперь мы можем создавать свои сайты на php.
Установка веб-сервера в качестве службы
Если мы часто работаем с веб-сервером, в том числе для программиррования на PHP, то постоянно запускать таким образом сервер, может быть утомительно. И в качестве альтернативы мы можем установить Apache в качестве службы Windows. Для этого запустим командную строку Windows от имени администратора и установим Apache в качестве службы с помощью команды:
C:\Apache24\bin\httpd.exe -k install
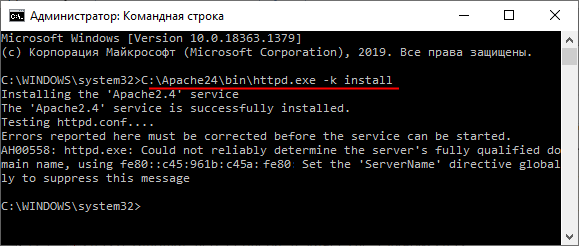
То есть в данном случае прописываем полный путь к файлу httpd.exe (C:\Apache24\bin\httpd.exe) и далее указываем команду на установку службы -k install .
Если установка завершится удачно, то в командная строка отобразит сообщение «The Apache2.4 service is successfully installed». Также будет проведено тестирование сервера.
После установки службы убедимся, что она запущена
How To Change Default Index Page in Apache

For every website, you will eventually need to change the default index page to the home page of your website/blog. In this article, we will look at how to change default index page in Apache Web Server.
How To Change Default Index Page in Apache Web Server
Here are the steps to change default index page in Apache web server. You can change default index page via Apache Server configuration file, or using .htaccess file. We will look at both approaches below.
Change default index page using Apache Configuration
Apache configuration file is present at one of the following locations depending on your installation:
- /etc/apache2/httpd.conf
- /etc/apache2/apache2.conf
- /etc/httpd/httpd.conf
- /etc/httpd/conf/httpd.conf
Open terminal and run the following command to open Apache configuration file
$ sudo vi /etc/apache2/httpd.conf
You will see the following lines of code.
# # DirectoryIndex: sets the file that Apache will serve if a directory # is requested. #DirectoryIndex index.html index.php
Change index.html index.php to your choice of web page (e.g home.html).
Make sure you have placed this file home.html at /var/www/html/. If you have placed it in a different folder (e.g /var/www/html/product/) then modify the path above accordingly (e.g /product/home.html).
DirectoryIndex /product/home.html
You can also add multiple index pages to Apache as shown below
DirectoryIndex home.html welcome.html
Restart Apache web server to apply changes.
$ sudo service apache2 restart
Change default index page using .htaccess
You can also change default index page for Apache using .htaccess. Before proceeding, please enable mod_rewrite (.htaccess) in your Apache web server.
Open .htaccess file, typically located at /var/www/html/.htaccess
$ sudo vi /var/www/html/.htaccess
Add the following line to .htaccess file to set index page to home.html.
Restart Apache web server to apply changes.
$ sudo service apache2 restart
That’s it. Open browser and visit http://your_server_or_ip and you will see the new page. Replace your_server_or_ip with your domain name, or server IP address.
Ubiq makes it easy to visualize data in minutes, and monitor in real-time dashboards. Try it Today!