How to install Apache 2.4 and PHP 8 on a Windows Machine
In this tutorial, you will learn how to install and configure Apache 2.4 and PHP 8 on a Windows machine. We all know Apache HTTP Server is an open-source cross-platform and free webserver to run web applications and similarly PHP is a free and open-source scripting language used to develop web applications.
To run the PHP code on a Windows machine, first, you’ll need to install and configure a web server (Apache) that executes the PHP application. And on this page, you will find the step-by-step guide on “How to install Apache 2.4 and PHP 8 on a Windows Machine”.
P.S. Tested with Apache 2.4 and PHP 8.1.4 on a Windows 10 machine.
1. Prerequisites
Download the Apache 2.4.x and PHP 8 from its official websites, extract the downloaded file and move it to the C drive.
1.1 Download Apache 2.4.x – Depending on your system build download the binary zip file accordingly.
1.2 Download PHP 8 – Similarly, depending on your system build download the Thread Safe version of PHP.
Before jumping to the main configuration part, be sure you installed latest 14.31.31103.0 Visual C++ Redistributable Visual Studio 2015-2022 : vc_redist_x64 or vc_redist_x86 software.
2. Install Apache
To install the Apache HTTP Server on a local Windows machine move the downloaded and extracted Apache 2.4 binary files to the C drive and follow the below steps:
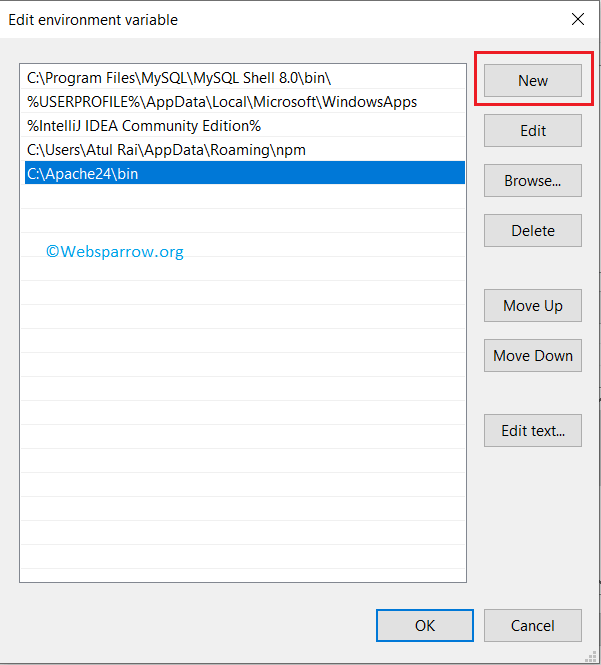
Step 2.1: Go to the Apache 2.4 bin directory path C:\Apache24\bin (it might be different in your case) and set it into your system environment variable path.
Step 2.2: Open the command prompt with admin privileges and run the httpd -k install command to install the Apache services.
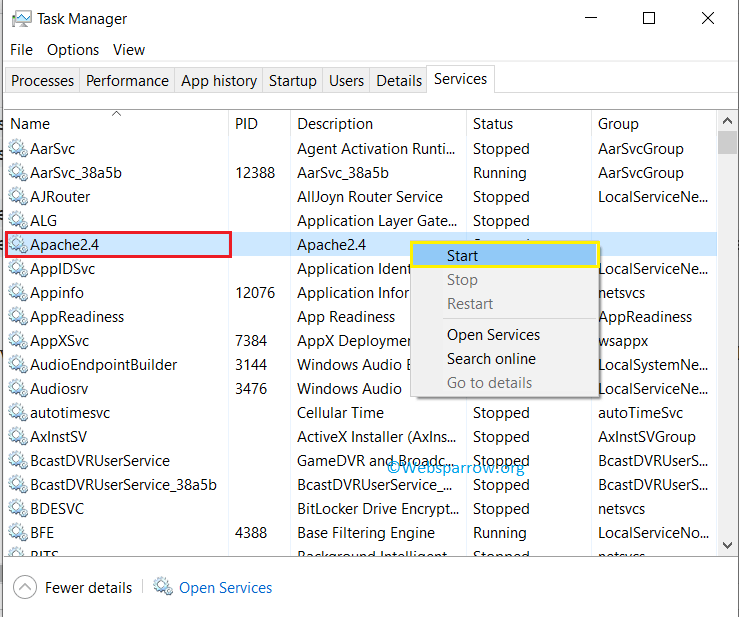
C:\WINDOWS\system32>httpd -k install Installing the 'Apache2.4' service The 'Apache2.4' service is successfully installed. Testing httpd.conf. Errors reported here must be corrected before the service can be started. AH00558: httpd: Could not reliably determine the server's fully qualified domain name, using fe80::ccb2:109d:6198:a489. Set the 'ServerName' directive globally to suppress this messageStep 2.3: Start the Apache service with the command httpd -k start or directly through the Task Manager » Services » Search for Apache2.4 » Right-click on the service » Start .
By default, Apache HTTP Server runs on port 80, make sure no other services/servers running on this port.
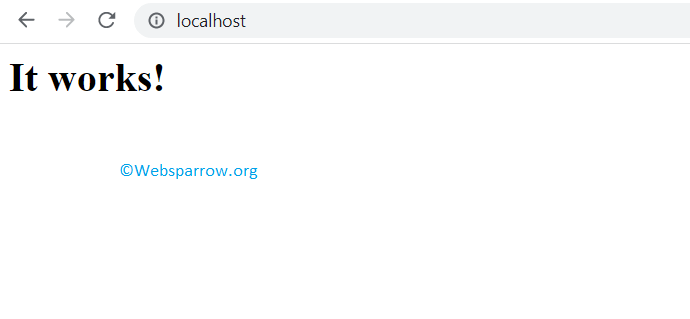
Step 2.4: Open the web browser and hit the default Apache localhost URL i.e localhost or localhost:80 . If everything is configured correctly, you will see the default index.html web page contents and it is located inside the C:\Apache24\htdocs directory.
3. Install PHP 8
The next step is to install PHP 8. To do that, similarly, move the downloaded and extracted PHP 8 binary files to the C drive and follow the below steps:
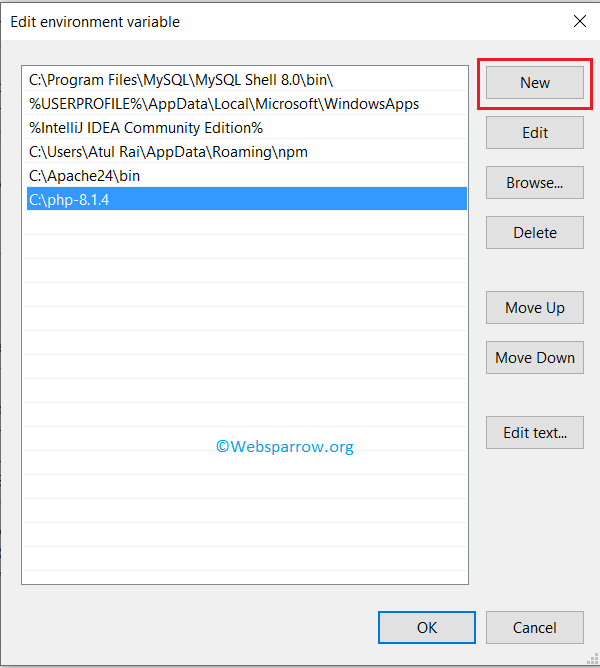
Step 3.1: Copy the PHP 8 home path i.e C:\php-8.1.4 and set it into your machine environment variable.
Step 3.2: Open the command prompt and type php -v to check whether the path is set correctly or not. If the PHP path is set correctly, it will print the PHP version.
C:\WINDOWS\system32>php -v PHP 8.1.4 (cli) (built: Mar 16 2022 09:33:31) (ZTS Visual C++ 2019 x64) Copyright (c) The PHP Group Zend Engine v4.1.4, Copyright (c) Zend Technologies4. Configure Apache and PHP
Now it’s time to configure Apache HTTP Server with PHP 8.
Step 4.1: Go to the C:\Apache24\conf directory, inside the conf directory edit the httpd.conf file. Go to the end of the file and add the below configuration because, in Apache, PHP is loaded as a module.
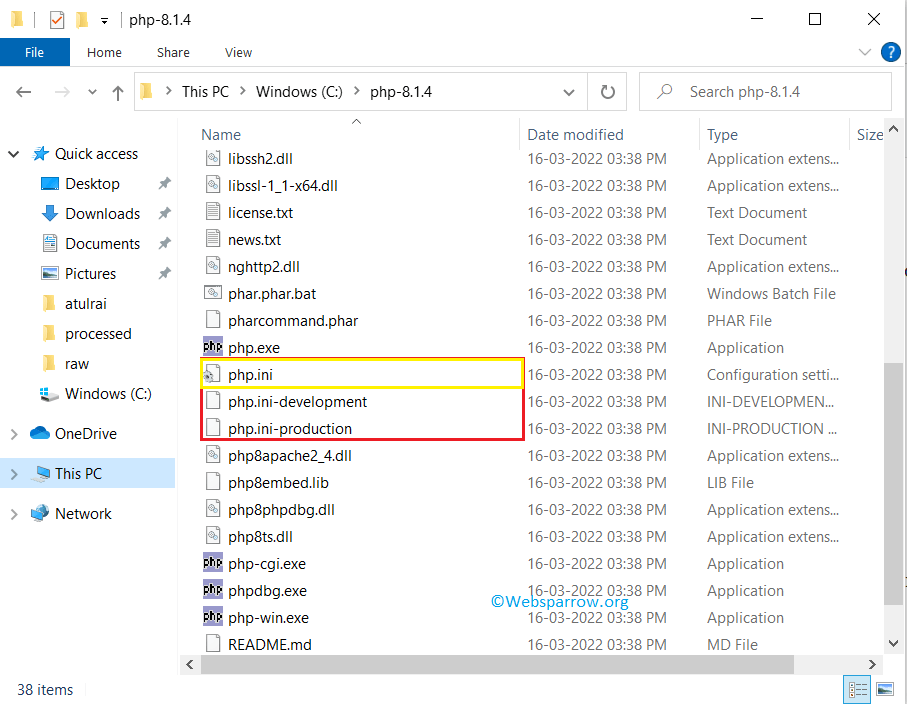
# Note: Repalce php_module location with your PHP path and # if the php8apache2_4.dll is not available, # download the non thread safe version of PHP. LoadModule php_module "C:\php-8.1.4\php8apache2_4.dll" AddHandler application/x-httpd-php .php PHPIniDir "C:\php-8.1.4"Step 4.2: Go to the PHP home directory C:\php-8.1.4, and you will find two configuration files php.ini-development and php.ini-production . Create a copy of php.ini-development and rename it to php.ini
Step 4.3: Again open the httpd.conf file and search for ServerName, uncomment and edit the ServerName with localhost .
# ServerName gives the name and port that the server uses to identify itself. # This can often be determined automatically, but we recommend you specify # it explicitly to prevent problems during startup. # # If your host doesn't have a registered DNS name, enter its IP address here. # ServerName localhostAnd in the same file also search for DirectoryIndex, and append the default index.php file.
# DirectoryIndex: sets the file that Apache will serve if a directory # is requested. # DirectoryIndex index.html index.php Step 4.4: Open the command prompt and run the httpd -t command to validate whether everything is configured correctly, it will return Syntax OK if everything is configured correctly.
C:\WINDOWS\system32>httpd -t Syntax OK5. Test the configuration
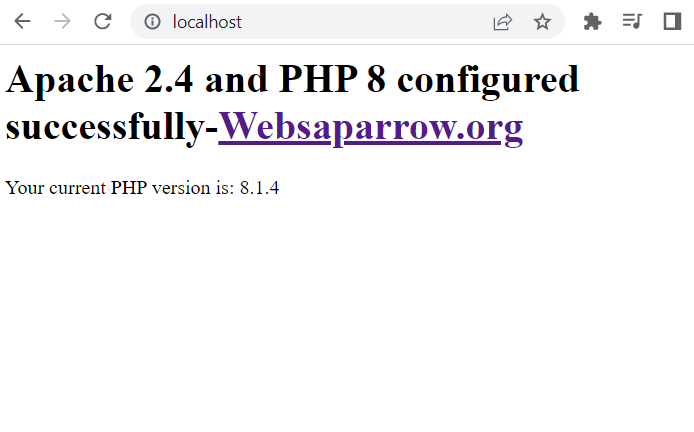
To test the Apache 2.4 and PHP 8 configuration, restart the Apache2.4 service from the Task Manager and rename the index.html file to index.php from the C:\Apache24\htdocs directory and add the below piece of code.
Apache 2.4 and PHP 8 configured successfully-Websaparrow.org'; echo ' Your current PHP version is: ' . phpversion(); header("Refresh:10; url=https://websparrow.org"); ?>Open the web browser and hit the localhost in the URL bar, you will get the following details:
References
Apache dll for php
Для работы с PHP нам потребуется веб-сервер. Обычно в связке с PHP применяется веб-сервер Apache. Официальный сайт проекта — https://httpd.apache.org/. Там же можно найти всю подробную информацию о релизах, скачать исходный код. Однако официальный сайт не предоставляет готовых сборок для ОС Windows.
Перед установкой Apache следует отметить, что если наша ОС Windows, то в системе должны быть установлен пакет для C++, который можно найти по адресу для 64-битной и для 32-битной.
Итак, если нашей ОС является Windows, перейдем на сайт http://www.apachelounge.com/, который предоставляет дистрибутивы Apache для Windows:
В подпункте Apache 2.4 binaries VS16 выберем последнюю версию дистрибутива сервера. На странице загрузок мы можем найти две версии пакета Apache — для 64-битных систем и для 32-битных.
После загрузки пакета с Apache распакуем загруженный архив. В нем найдем папку непосредственно с файлами веб-сервера — каталог Apache24 . Переместим данный каталог на диск C, чтобы полный путь к каталогу составлял C:/Apache24 .
Запуск Apache
В распакованном архиве в папке bin найдем файл httpd.exe
Это исполняемый файл сервера. Запустим его. Нам должна открыться следующая консоль:
Пока работает это приложение, мы можем обращаться к серверу. Для его тестирования введем в веб-браузере адрес http:\localhost . После этого веб-браузер должен отобразить следующую страницу:
Эта страница символизирует, что наш веб-сервер работает, и мы можем с ним работать.
Конфигурация веб-сервера
Теперь проведем конфигурацию сервера, чтобы связать его с ранее установленным интерпретатором PHP.. Для этого найдем в папке веб-сервера в каталоге conf (то есть C:\Apache24\conf ) файл httpd.conf
Откроем этот файл в текстовом редакторе. httpd.conf настраивает поведение веб-сервера. Мы не будем подобно затрагивать его описания, а только лишь произведем небольшие изменения, которые потребуются нам для работы с PHP.
Прежде всего подключим PHP. Для этого нам надо подключить модуль php, предназначенный для работы с apache. В частности, в папке php мы можем найти файл php8apache2_4.dll :
Для подключения php найдем в файле httpd.conf конец блока загрузки модулей LoadModule
//. #LoadModule vhost_alias_module modules/mod_vhost_alias.so #LoadModule watchdog_module modules/mod_watchdog.so #LoadModule xml2enc_module modules/mod_xml2enc.so
И в конце этого блока добавим строчки
LoadModule php_module "C:/php/php8apache2_4.dll" PHPIniDir "C:/php"
Далее укажем место, где у нас будут храниться сайты. Для этого создадим, например, на диске С каталог localhost . Затем найдем в файле httpd.conf строку
DocumentRoot "$/htdocs"
По умолчанию в качестве хранилища документов используется каталог «c:/Apache24/htdocs». Заменим эту строку на следующую:
Изменим пути файлам, в которые будут заноситься сведения об ошибках или посещении сайта. Для этого найдем строку
ErrorLog "c:/localhost/error.log"
CustomLog "logs/access.log" common
CustomLog "c:/localhost/access.log" common
Таким образом, файл error.log , в который записываются ошибки, и файл access.log , в который заносятся все данные о посещении веб-сайта, будут располагаться в папке c:/localhost.
#ServerName www.example.com:80
# # TypesConfig points to the file containing the list of mappings from # filename extension to MIME-type. # TypesConfig conf/mime.types
И под строкой добавим две строчки:
AddType application/x-httpd-php .php AddType application/x-httpd-php-source .phps
То есть должно получиться:
AddType application/x-httpd-php .php AddType application/x-httpd-php-source .phps # # TypesConfig points to the file containing the list of mappings from # filename extension to MIME-type. # TypesConfig conf/mime.types
В данном случае мы добавили поддержку для файлов с расширением .php и .phps .
И заменим его на следующий:
DirectoryIndex index.html index.php
В данном случае мы определяем файлы, которые будут выполняться при обращении к корню файла или каталога. То есть по сути определяем главные страницы веб-сайта: index.html и index.php.
Это минимально необходимая конфигурация, которая нужна для работы с PHP.
Теперь наша задача — убедиться, что php подключен и работает правильно. Для этого перейдем в папку c:/localhost , которую мы создали для хранения файлов веб-сервера, и добавим в нее обычный текстовый файл. Переименуем его в index.php и внесем в него следующее содержание:
В данном случае мы создали простейший скрипт, который выводит общую информацию о PHP.
Теперь заново запустим файл httpd.exe и обратимся к этому скрипту, набрав в строке браузера адрес http://localhost/index.php
Что тут произошло? При обращении к сайту на локальной машине в качестве адреса указывается http://localhost . Затем указывается имя ресурса, к которому идет обращение. В данном случае в качестве ресурса используется файл index.php . И так как в файле httpd.conf в качестве хранилища документов веб-сервера указан каталог C:\localhost , то именно в этом каталоге и будет веб-сервер будет производить поиск нужных файлов.
И поскольку выше при конфигурировании мы указали, что в качестве главной страницы может использоваться файл index.php , то мы можем также обратиться к этому ресурсу просто http://localhost/
Таким образом, теперь мы можем создавать свои сайты на php.
Установка веб-сервера в качестве службы
Если мы часто работаем с веб-сервером, в том числе для программиррования на PHP, то постоянно запускать таким образом сервер, может быть утомительно. И в качестве альтернативы мы можем установить Apache в качестве службы Windows. Для этого запустим командную строку Windows от имени администратора и установим Apache в качестве службы с помощью команды:
C:\Apache24\bin\httpd.exe -k install
То есть в данном случае прописываем полный путь к файлу httpd.exe (C:\Apache24\bin\httpd.exe) и далее указываем команду на установку службы -k install .
Если установка завершится удачно, то в командная строка отобразит сообщение «The Apache2.4 service is successfully installed». Также будет проведено тестирование сервера.
После установки службы убедимся, что она запущена


