- Mark’s coding playground.
- Search This Blog
- Spannable String in Android — URL Span ,Clickable Span, Rich-Style Formatting of Textview .
- Faster Loading images in GridViews or ListViews
- Android html to spannable
- YOU MAY BE INTERESTED IN
- YOU MAY BE INTERESTED IN
- Migration to compose
- Building a Language Learning App with Compose — Part 5
- Building a Language Learning App with Compose — Part 3
- No emulator needed for screenshot tests of Compose @Previews on CI
- Autoren
- Leave a Reply Cancel reply
- Your place for all things AndroidDev
- How to display HTML using Android Compose
- The entrance
- Fonts support
- Text styling
- Links support
- Links styling
- Combining everything together
- strings.xml
- Visual example
- Использование RichText в Android. Spannable
- Теория
- Практика
- Вместо заключения
Mark’s coding playground.
A blog where you can find all codes for Android, Corona, Basic tutorials, Interview questions and more.
Search This Blog
Spannable String in Android — URL Span ,Clickable Span, Rich-Style Formatting of Textview .
Faster Loading images in GridViews or ListViews
Spannable brings lots of possibility to TextView, includes displaying various appearance of a Text and onClick callbak.
The SpannableString class allows you to easily format certain pieces which are called spans of a string, by applying CharacterStyle ie,color, font, ormake it a link .
Here is an example where, explained how to use spannable string to give font size, color, linking a text via clickable span and through URL Span and to strike through the text.
Lets go through the example :
import android.os.Bundle; import android.text.SpannableString; import android.text.method.LinkMovementMethod; import android.text.style.ClickableSpan; import android.text.style.ForegroundColorSpan; import android.text.style.RelativeSizeSpan; import android.text.style.StrikethroughSpan; import android.text.style.URLSpan; import android.view.View; import android.widget.TextView; import android.widget.Toast; import android.widget.TextView.BufferType; import android.app.Activity; import android.graphics.Color; public class Spannable_String extends Activity < @Override protected void onCreate(Bundle savedInstanceState) < super.onCreate(savedInstanceState); setContentView(R.layout.activity_spannable__string); TextView spannabletextview = (TextView)findViewById(R.id.usage); //********* Simple Span to color text ************// // this is the text that we going to work on SpannableString text = new SpannableString("Iam an example for spannable string "); // make "Iam" (characters 0 to 3) green text.setSpan(new ForegroundColorSpan(Color.BLUE), 0, 3, 0); // Put the SpannableString in textview //**** Relative Span to change text relative to others ****// //changing the text from 5 to 9 1.5f bigger than textview size text.setSpan(new RelativeSizeSpan(1.5f), 5, 9, 0); //************ Clickable Span **************// // going to make "for" a clickable text and bring a toast ClickableSpan clickfor = new ClickableSpan() < @Override public void onClick(View widget) < Toast.makeText(Spannable_String.this, "hello clicked for", Toast.LENGTH_LONG).show(); >>; text.setSpan(clickfor, 15, 18, 0); //******** Strike through text***********// text.setSpan(new StrikethroughSpan(), 9, 14, 0); //******** URL Span *********************// text.setSpan(new URLSpan("http://eazyprogramming.blogspot.in/"), 22, 26, 0); //******** ForegroundColor *********************// text.setSpan(new ForegroundColorSpan(Color.GREEN), 22, 26, 0); // make our ClickableSpans and URLSpans work spannabletextview.setMovementMethod(LinkMovementMethod.getInstance()); spannabletextview.setText(text, BufferType.SPANNABLE); > > 

- Get link
- Other Apps
Android html to spannable
That’s it! With ~100 lines of code we are now able to display almost any HTML. Let’s look at the example:
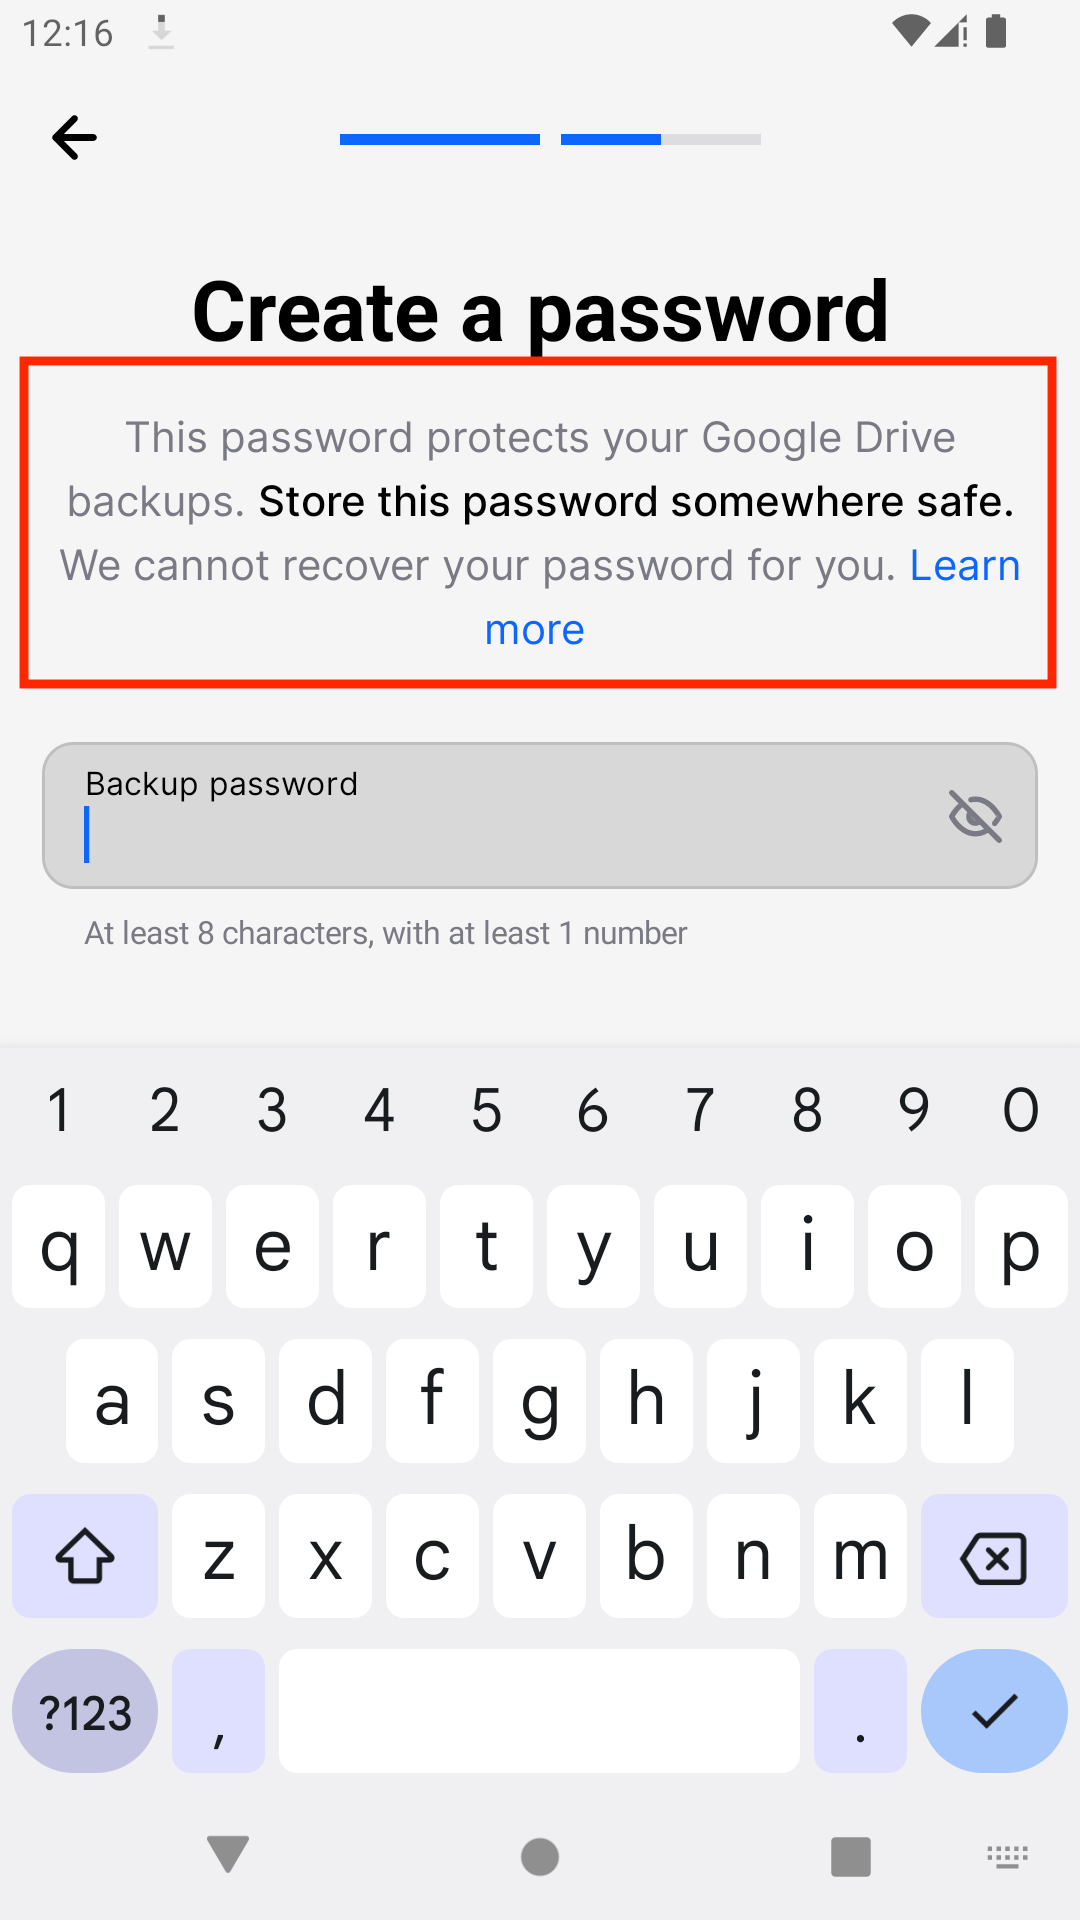
HtmlText( modifier = Modifier.padding(top = SIZE_16, bottom = SIZE_32), html = stringResource(id = R.string.create_drive_pass_description), textStyle = Typography.body1.copy(textAlign = TextAlign.Center, color = Secondary), onLink1Clicked = onLearnMoreClicked )
That’s it! Thank you for reading.
You can support my work by clapping this article or sharing it.
This article was originally published on proandroiddev.com on June 27, 2022
YOU MAY BE INTERESTED IN
YOU MAY BE INTERESTED IN
Migration to compose
Building a Language Learning App with Compose — Part 5
Building a Language Learning App with Compose — Part 3
No emulator needed for screenshot tests of Compose @Previews on CI
Autoren
Leave a Reply Cancel reply
Your place for all things AndroidDev
droidcon is a registered trademark of Mobile Seasons GmbH © 2021. All rights reserved.
Concept & Corporate Design by Atelier WEZOO
We use cookies to improve user experience and analyze website traffic. By clicking “Accept“, you agree to our website’s cookie use as described in our Cookie Policy. You can change your cookie settings at any time by clicking “Preferences.”
The technical storage or access is strictly necessary for the legitimate purpose of enabling the use of a specific service explicitly requested by the subscriber or user, or for the sole purpose of carrying out the transmission of a communication over an electronic communications network.
The technical storage or access is necessary for the legitimate purpose of storing preferences that are not requested by the subscriber or user.
The technical storage or access that is used exclusively for statistical purposes. The technical storage or access that is used exclusively for anonymous statistical purposes. Without a subpoena, voluntary compliance on the part of your Internet Service Provider, or additional records from a third party, information stored or retrieved for this purpose alone cannot usually be used to identify you.
The technical storage or access is required to create user profiles to send advertising, or to track the user on a website or across several websites for similar marketing purposes.
How to display HTML using Android Compose
The reason for writing this article is that Text composable function does not support HTML yet. Since there are plenty of utility libraries that try to archive the same, I chose the way of my implementation as it’s flexible and adjustable to my needs.
Requirements. I need:
- Fonts support.
- Text styling.
- Links support! This is especially important for me since my app is using in-app web-viewer to display any links.
Let’s see how each of the points archived. To make things clear — at high level this is just a wrapper for Android view. Full gist for this article.
The entrance
Start from HtmlText.kt . For now, read as least the method signature:
@Composable
fun HtmlText(
modifier: Modifier = Modifier,
html: String,
textStyle: TextStyle = Typography.body1,
onLink1Clicked: (() -> Unit)? = null,
onLink2Clicked: (() -> Unit)? = null
)
Fonts support
Refer to TypefaceSpanCompat.kt in the gist.
In HtmlText.kt pay attention to these lines:
val fontResId = when (textStyle.fontWeight) FontWeight.Medium -> R.font.inter_medium
else -> R.font.inter_regular
>
val font = ResourcesCompat.getFont(context, fontResId)
How to connect TypefaceSpanCompat.kt with HtmlText.kt will be explained a bit later.
Text styling
By default HtmlText composable takes body1 TextStyle :
textStyle: TextStyle = Typography.body1, And then maps it to classical Android parameters. As an example let’s look to the Gravity :
val gravity = when (textStyle.textAlign) TextAlign.Center -> Gravity.CENTER
TextAlign.End -> Gravity.END
else -> Gravity.START
>
TextStyle can be easily modified. Example:
HtmlText(
html = stringResource(id = R.string.create_drive),
textStyle = Typography.body1.copy(textAlign = TextAlign.Center, color = Secondary),
onLink1Clicked = onLearnMoreClicked
)
Links support
In HtmlText there are the next lines:
movementMethod = DefaultLinkMovementMethod() < link ->
when (link) LINK_1 -> onLink1Clicked?.invoke()
LINK_2 -> onLink2Clicked?.invoke()
>
true
>
What is DefaultLinkMovementMethod ? This is a java class copy-pasted from Stackoverflow that just changes spans under the hood to make onLinkClick methods possible. You may read the whole code here.
Links styling
Another thing is links styling. In HtmlText you may see this line:
setLinkTextColor(Primary.toArgb()) Another things is links underline. My design requires it to be removed. Refer to Spannable.removeLinksUnderline below.
Combining everything together
In HtmlText there is a line:
update = < it.text = fromHtml(it.context, html) >, Where fromHtml is a custom method. Let’s look at it here.
At first, it takes a string and makes a Spannable from it:
private fun parse(html: String): Spannable = (HtmlCompat.fromHtml(html, HtmlCompat.FROM_HTML_MODE_COMPACT) as Spannable) And then several Spannable transformations are made:
- Links underlines are removed in Spannable.removeLinksUnderline()
- Spannable.styleBold(context: Context) :
- makes bold parts black (the default text for my HtmlText composables is gray but I want the bold parts to be black);
- sets a dedicated font for the bold parts.
strings.xml
Finally, it’s important to show how I declare strings. This is a regular string with HTML (no links):
 For your eyes only! Anyone who has access to your 12 word recovery phrase can access your entire wallet. Learn more
]]>
And this is the same text but with the link:
As you see, I’m using link_1 and link_2 href s to declare a link. Later, in a callback I can do whenever I want. In my case, I open a build-in browser page to handle it.
Visual example
That’s it! With ~100 lines of code we are now able to display almost any HTML. Let’s look at the example:
HtmlText(
modifier = Modifier.padding(top = SIZE_16, bottom = SIZE_32),
html = stringResource(id = R.string.create_drive_pass_description),
textStyle = Typography.body1.copy(textAlign = TextAlign.Center, color = Secondary),
onLink1Clicked = onLearnMoreClicked
)
That’s it! Thank you for reading.
You can support my work by clapping this article or sharing it.
Использование RichText в Android. Spannable
Привет Хабраобщество! Эта статья об использовании Spannable в Android. Предназначен он для стилизации текста. Если Вас интересует как реализовать нечто подобное:

тогда добро пожаловать под кат. Статья ориентированная на разработчиков, у которых нет большого опыта разработки под Android.
Теория
Spannable — интерфейс, который описывает маркировку обычного текста некими объектами. Задание этих объектов заключается в присвоению части текста некоторого определенного стиля. Такими маркировочными объектами могут быть экземпляры классов, которые реализуют интерфейс ParcelableSpan. Добавление маркировки осуществляется методом:
Spannable.setSpan(Object span, int start, int end, int flags); Удаление, соответственно, методом:
Spannable.removeSpan(Object span); Теории немного, перейдем сразу к практике.
Практика
Для освоения практики необходимо создать android проект или открыть уже существующий. Я создал чистый проект, на главную activity разместил один TextView. Идем в метод, где будем инициализировать наш TextView (у меня onCreate) и добавляем следующий текст:
// Create spannable text and set style. Spannable text = new SpannableString("This is underline and bold text."); text.setSpan(new UnderlineSpan(), 8, 17, Spanned.SPAN_EXCLUSIVE_EXCLUSIVE); text.setSpan(new StyleSpan(Typeface.BOLD), 22, 26, Spanned.SPAN_EXCLUSIVE_EXCLUSIVE); // Set spannable text in TextView. TextView textView = (TextView) findViewById(R.id.text); textView.setText(text); Итак, разберемся что же мы написали. SpannableString — класс, который реализует интерфейс Spannable (с другими реализациями можно ознакомится на сайте официальной документации). UnderlineSpan — реализация ParcelableSpan, маркирует часть текста как подчеркнутый (в нашем примере это с 8-ой по 17-тую букву). Флаг Spanned.SPAN_EXCLUSIVE_EXCLUSIVE обозначает, что наш span не будет расширятся на вставки текста слева или справа от маркированной части. (Со всеми флагами можно ознакомится на официальном сайте, при работе с текстами readonly они не столь важны).
Также здесь ми использовали еще одну реализацию ParcelableSpan — StyleSpan. Как вы уже догадались, с его помощью можно маркировать текст как полужирный (Typeface.BOLD) или курсив (Typeface.ITALIC).
С кодом ми разобрались, запускаем наш проект и смотрим на результат. Текст должен выглядеть следующим образом:
Хорошо, идем дальше: добавим на наше activity кнопку, а в инициализирующий метод следующий текст:
// Create spannable text and set style. Spannable buttonText = new SpannableString("Italic text"); buttonText.setSpan(new StyleSpan(Typeface.ITALIC), 0, 6, Spanned.SPAN_EXCLUSIVE_EXCLUSIVE); // Set spannable text in TextView. Button button = (Button) findViewById(R.id.button); button.setText(buttonText); На этот раз не будем разбирать код, ничего нового уже для нас нет. Мы использовали маркировку курсивом, которую я описал выше. Запускаем, смотрим.

Мы смогли вывести стилизованный текст на кнопку.
Пойдем еще дальше, реализуем обработчик события клика кнопки, в нем пишем следующий код:
Spannable text = new SpannableString("Italic green text in toast"); text.setSpan(new StyleSpan(Typeface.ITALIC), 0, 18, Spanned.SPAN_EXCLUSIVE_EXCLUSIVE); text.setSpan(new ForegroundColorSpan(Color.GREEN), 0, 18, Spanned.SPAN_EXCLUSIVE_EXCLUSIVE); Toast.makeText(this, text, Toast.LENGTH_LONG).show(); Здесь у нас появляется новый класс — ForegroundColorSpan, который задает цвет нашему тексту, в примере мы задали зеленой. Мы его используем в паре с StyleSpan. Запускаем приложение, смотрим на результат.

Мы смогли запихнуть стилизованный текст даже в Toast. Также мы показали, что для одной части текста можно использовать несколько маркировок со стилями.
Вместо заключения
В примере мы использовали только некоторые из доступных стилей, больший список можно посмотреть на сайте разработчиков. Думаю вы сможете поэкспериментировать с ними.
Целью статьи было в доступной форме показать столь сильный и простой инструмент для стилизации своего приложения разработчикам, которые не знали о его существовании или просто не использовали его. Надеюсь что статья будет полезна.