- Simple Shopping List In Vanilla Javascript (Free Source Code)
- TABLE OF CONTENTS
- JAVASCRIPT SHOPPING LIST
- SHOPPING LIST DEMO
- PART 1) SHOPPING LIST HTML
- SHOPPING LIST
- PART 2) SHOPPING LIST JAVASCRIPT
- 2A) SHOPPING LIST INITIALIZATION
- 2B) ADD ITEM & SAVING INTO LOCAL STORAGE
- 2C) DELETE ITEM
- 2D) TOGGLE ITEM STATUS
- 2E) DRAW HTML SHOPPING LIST
- 2F) GENERATED SHOPPING LIST HTML
- PART 3) PROGRESSIVE WEB APP
- 3A) HTML META HEADERS
- 3B) WEB MANIFEST
- 3C) SERVICE WORKER
- DOWNLOAD & NOTES
- SUPPORT
- EXAMPLE CODE DOWNLOAD
- EXTRA BITS & LINKS
- COMPATIBILITY CHECKS
- LINKS & REFERENCES
- THE END
- Simple Javascript Shopping Cart (Free Code Download)
- TABLE OF CONTENTS
- JAVASCRIPT SHOPPING CART
- PART 1) THE HTML
- PART 2) THE PRODUCTS
- PART 3) THE JAVASCRIPT
- 3A) THE PROPERTIES
- 3B) WORKING WITH LOCALSTORAGE
- 3C) SHOPPING CART INITIALIZATION
- 3D) DRAW SHOPPING CART ITEMS
- 3E) SHOPPING CART ACTIONS
- DOWNLOAD & NOTES
- SUPPORT
- EXAMPLE CODE DOWNLOAD
- EXTRA BITS & LINKS
- MULTIPLE PRODUCT CATEGORIES?
- PRODUCT OPTIONS
- A WAY BETTER SHOPPING CART
- HOW TO “COMPLETE THE CHECKOUT”
- COMPATIBILITY CHECKS
- LINKS & REFERENCES
- THE END
Simple Shopping List In Vanilla Javascript (Free Source Code)
Welcome to a tutorial on how to create a simple shopping list in vanilla Javascript. Nope, I totally did not get the idea for this tutorial from a certain Javascript challenge. It’s original content. 😆 Anyway, a shopping list is totally possible these days with modern Javascript, using the local storage API – That is what we will be using in this guide. Read on to find out!
TABLE OF CONTENTS
JAVASCRIPT SHOPPING LIST
All right, let us now get into the details of the Javascript shopping list itself.
SHOPPING LIST DEMO
PART 1) SHOPPING LIST HTML
SHOPPING LIST
The HTML is very straightforward, and we only have 2 sections in the interface:
- – Just a simple, single text field HTML form that we will use to add items to the list.
- – We will use Javascript to dynamically generate the shopping list in this empty container.
That’s all to the HTML page, the rest of the mechanics will be driven by Javascript.
PART 2) SHOPPING LIST JAVASCRIPT
2A) SHOPPING LIST INITIALIZATION
// (A) INITIALIZE SHOPPING LIST items : [], // current shopping list hform : null, // html add item hitem : null, // html add item field hadd : null, // html add item submit button hlist : null, // html shopping list init : () => < // (A1) GET HTML ELEMENTS slist.hform = document.getElementById("shop-form"); slist.hitem = document.getElementById("shop-item"); slist.hadd = document.getElementById("shop-add"); slist.hlist = document.getElementById("shop-list"); // (A2) "ACTIVATE" HTML ADD ITEM FORM slist.hitem.setAttribute("autocomplete", "off"); slist.hform.onsubmit = slist.add; slist.hitem.disabled = false; slist.hadd.disabled = false; // (A3) RESTORE PREVIOUS SHOPPING LIST if (localStorage.items == undefined) < localStorage.items = "[]"; >slist.items = JSON.parse(localStorage.items); // (A4) DRAW HTML SHOPPING LIST slist.draw(); > window.addEventListener("load", slist.init);The first thing that we do on page load is to run the slist.init() function to set up the shopping list. What this function does is very straightforward –
- (A1 & A2) Get all the related HTML elements, and initialize the “add item” form.
- (A3) Load the previously saved shopping cart from localstorage.items and restore it into slist.items .
- (A4) Finally, draw the HTML shopping list.
Yep, that’s all. The only thing to take extra here is the slist.items array – This is where we save the raw shopping list data and use it to draw the HTML.
2B) ADD ITEM & SAVING INTO LOCAL STORAGE
// (B) SAVE SHOPPING LIST INTO LOCAL STORAGE save : () => < if (localStorage.items == undefined) < localStorage.items = "[]"; >localStorage.items = JSON.stringify(slist.items); > // (C) ADD NEW ITEM TO THE LIST add : evt => < // (C1) PREVENT FORM SUBMIT evt.preventDefault(); // (C2) ADD NEW ITEM TO LIST slist.items.push(< name : slist.hitem.value, // item name done : false // true for "got it", false for "not yet" >); slist.hitem.value = ""; slist.save(); // (C3) REDRAW HTML SHOPPING LIST slist.draw(); >Moving on, the slist.add() function is fired whenever the user adds a new item.
- (C1) Captain Obvious, to stop the HTML form from submitting and reloading the entire page.
- (C2) Take note of how the new item is being pushed as an object into the slist.items array – < name:"ITEM NAME", done:true/false >
- (B & C2) Update the localstorage .
- (C3) Lastly, redraw the updated list.
2C) DELETE ITEM
// (D) DELETE SELECTED ITEM delete : < if (confirm("Remove this item?")) < slist.items.splice(id, 1); slist.save(); slist.draw(); >>Yep – This should be self-explanatory. Remove a specified item from slist.items , update the localstorage , then update the HTML.
2D) TOGGLE ITEM STATUS
// (E) TOGGLE ITEM BETWEEN "GOT IT" OR "NOT YET" toggle :
This function toggles the “status” of the item between “got it” and “not yet” – Don’t think it needs explanation.
2E) DRAW HTML SHOPPING LIST
// (F) DRAW THE HTML SHOPPING LIST draw : () => < // (F1) RESET HTML LIST slist.hlist.innerHTML = ""; // (F2) NO ITEMS if (slist.items.length == 0) < slist.hlist.innerHTML = "No items found."; > // (F3) DRAW ITEMS else < for (let i in slist.items) < // ITEM ROW let row = document.createElement("div"); row.className = "item-row"; slist.hlist.appendChild(row); // ITEM NAME let name = document.createElement("div"); name.innerHTML = slist.items[i].name; name.className = "item-name"; if (slist.items[i].done) < name.classList.add("item-got"); >row.appendChild(name); // DELETE BUTTON let del = document.createElement("input"); del.className = "item-del"; del.type = "button"; del.value = "Delete";; del.onclick = () => < slist.delete(i); >; row.appendChild(del); // COMPLETED/NOT YET BUTTON let ok = document.createElement("input"); ok.className = "item-ok"; ok.type = "button"; ok.value = slist.items[i].done ? "Not Yet" : "Got It"; ok.onclick = () => < slist.toggle(i); >; row.appendChild(ok); > > >Lastly, don’t let this slist.draw() function intimidate you. It may look massive, but all it does is loop through slist.hlist and create the HTML – Which we already went through in all of the above sections.
2F) GENERATED SHOPPING LIST HTML
If you are wondering – This is an example of what the above slist.draw() generates into .
PART 3) PROGRESSIVE WEB APP
3A) HTML META HEADERS
if ("serviceWorker" in navigator) 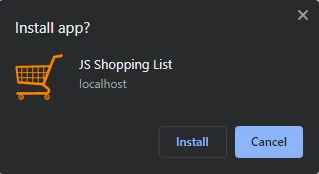
We already have a fully functioning app, and this part is completely optional. But to turn this into an installable web app, all we need is:
- Define a whole load of “icons and app name” meta headers.
- Create a web manifest file.
- Register a service worker to support “offline mode”.
3B) WEB MANIFEST
< "short_name": "JS Shopping List", "name": "JS Shopping List", "icons": [< "src": "favicon.png", "sizes": "512x512", "type": "image/png" >], "start_url": "shop-list.html", "scope": "/", "background_color": "white", "theme_color": "white", "display": "standalone" >The manifest file is what it is. A file to contain information about your web app – The name, icons, preferred settings, etc.
3C) SERVICE WORKER
// (A) CREATE/INSTALL CACHE self.addEventListener("install", evt => < self.skipWaiting(); evt.waitUntil( caches.open("ShopList") .then(cache =>cache.addAll([ "favicon.png", "1-shop-list.css", "1-shop-list.html", "2-shop-list.js", "3-manifest.json" ])) .catch(err => console.error(err)) ); >); // (B) CLAIM CONTROL INSTANTLY self.addEventListener("activate", evt => self.clients.claim()); // (C) LOAD FROM CACHE FIRST, FALLBACK TO NETWORK IF NOT FOUND self.addEventListener("fetch", evt => evt.respondWith( caches.match(evt.request).then(res => res || fetch(evt.request)) )); For those who are new, a service worker is simply a piece of Javascript that runs in the background. In this simple worker:
- (A) We tell the browser to cache a whole list of project files.
- (C) “Hijack” the fetch requests. If the requested file is cached, use the cached copy; If not, fallback to loading from the network.
In a nutshell, enabling “offline mode”. This app will still run from the browser cache even when the user is offline.
DOWNLOAD & NOTES
Here is the download link to the example code, so you don’t have to copy-paste everything.
SUPPORT
600+ free tutorials & projects on Code Boxx and still growing. I insist on not turning Code Boxx into a «paid scripts and courses» business, so every little bit of support helps.
EXAMPLE CODE DOWNLOAD
Click here for the source code on GitHub gist, just click on “download zip” or do a git clone. I have released it under the MIT license, so feel free to build on top of it or use it in your own project.
EXTRA BITS & LINKS
That’s all for this project, and here is a small section on some extras and links that may be useful to you.
COMPATIBILITY CHECKS
This shopping list will work on all modern browsers.
LINKS & REFERENCES
THE END
Thank you for reading, and we have come to the end of this guide. I hope that it has helped you with your project, and if you want to share anything with this guide, please feel free to comment below. Good luck and happy coding!
Simple Javascript Shopping Cart (Free Code Download)
Welcome to a tutorial on how to create a simple vanilla Javascript Shopping Cart. Looking to build an eCommerce website or web app? Not too keen on the complicated bloated scripts and just need a simple interface? Well, here it is. A standalone local storage shopping cart that does not use any frameworks – Read on to find out!
TABLE OF CONTENTS
JAVASCRIPT SHOPPING CART
All right, let us now get into the mechanics of the shopping cart itself.
PART 1) THE HTML
- The HTML interface should be very straightforward with only 2 sections in the container:
- To contain the list of products.
- To show the current items in the cart.
- HTML templates for the product and cart items.
PART 2) THE PRODUCTS
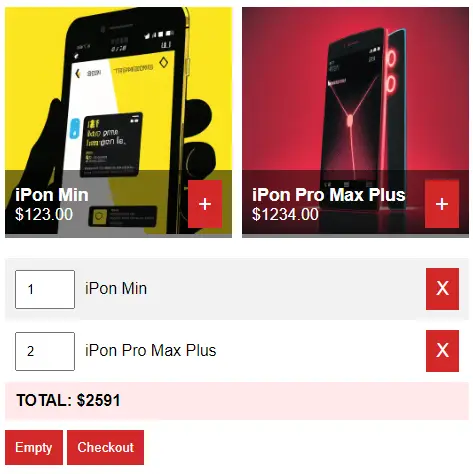
// DUMMY PRODUCTS (PRODUCT ID : DATA) var products = < 123: < name : "iPon Min", img : "JS-CART-1.png", price : 123 >, 124: < name : "iPon Pro Max Plus", img : "JS-CART-2.png", price : 1234 >>;Since we don’t have a database here, the only option is to hardcode all the products in a script.
PART 3) THE JAVASCRIPT
3A) THE PROPERTIES
var cart = < // (A) PROPERTIES hPdt : null, // html products list hItems : null, // html current cart items : <>, // current items in cart iURL : "images/", // product image url folder currency : "$", // currency symbol total : 0, // total amount >;- cart.hPdt and cart.hItems shouldn’t be too difficult to understand – We will use these to refer to and .
- cart.items contains the current items in the cart. This is simply an object that has the format of PRODUCT ID : QUANTITY .
- iURL is the URL to the product image folder.
- currency and total The currency symbol and the total amount of items in the cart.
3B) WORKING WITH LOCALSTORAGE
// (B) LOCALSTORAGE CART // (B1) SAVE CURRENT CART INTO LOCALSTORAGE save : () => localStorage.setItem("cart", JSON.stringify(cart.items)), // (B2) LOAD CART FROM LOCALSTORAGE load : () => < cart.items = localStorage.getItem("cart"); if (cart.items == null) < cart.items = <>; > else < cart.items = JSON.parse(cart.items); >>, // (B3) NUKE CART! nuke : () => < if (confirm("Empty cart?")) < cart.items = <>; localStorage.removeItem("cart"); cart.list(); >>- cart.save() simply saves cart.items into the local storage.
- cart.load() will fetch the data from the local storage and restore cart.items .
- Lastly, cart.nuke() will empty the entire cart.
3C) SHOPPING CART INITIALIZATION
// (C) INITIALIZE init : () => < // (C1) GET HTML ELEMENTS cart.hPdt = document.getElementById("cart-products"); cart.hItems = document.getElementById("cart-items"); // (C2) DRAW PRODUCTS LIST cart.hPdt.innerHTML = ""; let template = document.getElementById("template-product").content, p, item; for (let id in cart.products) < p = cart.products[id]; item = template.cloneNode(true); item.querySelector(".p-img").src = cart.iURL + p.img; item.querySelector(".p-name").textContent = p.name; item.querySelector(".p-price").textContent = cart.currency + p.price.toFixed(2); item.querySelector(".p-add").onclick = () =>cart.add(id); cart.hPdt.appendChild(item); > // (C3) LOAD CART FROM PREVIOUS SESSION cart.load(); // (C4) LIST CURRENT CART ITEMS cart.list(); >- (C1) “Tie” cart.hPdt to and cart.hItems to .
- (C2) Draw the list of products.
- (C3) Load the cart from the previous session.
- (C4) Draw the current cart items.
3D) DRAW SHOPPING CART ITEMS
// (D) LIST CURRENT CART ITEMS (IN HTML) list : () => < // (D1) RESET cart.total = 0; cart.hItems.innerHTML = ""; let item, empty = true; for (let key in cart.items) < if (cart.items.hasOwnProperty(key)) < empty = false; break; >> // (D2) CART IS EMPTY if (empty) < item = document.createElement("div"); item.innerHTML = "Cart is empty"; cart.hItems.appendChild(item); >// (D3) CART IS NOT EMPTY - LIST ITEMS else < let template = document.getElementById("template-cart").content, p; for (let id in cart.items) < p = cart.products[id]; item = template.cloneNode(true); item.querySelector(".c-del").onclick = () =>cart.remove(id); item.querySelector(".c-name").textContent = p.name; item.querySelector(".c-qty").value = cart.items[id]; item.querySelector(".c-qty").onchange = function () < cart.change(id, this.value); >; cart.hItems.appendChild(item); cart.total += cart.items[id] * p.price; > // (D3-3) TOTAL AMOUNT item = document.createElement("div"); item.className = "c-total"; item.id = "c-total"; item.innerHTML = `TOTAL: $$`; cart.hItems.appendChild(item); // (D3-4) EMPTY & CHECKOUT item = document.getElementById("template-cart-checkout").content.cloneNode(true); cart.hItems.appendChild(item); > >The list() function draws the current cart items into . Looks complicated, but it is just generating a whole load of HTML.
3E) SHOPPING CART ACTIONS
// (E) ADD ITEM INTO CART add : < if (cart.items[id] == undefined) < cart.items[id] = 1; >else < cart.items[id]++; >cart.save(); cart.list(); >, // (F) CHANGE QUANTITY change : (pid, qty) => < // (F1) REMOVE ITEM if (qty // (F2) UPDATE TOTAL ONLY else < cart.items[pid] = qty; var total = 0; for (let id in cart.items) < cart.total += cart.items[id] * products[id].price; document.getElementById("c-total").innerHTML = `TOTAL: $$`; > > >, // (G) REMOVE ITEM FROM CART remove : < delete cart.items[id]; cart.save(); cart.list(); >, // (H) CHECKOUT checkout : () => < // SEND DATA TO SERVER // CHECKS // SEND AN EMAIL // RECORD TO DATABASE // PAYMENT // WHATEVER IS REQUIRED alert("TO DO"); /* var data = new FormData(); data.append("cart", JSON.stringify(cart.items)); data.append("products", JSON.stringify(products)); data.append("total", cart.total); fetch("SERVER-SCRIPT", < method:"POST", body:data >) .then(res=>res.text()) .then(res => console.log(res)) .catch(err => console.error(err)); */ >- cart.add() Adds a selected item into the cart. Remember the format of cart.items = < ID : QUANTITY >? That is exactly what we are doing here.
- cart.change() Changes the quantity of the item in the cart.
- cart.remove() Removes an item from the cart.
- cart.checkout() Is up to you to complete – Send the order via email, SMS, save to database, save to Google Forms, etc…
DOWNLOAD & NOTES
Here is the download link to the example code, so you don’t have to copy-paste everything.
SUPPORT
600+ free tutorials & projects on Code Boxx and still growing. I insist on not turning Code Boxx into a «paid scripts and courses» business, so every little bit of support helps.
EXAMPLE CODE DOWNLOAD
Click here for the source code on GitHub gist, just click on “download zip” or do a git clone. I have released it under the MIT license, so feel free to build on top of it or use it in your own project.
EXTRA BITS & LINKS
That’s all for this project, and here is a small section on some extras and links that may be useful to you.
MULTIPLE PRODUCT CATEGORIES?
- Create another var categories object to hold the product IDs of each category. For example < CATEGORY-A: [123, 124, 125], CATEGORY-B: [1, 2, 3] >.
- Modify the cart.draw() function to draw the products in a selected category.
PRODUCT OPTIONS
- Create a new var options = < color : [red, green, blue], size : [small, large], . >.
- Attach the options to products.
- Change the product list to also draw the options.
- Change the way the cart records items – PRODUCT-ID[OPTION][VALUE][OPTION][VALUE] : QUANTITY .
Yes, that’s all, just a few steps only. Please don’t ask about product options again… It is “so simple” that I don’t even want to touch on it.
A WAY BETTER SHOPPING CART
A shopping cart with product options, categories, discount coupons, user system, admin panel, API, and an installable web app — Click here to check out my eBook!
HOW TO “COMPLETE THE CHECKOUT”
- Save order to the database.
- Save order to Google Forms.
- Send order via email.
- Send order via SMS.
- Process online payment.
- Link up with other systems.
As you can guess, there is simply no way that I can explain “how to checkout” in every possible scenario and language. Neither can I give free consultation services. So it is up to you to complete your own checkout sequence. If you need more examples, check out the PHP MySQL shopping cart link below… Or get my eBook above. 😆
COMPATIBILITY CHECKS
Works well in all modern browsers. If you want to be safe, use Modernizr to do feature checks and even load polyfills.
LINKS & REFERENCES
- Need a more “substantial” cart? Check out my PHP MySQL Shopping Cart tutorial.
- Shopping Cart Design Ideas – SpeckyBoy
- Javascript POS System – Code Boxx
- Javascript Food Ordering System – Code Boxx
- Example on CodePen – JS Shopping Cart
THE END
Thank you for reading, and we have come to the end of this guide. I hope that it has helped you with your project, and if you want to share anything with this guide, please feel free to comment below. Good luck and happy coding!