- CSS box alignment
- Older alignment methods
- Basic examples
- CSS grid layout alignment example
- Flexbox Alignment Example
- Key concepts and terminology
- Relationship to writing modes
- Two dimensions of alignment
- The alignment subject
- The alignment container
- Fallback alignment
- Types of alignment
- Positional alignment keyword values
- Baseline alignment
- Distributed alignment
- Overflow alignment
- Gaps between boxes
- Pages detailing individual alignment properties
- Reference
- CSS Properties
- Glossary Entries
- CSS Layout — Horizontal & Vertical Align
- Example
- Center Align Text
- Example
- Center an Image
- Example
- Left and Right Align — Using position
- Example
- Left and Right Align — Using float
- Example
- The clearfix Hack
- Without Clearfix
- With Clearfix
- Example
- Center Vertically — Using padding
- Example
- Example
- Center Vertically — Using line-height
- Example
- Center Vertically — Using position & transform
- Example
- Center Vertically — Using Flexbox
- Example
CSS box alignment
The CSS box alignment module specifies CSS features that relate to the alignment of boxes in the various CSS box layout models: block layout, table layout, flex layout, and grid layout. The module aims to create a consistent method of alignment across all of CSS. This document details the general concepts found in the specification.
Note: The documentation for each layout method will detail how Box Alignment is applied there.
Older alignment methods
CSS traditionally had very limited alignment capabilities. We were able to align text using text-align , center blocks using auto margin s, and in table or inline-block layouts using the vertical-align property. Alignment of text is now covered by the Inline Layout and CSS Text modules, and for the first time in Box Alignment we have full horizontal and vertical alignment capabilities.
If you initially learned Flexbox then you may consider these properties to be part of the Flexbox specification, and some of the properties are indeed listed in Level 1 of Flexbox. However the specification notes that the Box Alignment specification should be referred to as it may add additional capabilities over what is currently in Flexbox.
Basic examples
The following examples demonstrate how some of the Box Alignment Properties are applied in Grid and Flexbox.
CSS grid layout alignment example
In this example using Grid Layout, there is extra space in the grid container after laying out the fixed width tracks on the inline (main) axis. This space is distributed using justify-content . On the block (cross) axis the alignment of the items inside their grid areas is controlled with align-items . The first item overrides the align-items value set on the group by setting align-self to center .
Flexbox Alignment Example
In this example, three flex items are aligned on the main axis using justify-content and on the Cross Axis using align-items . The first item overrides the align-items set on the group by setting align-self to center .
Key concepts and terminology
The specification details some alignment terminology to make it easier to discuss these alignment properties outside their implementation within a particular layout method. There are also some key concepts which are common to all layout methods.
Relationship to writing modes
Alignment is linked to writing modes in that when we align an item we do not consider whether we are aligning it to the physical dimensions of top, right, bottom and left. Instead we describe alignment in terms of the start and end of the particular dimension we are working with. This ensures that alignment works in the same way whichever writing mode the document has.
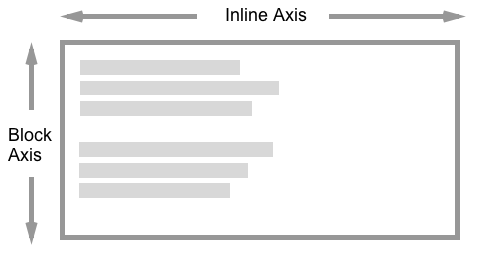
Two dimensions of alignment
When using the box alignment properties you will align content on one of two axes — the inline (or main) axis, and the block (or cross) axis. The inline axis is the axis along which words in a sentence flow in the writing mode being used — for English, for example, the inline axis is horizontal. The block axis is the axis along which blocks, such as paragraph elements, are laid out and it runs across the Inline axis.
When aligning items on the inline axis you will use the properties which begin with justify- :
When aligning items on the block axis you will use the properties that begin align- :
Flexbox adds an additional complication in that the above is true when flex-direction is set to row . The properties are swapped when flexbox is set to column . Therefore, when working with flexbox it is easier to think about the main and cross axis rather than inline and block. The justify- properties are always used to align on the main axis, the align- properties on the cross axis.
The alignment subject
The alignment subject is the thing that is being aligned. For justify-self or align-self , or when setting these values as a group with justify-items or align-items , this will be the margin box of the element that this property is being used on. The justify-content and align-content properties differ per layout method.
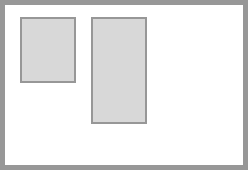
The alignment container
The alignment container is the box the subject is being aligned inside. This will typically be the alignment subject’s containing block. An alignment container may contain one or many alignment subjects.
The below image shows an alignment container with two alignment subjects inside.
Fallback alignment
If you set an alignment that cannot be fulfilled, then the fallback alignment will come into play and deal with the available space. This fallback alignment is specified individually for each layout method and detailed on the page for that method.
Types of alignment
There are three different types of alignment that the specification details; these use keyword values.
- Positional alignment: specifying the position of an alignment subject with relation to its alignment container.
- Baseline alignment: These keywords define alignment as a relationship among the baselines of multiple alignment subjects within an alignment context.
- Distributed alignment: These keywords define alignment as a distribution of space among alignment subjects.
Positional alignment keyword values
The following values are defined for positional alignment, and can be used as values for content alignment with justify-content and align-content and also for self alignment with justify-self and align-self .
- center
- start
- end
- self-start
- self-end
- flex-start for Flexbox only
- flex-end for Flexbox only
- left
- right
Other than the physical values of left and right , which relate to physical attributes of the screen, all of the other values are logical values and relate to the writing mode of the content.
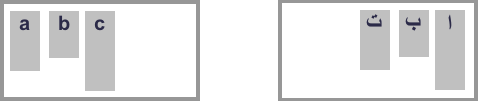
For example, when working in CSS Grid Layout, if you are working in English and set justify-content to start this will move the items in the inline dimension to the start, which will be the left as sentences in English start on the left. If you were using Arabic, a right to left language, then the same value of start would result in the items moving to the right, as sentences in Arabic start on the right-hand side of the page.
Both of these examples have justify-content: start , however the location of start changes according to the writing mode.
Baseline alignment
The Baseline alignment keywords are used to align the baselines of boxes across a group of alignment subjects. They can be used as values for content alignment with justify-content and align-content and also for self alignment with justify-self and align-self .
Baseline content alignment — specifying a baseline alignment value for justify-content or align-content — works in layout methods that lay items out in rows. The alignment subjects are baseline aligned against each other by adding padding inside the boxes.
Baseline self alignment shifts the boxes to align by baseline by adding a margin outside the boxes. Self alignment is when using justify-self or align-self , or when setting these values as a group with justify-items and align-items .
Distributed alignment
The distributed alignment keywords are used with the align-content and justify-content properties. These keywords define what happens to any additional space after alignment subjects have been displayed. The values are as follows:
For example, in Flex Layout items are aligned with flex-start initially. Working in a horizontal top to bottom writing mode such as English, with flex-direction as row the items start on the far left and any available space after displaying the items is placed after the items.

If you set justify-content: space-between on the flex container, the available space is now shared out and placed between the items.

There needs to be space available in the dimension you wish to align the items in, in order for these keywords to take effect. With no space, there is nothing to distribute.
Overflow alignment
The safe and unsafe keywords help define behavior when an alignment subject is larger than the alignment container. The safe keyword will align to start in the case of a specified alignment causing an overflow, the aim being to avoid «data loss» where part of the item is outside the boundaries of the alignment container and can’t be scrolled to.
If you specify unsafe then the alignment will be honoured even if it would cause such data loss.
Gaps between boxes
The box alignment specification also includes the gap , row-gap , and column-gap properties. These properties enable the setting of a consistent gap between items in a row or column, in any layout method which has items arranged in this way.
The gap property is a shorthand for row-gap and column-gap , which allows us to set these properties at once:
In the below example, a grid layout uses the gap shorthand to set a 10px gap between row tracks, and a 2em gap between column tracks.
Note: The early grid implementation included -gap properties prefixed with grid- . All browsers now support the unprefixed properties, though you may see the following legacy properties in examples and tutorials: grid-row-gap , grid-column-gap , and grid-gap . The prefixed versions will be maintained as an alias of the unprefixed ones.
Be aware that other things may increase the visual gap displayed, for example using the space distribution keywords or adding margins to items.
Pages detailing individual alignment properties
As the CSS box alignment properties are implemented differently depending on the specification they interact with, refer to the following pages for each layout type for details of how to use the alignment properties with it:
Reference
CSS Properties
Glossary Entries
CSS Layout — Horizontal & Vertical Align
Setting the width of the element will prevent it from stretching out to the edges of its container.
The element will then take up the specified width, and the remaining space will be split equally between the two margins:
This div element is centered.
Example
Note: Center aligning has no effect if the width property is not set (or set to 100%).
Center Align Text
To just center the text inside an element, use text-align: center;
Example
Tip: For more examples on how to align text, see the CSS Text chapter.
Center an Image
To center an image, set left and right margin to auto and make it into a block element:

Example
Left and Right Align — Using position
One method for aligning elements is to use position: absolute; :
In my younger and more vulnerable years my father gave me some advice that I’ve been turning over in my mind ever since.
Example
Note: Absolute positioned elements are removed from the normal flow, and can overlap elements.
Left and Right Align — Using float
Another method for aligning elements is to use the float property:
Example
The clearfix Hack
Note: If an element is taller than the element containing it, and it is floated, it will overflow outside of its container. You can use the «clearfix hack» to fix this (see example below).
Without Clearfix
![]()
With Clearfix
![]()
Then we can add the clearfix hack to the containing element to fix this problem:
Example
Center Vertically — Using padding
There are many ways to center an element vertically in CSS. A simple solution is to use top and bottom padding :
Example
To center both vertically and horizontally, use padding and text-align: center :
I am vertically and horizontally centered.
Example
Center Vertically — Using line-height
Another trick is to use the line-height property with a value that is equal to the height property:
I am vertically and horizontally centered.
Example
.center <
line-height: 200px;
height: 200px;
border: 3px solid green;
text-align: center;
>
/* If the text has multiple lines, add the following: */
.center p line-height: 1.5;
display: inline-block;
vertical-align: middle;
>
Center Vertically — Using position & transform
If padding and line-height are not options, another solution is to use positioning and the transform property:
I am vertically and horizontally centered.
Example
.center <
height: 200px;
position: relative;
border: 3px solid green;
>
.center p margin: 0;
position: absolute;
top: 50%;
left: 50%;
transform: translate(-50%, -50%);
>
Tip: You will learn more about the transform property in our 2D Transforms Chapter.
Center Vertically — Using Flexbox
You can also use flexbox to center things. Just note that flexbox is not supported in IE10 and earlier versions:
Example
.center <
display: flex;
justify-content: center;
align-items: center;
height: 200px;
border: 3px solid green;
>
Tip: You will learn more about Flexbox in our CSS Flexbox Chapter.