- HTMLTableElement: insertRow() method
- Syntax
- Parameters
- Return value
- Exceptions
- Examples
- HTML
- JavaScript
- Result
- Specifications
- Browser compatibility
- See also
- Found a content problem with this page?
- MDN
- Support
- Our communities
- Developers
- Add HTML Table Rows & Cells In Javascript (Simple Examples)
- TLDR – QUICK SLIDES
- TABLE OF CONTENTS
- ADD ROWS & CELLS
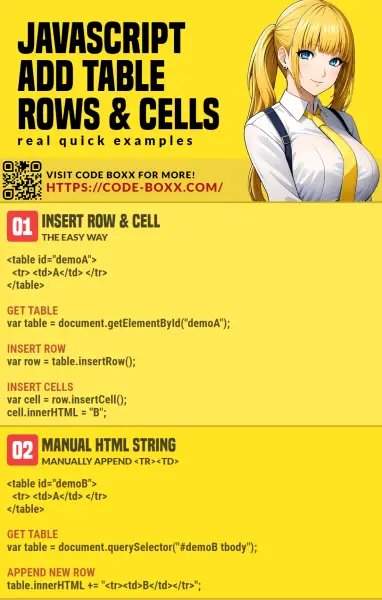
- 1) INSERT ROWS & CELLS
- 2) MANUAL HTML STRING
- DOWNLOAD & NOTES
- SUPPORT
- EXAMPLE CODE DOWNLOAD
- EXTRA BITS & LINKS
- WHICH IS BETTER?
- LINKS & REFERENCES
- INFOGRAPHIC CHEAT SHEET
- THE END
- Table insertRow() Method
- Browser Support
- Syntax
- Parameter Values
- Technical Details
- More Examples
- Example
- Related Pages
- COLOR PICKER
- Report Error
- Thank You For Helping Us!
- How to Add Row to HTML Table Using JavaScript
- How to Add Row to HTML Table Using JavaScript?
- Method 1: Add Row to HTML Table Using insertRow() Method
- Example 1: Adding a Row at the Top/Start of the Table
- Example 2: Adding a Row at the End of the Table
- Method 2: Add Row to HTML Table by Creating New Element
- Example
- Conclusion
- About the author
- Farah Batool
HTMLTableElement: insertRow() method
The HTMLTableElement.insertRow() method inserts a new row ( ) in a given , and returns a reference to the new row.
let specific_tbody = document.getElementById(tbody_id); let row = specific_tbody.insertRow(index);
Syntax
Parameters
The row index of the new row. If index is -1 or equal to the number of rows, the row is appended as the last row. If index is omitted it defaults to -1 .
Return value
An HTMLTableRowElement that references the new row.
Exceptions
Thrown if index is greater than the number of rows.
Examples
This example uses insertRow(-1) to append a new row to a table.
HTML
table id="my-table"> tr> td>Row 1td> tr> tr> td>Row 2td> tr> tr> td>Row 3td> tr> table>
JavaScript
function addRow(tableID) // Get a reference to the table let tableRef = document.getElementById(tableID); // Insert a row at the end of the table let newRow = tableRef.insertRow(-1); // Insert a cell in the row at index 0 let newCell = newRow.insertCell(0); // Append a text node to the cell let newText = document.createTextNode("New bottom row"); newCell.appendChild(newText); > // Call addRow() with the table's ID addRow("my-table");
Result
Specifications
Browser compatibility
BCD tables only load in the browser
See also
Found a content problem with this page?
This page was last modified on Apr 7, 2023 by MDN contributors.
Your blueprint for a better internet.
MDN
Support
Our communities
Developers
Visit Mozilla Corporation’s not-for-profit parent, the Mozilla Foundation.
Portions of this content are ©1998– 2023 by individual mozilla.org contributors. Content available under a Creative Commons license.
Add HTML Table Rows & Cells In Javascript (Simple Examples)
Welcome to a quick tutorial on how to add HTML table rows and cells in Javascript. Need to dynamically update an HTML table using Javascript?
To add new rows and cells to an HTML table in Javascript:
- Get the table – var table = document.getElementById(«TABLE»);
- Add a new row – var row = table.insertRow();
- Append the cells – var cell = row.insertCell();
- Set cell content – cell.innerHTML = «TEXT»;
That should cover the basics, but read on for more examples!
TLDR – QUICK SLIDES

TABLE OF CONTENTS
ADD ROWS & CELLS
All right, let us now get into the examples of adding rows and cells to HTML tables.
1) INSERT ROWS & CELLS
| A | B |
- By default, insertRow() will insert to the bottom of the table.
- Use insertRow(0) to add to the top of the table instead.
2) MANUAL HTML STRING
| B |
For you guys who prefer to do it the “manual HTML way”, this is the alternative. But a small word of advice – Directly changing the innerHTML is probably not that good for performance, especially when we have a massive table.
DOWNLOAD & NOTES
Here is the download link to the example code, so you don’t have to copy-paste everything.
SUPPORT
600+ free tutorials & projects on Code Boxx and still growing. I insist on not turning Code Boxx into a «paid scripts and courses» business, so every little bit of support helps.
EXAMPLE CODE DOWNLOAD
Click here for the source code on GitHub gist, just click on “download zip” or do a git clone. I have released it under the MIT license, so feel free to build on top of it or use it in your own project.
EXTRA BITS & LINKS
That’s all for the main tutorial, and here is a small section on some extras and links that may be useful to you.
WHICH IS BETTER?
Personally, I am leaning towards the “object-oriented” create new rows and cells way. That is just a lot more convenient and easier, without having a write manual HTML code. But both methods are correct – Use whichever works best for you.
LINKS & REFERENCES
INFOGRAPHIC CHEAT SHEET
THE END
Thank you for reading, and we have come to the end. I hope that it has helped you to better understand, and if you want to share anything with this guide, please feel free to comment below. Good luck and happy coding!
Table insertRow() Method
The insertRow() method inserts the new row(s) at the specified index in the table.
Tip: Use the deleteRow() method to remove a row.
Browser Support
Syntax
Parameter Values
| Value | Description |
|---|---|
| index | Required in Firefox and Opera, optional in IE, Chrome and Safari. A number that specifies the position of the row to insert (starts at 0). The value of 0 results in that the new row will be inserted at the first position. |
The value of -1 can also be used, this results in a new row being inserted at the last position.
This parameter is required in Firefox and Opera, but optional in Internet Explorer, Chrome and Safari.
Technical Details
More Examples
Example
function myCreateFunction() <
var table = document.getElementById(«myTable»);
var row = table.insertRow(0);
var cell1 = row.insertCell(0);
var cell2 = row.insertCell(1);
cell1.innerHTML = «NEW CELL1»;
cell2.innerHTML = «NEW CELL2»;
>
function myDeleteFunction() document.getElementById(«myTable»).deleteRow(0);
>
Related Pages

COLOR PICKER


Report Error
If you want to report an error, or if you want to make a suggestion, do not hesitate to send us an e-mail:
Thank You For Helping Us!
Your message has been sent to W3Schools.
Top Tutorials
Top References
Top Examples
Get Certified
W3Schools is optimized for learning and training. Examples might be simplified to improve reading and learning. Tutorials, references, and examples are constantly reviewed to avoid errors, but we cannot warrant full correctness of all content. While using W3Schools, you agree to have read and accepted our terms of use, cookie and privacy policy.
How to Add Row to HTML Table Using JavaScript
![]()
Sometimes, while developing a website, there can be a requirement to create or remove rows and cells or add data in a table dynamically using JavaScript. JavaScript is a dynamic language that helps in dynamically controlling, gaining access to, and modifying HTML components on the client side. More specifically, it can be utilized to add a row to an HTML table.
This manual will use JavaScript to explain the procedure for adding a row to a table.
How to Add Row to HTML Table Using JavaScript?
For adding a row in a table, use the following procedures:
Let’s check each procedure individually.
Method 1: Add Row to HTML Table Using insertRow() Method
If you intend to add the row at the last/end of the table, then pass index “-1” as an argument.
Use the following syntax for adding rows in a table with the help of the insertRow() method:
Here, “index” indicates the position where you want to add a new row, such as at the end of the table or at the start.
Example 1: Adding a Row at the Top/Start of the Table
Here, we will create a table and a button in an HTML file using the HTML and tags. The table contains three rows and three columns or cells:
Then, create a button which will invoke the “addRow()” button when clicked:
For styling the table, we will set the border of each cell and the table as given below:
Now, we will add rows in the table at the top/start of the table using JavaScript. To do so, define a function named “addRow()” that will be called on the button’s onclick() event. Then, fetch the created table using the “getElementById()” method. After that, call the “insertRow()” method by passing the “0” index as a parameter that indicates the row will be added at the start of the table.
Then, invoke the “insertCell()” method by passing indexes that show how many cells will be added to the row. Finally, add the text data or text in cells using “innerHTML” property:
functionaddRow ( ) {
var tableRow = document. getElementById ( «table» ) ;
var row = tableRow. insertRow ( 0 ) ;
var cell1 = row. insertCell ( 0 ) ;
var cell2 = row. insertCell ( 1 ) ;
var cell3 = row. insertCell ( 2 ) ;
cell1. innerHTML = «Cell of New Row» ;
cell2. innerHTML = «Cell of New Row» ;
cell3. innerHTML = «Cell of New Row» ;
}
As you can see in the output, the new row is added at the top of the existing table by clicking on the button:
Example 2: Adding a Row at the End of the Table
If you want to insert a row at the last/end of the table, pass the “-1” index to the “insertRow()” method. It will add the row at last when the button is clicked:
functionaddRow ( ) {
var tableRow = document. getElementById ( «table» ) ;
var row = tableRow. insertRow ( — 1 ) ;
var cell1 = row. insertCell ( 0 ) ;
var cell2 = row. insertCell ( 1 ) ;
var cell3 = row. insertCell ( 2 ) ;
cell1. innerHTML = «Cell of New Row» ;
cell2. innerHTML = «Cell of New Row» ;
cell3. innerHTML = «Cell of New Row» ;
}
Let’s move to the other method!
Method 2: Add Row to HTML Table by Creating New Element
Follow the provided syntax to create a new element for adding a row in a table using JavaScript:
Here, the “tr” is the table row.
Example
We will now use the same previously created table in HTML with a CSS file, but in the JavaScript file, we will use the “createElement()” method. Then, add the data or text in the cells using the “innerHTML” property. Lastly, invoke the “appendChild()” method that will add the cells in a row and then the row in a table:
functionaddRow ( ) {
var tableRow = document. getElementById ( «table» ) ;
var row = document. createElement ( «tr» ) ;
var cell1 = document. createElement ( «td» ) ;
var cell2 = document. createElement ( «td» ) ;
var cell3 = document. createElement ( «td» ) ;
cell1. innerHTML = «Cell of New Row» ;
cell2. innerHTML = «Cell of New Row» ;
cell3. innerHTML = «Cell of New Row» ;
row. appendChild ( cell1 ) ;
row. appendChild ( cell2 ) ;
row. appendChild ( cell3 ) ;
tableRow. appendChild ( row ) ;
}
The output shows that the new row is successfully added at the end of the table:
We have compiled all the methods for adding a row in a table using JavaScript.
Conclusion
For adding a row in a table, use the two approaches: insertRow() method or create a new element using JavaScript predefined methods, including the appendChild() method and the createElement() method. You can add a row at the start of the end of the table using the insertRow() method by passing indexes. This manual explained the procedures for adding a new row in a table by clicking on a button using JavaScript.
About the author
Farah Batool
I completed my master’s degree in computer science. I am an academic researcher and love to learn and write about new technologies. I am passionate about writing and sharing my experience with the world.