- Add html into html
- HTML-импорт — include для веба: часть 1
- Для чего нужен HTML-импорт?
- Начало работы
- Использование содержимого импорта
- Скрипты в импорте
- How to include another HTML file in an HTML file?
- Using JQuery load to include an HTML file
- Syntax
- Parameters
- Example
- Inner HTML file
- Main HTML file
- Output
- Using w3-include-html attribute to include an HTML file
- Syntax
- Example
- Inner HTML file
- Main HTML file
- Output
- Using the htmlinclude library to include an HTML file
- Syntax
- Example
- Inner HTML file
- Main HTML file
- Output
- Using an iframe to include an HTML file
- Syntax
- Example
- Inner HTML file
- Main HTML file
- Output
Add html into html
- Регистрация
- Создать Форму
- Мои Формы
- Цены
- Jotform Корпоративный
- Примеры
- Популярные Формы
- Формы Заявлений
- Регистрационные Формы
- Контактные Формы
- Формы Обратной Связи
- Формы Заказа
- Оценочные Формы
- Формы Резервирования
- Формы Бронирования
- Формы Запросов
- Здравоохранение
- Летние Лагеря
- Restaurants and Groceries
- Churches
- Animal Shelters
- Фото Бизнес
- Сектор Образования
- Малый Бизнес
- Некоммерческие Организации
- Креативные Агентства
- Истории Пользователей
- How to Create a Survey
- Методы Сбора Информации
- Создание Форм
- Accepting payments online
- Creating an app without coding
- What Is a QR Code?
- How to Make a Website
- How to Sell Online
- Performance Appraisal Guide
- Working From Home
- Jotform Teams
- Jotform Sign
- Jotform Приложения
- Jotform Согласования
- Jotform Tables
- PDF Редактор
- Report Builder
- Jotform Входящие 2.0
- Smart PDF Forms
- Мобильные Формы
- Условная Логика
- Conversational Forms
- Назначайте Формы
- Translate Forms
- Собственное Брендирование
- Enable-Disable Form
- Многопользовательский Доступ
HTML-импорт — include для веба: часть 1
Перевод статьи «HTML Imports #include for the web», Eric Bidelman.
От переводчика
Недавно я перевел статью по основам HTML Import. Я обещал, что если эта тема заинтересует хабра-сообщество, то переведу более подробную статью. Я решил разбить перевод на две одинаковые по размеру части, так как, по моему, на одну часть слишком много буков. Вторая часть выйдет спустя несколько дней после публикации этой части. Если, конечно, эта часть более-менее понравится хабра-сообществу.
Для чего нужен HTML-импорт?
Начало работы
В наборе стандартов Web Components есть стандарт HTML Imports, который позволяет подключение HTML-документов друг в друга. В подключаемых HTML-документах разрешается Javascript и CSS, словом, все что .html обычно содержит. Это замечательный инструмент для загрузки пакетов HTML/CSS/JS кода.
Основы
Указанный URL, это расположение импорта(import location). Чтобы использовать импорт с другого домена, его расположение должно позволять междоменное разделение ресурсов(CORS):
Примечание: браузеры игнорируют повторные запросы на один и тот же URL. Это значит, что из одного адреса будет выполнена только одна загрузка сколько бы ни было подключений на странице
Проверка на поддержку браузером
function supportsImports() < return 'import' in document.createElement('link'); >if (supportsImports()) < // Good to go! >else < // Use other libraries/require systems to load files. >Браузерная поддержка пока на ранней стадии(прим. переводчика: оригинал статьи опубликован 11 ноября 2013, теперь, наверное, другая ситуация с поддержкой). Chrome 31 первый браузер поддерживающий HTML-импорт. Chrome 36 обновлен до последней спецификации этой фичи. Вы можете включить поддержку импорта, отметив флаг «Включить экспериментальные функции веб-платформы» по адресу
в Chrome Canary. Для других браузеров это пока не работает.
Примечание: Включение экспериментальных функций позволит использовать и другие полезные фичи веб-компонентов
Бандлинг ресурсов
HTML-импорт позволяет собирать пакеты HTML/CSS/JS кода, которые в свою очередь могут использовать другие пакеты. Этот простой, но мощный функционал, может пригодиться, если вы хотите импортированием одного ресурса предоставить другим программистам какую-то библиотеку или набор стилей. Также это полезно для поддержки модульности вашего приложения. Вы даже можете отдавать на импорт целые приложения. Только подумайте, чего можно добиться таким образом.
Вы сможете экспортировать целые пакеты веб содержимого всего одной линкой.
Bootstrap это хороший пример того, как мог бы пригодиться импорт компонентов. Бутстрап состоит из различных файлов (bootstrap.css, bootstrap.js и др.), использует JQuery (как импортируемый компонент), а в результате выдает инструменты для верстки. Разработчикам нравится возможность подключать те или иные модули, по мере необходимости. Но обычно мы идем простым путем, подключая все модули бутстрапа сразу.
Импорт был бы очень полезен при использовании таких пакетов, как Bootstrap. Вот как в будущем может выглядеть его подключение:
Нужно всего лишь добавить один линк импорта. Больше не нужно подключать кучу файлов, вместо этого весь Bootstrap завернут в файл bootstrap.html:
События load/error
Импорт всегда загружается сразу же, в порядке нахождения тега
function handleLoad(e) < console.log('Loaded import: ' + e.target.href); >function handleError(e)Примечание: обработчики событий загрузки/ошибки нужно объявлять перед импортом, так как браузер загружает импорт в тот момент, когда встречает тег импорта. Если на момент импорта нет обработчика загрузки, в консоли выведется ошибка undefined function.
Вы, также, можете динамически создавать импорт:
var link = document.createElement('link'); link.rel = 'import'; link.href = 'file.html' link.onload = function(e) ; link.onerror = function(e) ; document.head.appendChild(link);Использование содержимого импорта
Элемент импорта на странице не указывает браузеру, где размещать содержимое импорта. Он только говорит браузеру получить документ для его дальнейшего использования. Чтобы использовать содержимое импорта, нам нужно написать немного JS кода.
Вот он момент прозрения, импорт, это всего-лишь документ. На самом деле, содержимое импорта так и называется документ импорта(import document). А использовать результат импорта вы можете стандартными средствами DOM API!
link.import
var content = document.querySelector('link[rel="import"]').import;- Браузер не поддерживает импорт.
- У элемента нет атрибута rel=»import» .
Объект не добавлен в DOM.
Или был удален из DOM
Ресурс не поддерживает CORS.
Полный пример
Допустим у нас есть страница warnings.html :
h3Warning!
This page is under construction
Heads up!
This content may be out of date
Вы можете использовать только необходимую вам часть импортированной страницы:
.Скрипты в импорте
Импорт работает не совсем, как часть документа, который его использует. Но вы, все же, можете работать с подключившей его страницей. Из импортированной страницы можно работать, как с внутренним DOM, так и с главным документом:
Пример — import.html добавляет один из своих стилей главному документу
/* Примечание: Внутренние стили, по умолчанию применяются к импортирующему документу. Их не нужно явно добавлять в главную страницу. */ #somecontainer .document.currentScript.ownerDocumentмы получаем доступ к внутреннему элементу-корню импортированного документа и добавляем его кусок в главный документ (
). Это конечно бесполезный код, но нам он нужен, чтобы понять, что мы можем обращаться как к главному, так и ко внутреннему корню DOM.
Скрипты внутри импорта могут как сами исполнять код, так и предоставлять функции для выполнения в главном документе. Это похоже на модули в Питоне.
- Код импорта выполняется в контексте содержащего его документа. Из этого исходят две удобные вещи:
- Функции объявленные в импорте содержатся в главном объекте window .
- Вам не нужно делать действий вроде добавления в главный документ тегов
How to include another HTML file in an HTML file?
In this tutorial, we shall learn to include another HTML file in an HTML file.
Various methods are available to include another HTML file in an HTML file. Let us quickly go through the techniques that have support on the web.
Using JQuery load to include an HTML file
In this section, we shall check how to use JQuery’s load method to include an HTML file.
Users can follow the syntax below to use this method.
Syntax
The wrapper appends the new HTML file that jQuery loads.
Parameters
- wrapper − ID of the DOM element that includes the new HTML content.
- htmlfile − The new HTML file name.
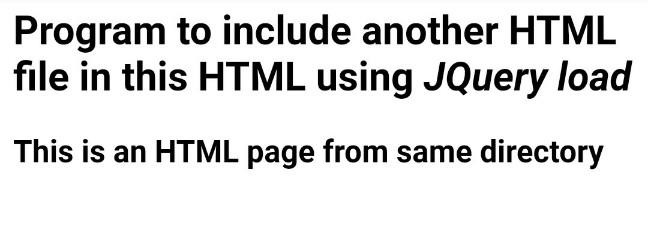
Example
The program requires two HTML files. One is the main HTML file to load the new HTML file. Next is the new HTML file. Place both files in the exact location.
Define a wrapper DOM element in the main HTML file to append the new HTML file. Using the jQuery load technique load the new HTML file and set it inside the wrapper DOM.
Inner HTML file
html> body> h3>This is an HTML page from same directoryh3> body> html>Main HTML file
html> head> script src="https://code.jquery.com/jquery-1.11.3.min.js">script> script> $(function() < $("#includeHtml").load("result.html"); >); script> head> body> h2>Program to include another HTML file in this HTML using i>JQuery loadi>h2> div id="includeHtml">div> body> html>Output

Using w3-include-html attribute to include an HTML file
In this section, let us check how to use the w3-include-html attribute to include an HTML file.
Users can follow the syntax below to use this method.
Syntax
Includes a wrapper DOM with the attribute w3-include-html having the new HTML file name as the value.
//Read the attribute fileName = domEl.getAttribute("w3-include-html"); //Make XMLHttpRequest with the attribute value xmlHttp = new XMLHttpRequest(); xmlHttp.onreadystatechange = function() < //If the request is successful, load the new HTML. Else throw 404 error and try again if (this.readyState == 4) < if (this.status == 200) if (this.status == 404) /* Remove the attribute and invoke the function again*/ domEl.removeAttribute("w3-include-html"); addHTML(); > xmlHttp.open("GET", fileName, true); xmlHttp.send();The syntax reads the w3-include-html attribute value and loads the new HTML with a XMLHttpRequest.
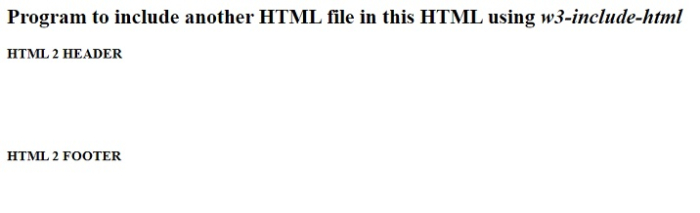
Example
In this example, create a new HTML and a default HTML file. The default HTML file contains a div element with attribute w3-include-html which contains the new HTML file name.
The program reads the w3-include-html attribute value, makes an XMLHttpRequest with the file name, and loads the file.
A New HTML file renders inside the w3-include-html wrapper DOM after a successful file load. Else user gets an error message, and the program loads the file again.
Inner HTML file
html> body> header>b>HTML 2 HEADERb>header> div style="height: 100px;">div> footer>b>HTML 2 FOOTERb>footer> body> html>Main HTML file
html> body> h2>Program to include another HTML file in this HTML using i>w3-include-htmli>h2> div w3-include-html="result.html">div> script> function addHTML() < var el, i, domEl, fileName, xmlHttp; /*Iterate all DOM*/ el = document.getElementsByTagName("*"); for (i = 0; i < el.length; i++) < domEl = el[i]; /*find the element having w3-include-html attribute*/ fileName = domEl.getAttribute("w3-include-html"); if (fileName) < /*http request with attribute value as file name*/ xmlHttp = new XMLHttpRequest(); xmlHttp.onreadystatechange = function() < if (this.readyState == 4) < if (this.status == 200) < domEl.innerHTML = this.responseText; >if (this.status == 404) < domEl.innerHTML = "Page not found."; >/* Remove the attribute and invoke the function again*/ domEl.removeAttribute("w3-include-html"); addHTML(); > > xmlHttp.open("GET", fileName, true); xmlHttp.send(); /*function ends*/ return; > > > addHTML(); script> body> html>Output
Using the htmlinclude library to include an HTML file
In this section, we shall check how to use the htmlinclude library to include an HTML file.
Users can follow the syntax below to use this method.
Syntax
The syntax adds the javascript library file URL.
The include tag src contains the new HTML file name.
//Getting include attribute value let includes = document.getElementsByTagName('include'); for(var i=0; i); > function load_file(filename, callback) < fetch(filename).then(response =>response.text()).then(text => callback(text)); >The syntax loads the source of the tag «include» using the fetch method.
Example
In this example, the htmlinclude library is available in the header. Creating an include tag with the new file name as the src attribute value.
Coming to the script, loading the include tag src value with the fetch method. If you get any error using fetch, try to get help from nodejs or any other program IDE.
Inner HTML file
html> body> b>htmlinclude library included this HTML fileb> body> html>Main HTML file
html> head> script src="https://unpkg.com/htmlincludejs">script> head> body> h2>Program to include another HTML file in this HTML using i>htmlinclude libraryi>h2> include src="./result.html">include> script> let includes = document.getElementsByTagName('include'); for (var i = 0; i < includes.length; i++) < let include = includes[i]; load_file(includes[i].attributes.src.value, function(text) < include.insertAdjacentHTML('afterend', text); include.remove(); >); > function load_file(filename, callback) < fetch(filename).then(response =>response.text()).then(text => callback(text)); > script> body> html>Output
Using an iframe to include an HTML file
In this section, let us check how to use an iframe to include an HTML file.
Users can follow the syntax below to use this method.
Syntax
The iframe tag includes the new HTML file name in the src.
Example
In this example, create a sample HTML file to include and main HTML file. The approach adds an iframe with the new HTML file name as the source value in the new HTML body.
The iframe loads the new HTML content inside the main HTML file.
Inner HTML file
html> body> div style="background-color: skyblue;">iframe included this HTML filediv> body> html>Main HTML file
html> head> h2>Program to include another HTML file in this HTML using i>iframei>h2> style> iframe[iframetag] < border: none; >style> head> body> div id="iframeDiv"> iframe src="result.html" iframetag>iframe> div> body> html>Output
This tutorial introduced four methods to include a new HTML file in an HTML file. The iframe method is simple to implement. Users can choose the jQuery load method if they need a jQuery method.
- Популярные Формы