- Element: innerHTML property
- Value
- Exceptions
- Usage notes
- Reading the HTML contents of an element
- Replacing the contents of an element
- Operational details
- Appending HTML to an element
- HTML
- JavaScript
- Security considerations
- Examples
- JavaScript
- HTML
- CSS
- Result
- Specifications
- Browser compatibility
- See also
- Found a content problem with this page?
- MDN
- Support
- Our communities
- Developers
- How To Use a , the HTML Content Division Element
- Tutorial Series: How To Build a Website with HTML
- Как с помощью js добавить html код в div. HTML в Div через JavaScript или jQuery.
Element: innerHTML property
The Element property innerHTML gets or sets the HTML or XML markup contained within the element.
To insert the HTML into the document rather than replace the contents of an element, use the method insertAdjacentHTML() .
Value
A string containing the HTML serialization of the element’s descendants. Setting the value of innerHTML removes all of the element’s descendants and replaces them with nodes constructed by parsing the HTML given in the string htmlString.
Exceptions
Thrown if an attempt was made to set the value of innerHTML using a string which is not properly-formed HTML.
Thrown if an attempt was made to insert the HTML into a node whose parent is a Document .
Usage notes
The innerHTML property can be used to examine the current HTML source of the page, including any changes that have been made since the page was initially loaded.
Reading the HTML contents of an element
Reading innerHTML causes the user agent to serialize the HTML or XML fragment comprised of the element’s descendants. The resulting string is returned.
let contents = myElement.innerHTML;
This lets you look at the HTML markup of the element’s content nodes.
Note: The returned HTML or XML fragment is generated based on the current contents of the element, so the markup and formatting of the returned fragment is likely not to match the original page markup.
Replacing the contents of an element
Setting the value of innerHTML lets you easily replace the existing contents of an element with new content.
Note: This is a security risk if the string to be inserted might contain potentially malicious content. When inserting user-supplied data you should always consider using Element.setHTML() instead, in order to sanitize the content before it is inserted.
For example, you can erase the entire contents of a document by clearing the contents of the document’s body attribute:
This example fetches the document’s current HTML markup and replaces the »
.documentElement.innerHTML = ` $document.documentElement.innerHTML.replace( //g, "<", )> `;
Operational details
What exactly happens when you set value of innerHTML ? Doing so causes the user agent to follow these steps:
- The specified value is parsed as HTML or XML (based on the document type), resulting in a DocumentFragment object representing the new set of DOM nodes for the new elements.
- If the element whose contents are being replaced is a element, then the element’s content attribute is replaced with the new DocumentFragment created in step 1.
- For all other elements, the element’s contents are replaced with the nodes in the new DocumentFragment .
Appending HTML to an element
Setting the value of innerHTML lets you append new contents to the existing one of an element.
HTML
ul id="list"> li>a href="#">Item 1a>li> li>a href="#">Item 2a>li> li>a href="#">Item 3a>li> ul>
JavaScript
Please note that using innerHTML to append HTML elements (e.g. el.innerHTML += «link» ) will result in the removal of any previously set event listeners. That is, after you append any HTML element that way you won’t be able to listen to the previously set event listeners.
Security considerations
It is not uncommon to see innerHTML used to insert text into a web page. There is potential for this to become an attack vector on a site, creating a potential security risk.
let name = "John"; // assuming 'el' is an HTML DOM element el.innerHTML = name; // harmless in this case // … name = ""; el.innerHTML = name; // harmless in this case
Although this may look like a cross-site scripting attack, the result is harmless. HTML specifies that a tag inserted with innerHTML should not execute.
const name = ""; el.innerHTML = name; // shows the alert
For that reason, it is recommended that instead of innerHTML you use:
- Element.setHTML() to sanitize the text before it is inserted into the DOM.
- Node.textContent when inserting plain text, as this inserts it as raw text rather than parsing it as HTML.
Warning: If your project is one that will undergo any form of security review, using innerHTML most likely will result in your code being rejected. For example, if you use innerHTML in a browser extension and submit the extension to addons.mozilla.org, it may be rejected in the review process. Please see Safely inserting external content into a page for alternative methods.
Examples
This example uses innerHTML to create a mechanism for logging messages into a box on a web page.
JavaScript
function log(msg)  const logElem = document.querySelector(".log"); const time = new Date(); const timeStr = time.toLocaleTimeString(); logElem.innerHTML += `$timeStr>: $msg>
`; > log("Logging mouse events inside this container…");
The log() function creates the log output by getting the current time from a Date object using toLocaleTimeString() , and building a string with the timestamp and the message text. Then the message is appended to the box with the class «log» .
We add a second method that logs information about MouseEvent based events (such as mousedown , click , and mouseenter ):
function logEvent(event) const msg = `Event $event.type> at $event.clientX>, $event.clientY> `; log(msg); >
Then we use this as the event handler for a number of mouse events on the box that contains our log:
const boxElem = document.querySelector(".box"); boxElem.addEventListener("mousedown", logEvent); boxElem.addEventListener("mouseup", logEvent); boxElem.addEventListener("click", logEvent); boxElem.addEventListener("mouseenter", logEvent); boxElem.addEventListener("mouseleave", logEvent);
HTML
The HTML is quite simple for our example.
div class="box"> div>strong>Log:strong>div> div class="log">div> div>
CSS
The following CSS styles our example content.
.box width: 600px; height: 300px; border: 1px solid black; padding: 2px 4px; overflow-y: scroll; overflow-x: auto; > .log margin-top: 8px; font-family: monospace; > Result
The resulting content looks like this. You can see output into the log by moving the mouse in and out of the box, clicking in it, and so forth.
Specifications
Browser compatibility
BCD tables only load in the browser
See also
- Node.textContent and HTMLElement.innerText
- Element.insertAdjacentHTML()
- Element.outerHTML
- Element.setHTML
- Parsing HTML or XML into a DOM tree: DOMParser
- Serializing a DOM tree into an XML string: XMLSerializer
Found a content problem with this page?
This page was last modified on Jul 7, 2023 by MDN contributors.
Your blueprint for a better internet.
MDN
Support
Our communities
Developers
Visit Mozilla Corporation’s not-for-profit parent, the Mozilla Foundation.
Portions of this content are ©1998– 2023 by individual mozilla.org contributors. Content available under a Creative Commons license.
How To Use a , the HTML Content Division Element
The HTML Content Division element ( ) acts as a container to structure a webpage into separate components for individual styling. This tutorial will teach you how to create and style containers on your webpage.
On its own, the element has little effect on the layout of the page and is usually given attributes to adjust its size, color, position, or other features. Typically, developers style elements with CSS, but this tutorial will give you an understanding of how elements work by styling them directly in an HTML document.
The element is styled with the HTML style attribute. As demonstrated in the example below, a element can contain multiple style properties:
div style=”property: value; property: value;”>div> Notice that the element has opening and closing tags but does not require any content. To understand how the element works in practice, clear your index.html file and paste the code below inside. (If you have not been following the tutorial series, you can review instructions for setting up an index.html file in our tutorial Setting Up Your HTML Project.
div style="width:300px;height:200px; background-color:red;"> div> Save the file and reload it in the browser. (For instructions on loading the file in your browser, see our tutorial here.) You should receive a red box with a width of 300 pixels and a height of 200 pixels like this:

You can also add content to a element by adding content in between the opening and closing tags. Try adding text in between your tags like so:
div style="width:300px;height:300px; background-color:red;"> This is text inside a div. div> Save the file and reload it in the browser. You should receive something like this:

You can also put containers inside containers. Try adding a yellow container inside the red container like so:
div style="width:300px;height:300px; background-color:red;"> div style="width:100px;height:100px; background-color:yellow;"> div> div> Save the file and reload it in the browser. You should receive something like this:

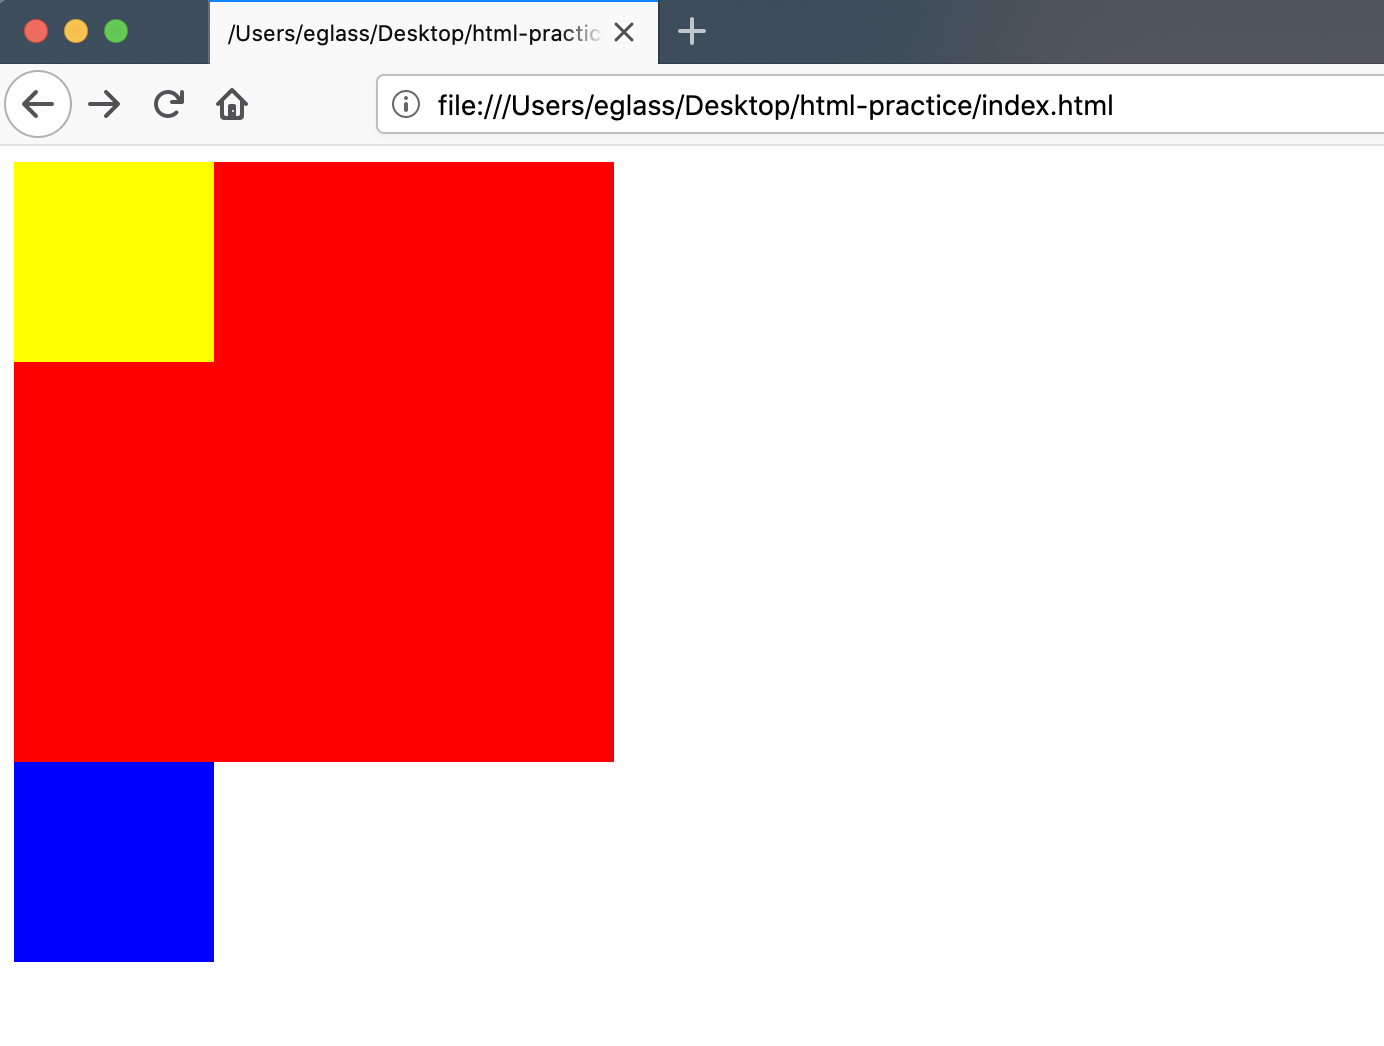
Note that elements are block-level elements and will start on their own line and push subsequent elements down to the next line. Try adding another element to your file to understand how it is pushed down to the next line (even though there appears to be enough space for it to fit next to the second element:
div style="width:300px;height:300px;background-color:red;"> div style="width:100px;height:100px; background-color:yellow;"> div> div> div style="width:100px;height:100px; background-color:blue;"> div> Save the file and reload it in the browser. You should receive something like this:
You should now have a basic understanding of how elements work. We will return to elements when we begin building our website in the third section of this tutorial series.
Thanks for learning with the DigitalOcean Community. Check out our offerings for compute, storage, networking, and managed databases.
Tutorial Series: How To Build a Website with HTML
This tutorial series will guide you through creating and further customizing this website using HTML, the standard markup language used to display documents in a web browser. No prior coding experience is necessary but we recommend you start at the beginning of the series if you wish to recreate the demonstration website.
At the end of this series, you should have a website ready to deploy to the cloud and a basic familiarity with HTML. Knowing how to write HTML will provide a strong foundation for learning additional front-end web development skills, such as CSS and JavaScript.
Как с помощью js добавить html код в div. HTML в Div через JavaScript или jQuery.

Добавить можно, естественно, не только в DIV элемент на сайте, но и совершенно в любую другую конструкцию вашего HTML сайта.
В примере будет рассмотрено 2 варианта вставки текста в html с помощью javascript и дополнительно вариант вставки кода через функцию, которая запускается по нажатию на кнопку.
1. На чистом JavaScript без jQuery
Пример HTML — текст будет добавлен в тег с классом demo
id="description_id"> class="demo">