- JavaScript programmatically create an HTML button
- Learn JavaScript for Beginners 🔥
- About
- Search
- Tags
- How to Create Button in JavaScript
- How to Create Button in JavaScript?
- Method 1: Create Button in JavaScript Using “createElement()” and “appendChild()” Methods
- Syntax
- Example
- Method 2: Create Button in JavaScript Using “Type” Attribute of “input” Tag
- Syntax
- Example
- Output
- Conclusion
- About the author
- Sharqa Hameed
- Add buttons in javascript
- Dynamically add button, textbox, input, radio elements in html form using JavaScript.
- Demo
JavaScript programmatically create an HTML button
Sometimes you need to create an HTML button programmatically as a result of some code execution. You can easily create a button using JavaScript by calling on the document.createElement(«button») method.
- First, you call the document.createElement(«button») and assign the returned element to a variable named btn .
- Then, assign the «Click Me» string to the btn.innerHTML property
- Finally, use document.body.appendChild() to append the button element to the tag
The code below shows how this can be done:
You can append the button element that you’ve created with JavaScript anywhere inside your HTML page by using the appendChild() method.
You can also set the button’s name , type , or value attributes as required by your project. Sometimes, you need to create a type=’submit’ button for forms:
The code above will create the following HTML tag:
Finally, if you want to execute some code when the button is clicked, you can change the onclick property to call a function as follows:
or you can also add an event listener as follows: And that’s how you can create a button programmatically using JavaScript.
Learn JavaScript for Beginners 🔥
Get the JS Basics Handbook, understand how JavaScript works and be a confident software developer.
A practical and fun way to learn JavaScript and build an application using Node.js.
About
Hello! This website is dedicated to help you learn tech and data science skills with its step-by-step, beginner-friendly tutorials.
Learn statistics, JavaScript and other programming languages using clear examples written for people.
Search
Type the keyword below and hit enter
Tags
Click to see all tutorials tagged with:
How to Create Button in JavaScript
![]()
Developers mostly want their web pages to be attractive and make them interactive. For this purpose, buttons are added to the web page. For instance, when there is a need to send or receive data, including click events for added functionalities for the user while registering or signing in to an account. In such cases, buttons allow the end-user to perform various functionalities smartly.
This blog will explain the methods to create buttons in JavaScript.
How to Create Button in JavaScript?
To create button in JavaScript, the following methods can be utilized:
The following approaches will demonstrate the concept one by one!
Method 1: Create Button in JavaScript Using “createElement()” and “appendChild()” Methods
The “createElement()” method creates an element, and the “appendChild()” method appends an element to the last child of an element. These methods will be applied for creating a button and appending it to the Document Object Model(DOM) that needs to be utilized, respectively.
Syntax
document. createElement ( type )
element. appendChild ( node )
In the above syntax, “type” refers to the type of element that will be created using the createElement() method, and “node” is the node that will be appended with the help of the appendChild() method.
The following example will explain the stated concept.
Example
Firstly, a “button” will be created using the document.createElement() method and stored in a variable named “createButton”:
Next, the “innerText” property will refer to the created button and set the text value of the specified button as follows:
Lastly, the “appendChild()” method will append the created button to DOM by referring to the variable in which it is stored as an argument:
The output of the above implementation will result as follows:
Method 2: Create Button in JavaScript Using “Type” Attribute of “input” Tag
The “type” attribute represents the type of input element to display. It can be used to create a button by specifying “button” as the value of the type attribute of the input tag.
Syntax
Here, “button” indicates the type of the input field.
Check out the below-given example.
Example
Firstly, we will use an input tag, specify its type as “button”, and value as “Click_Me”. As a result, a button will be created. Furthermore, it will trigger the “createButton()” function when clicked:
In the JavaScript file, we will define the “createButton()” function which will generate an alert box when the added button will be clicked:
Output
The discussed techniques to create a button in JavaScript can be utilized suitably according to the requirements.
Conclusion
To create a button in JavaScript, “createElement()” and “appendChild()” methods can be applied for creating a button and appending it to be utilized in the DOM. Another technique that can be used to create a button is defining an input type and adding the associated functionality. This article demonstrated the methods to create a button in JavaScript.
About the author
Sharqa Hameed
I am a Linux enthusiast, I love to read Every Linux blog on the internet. I hold masters degree in computer science and am passionate about learning and teaching.
Add buttons in javascript

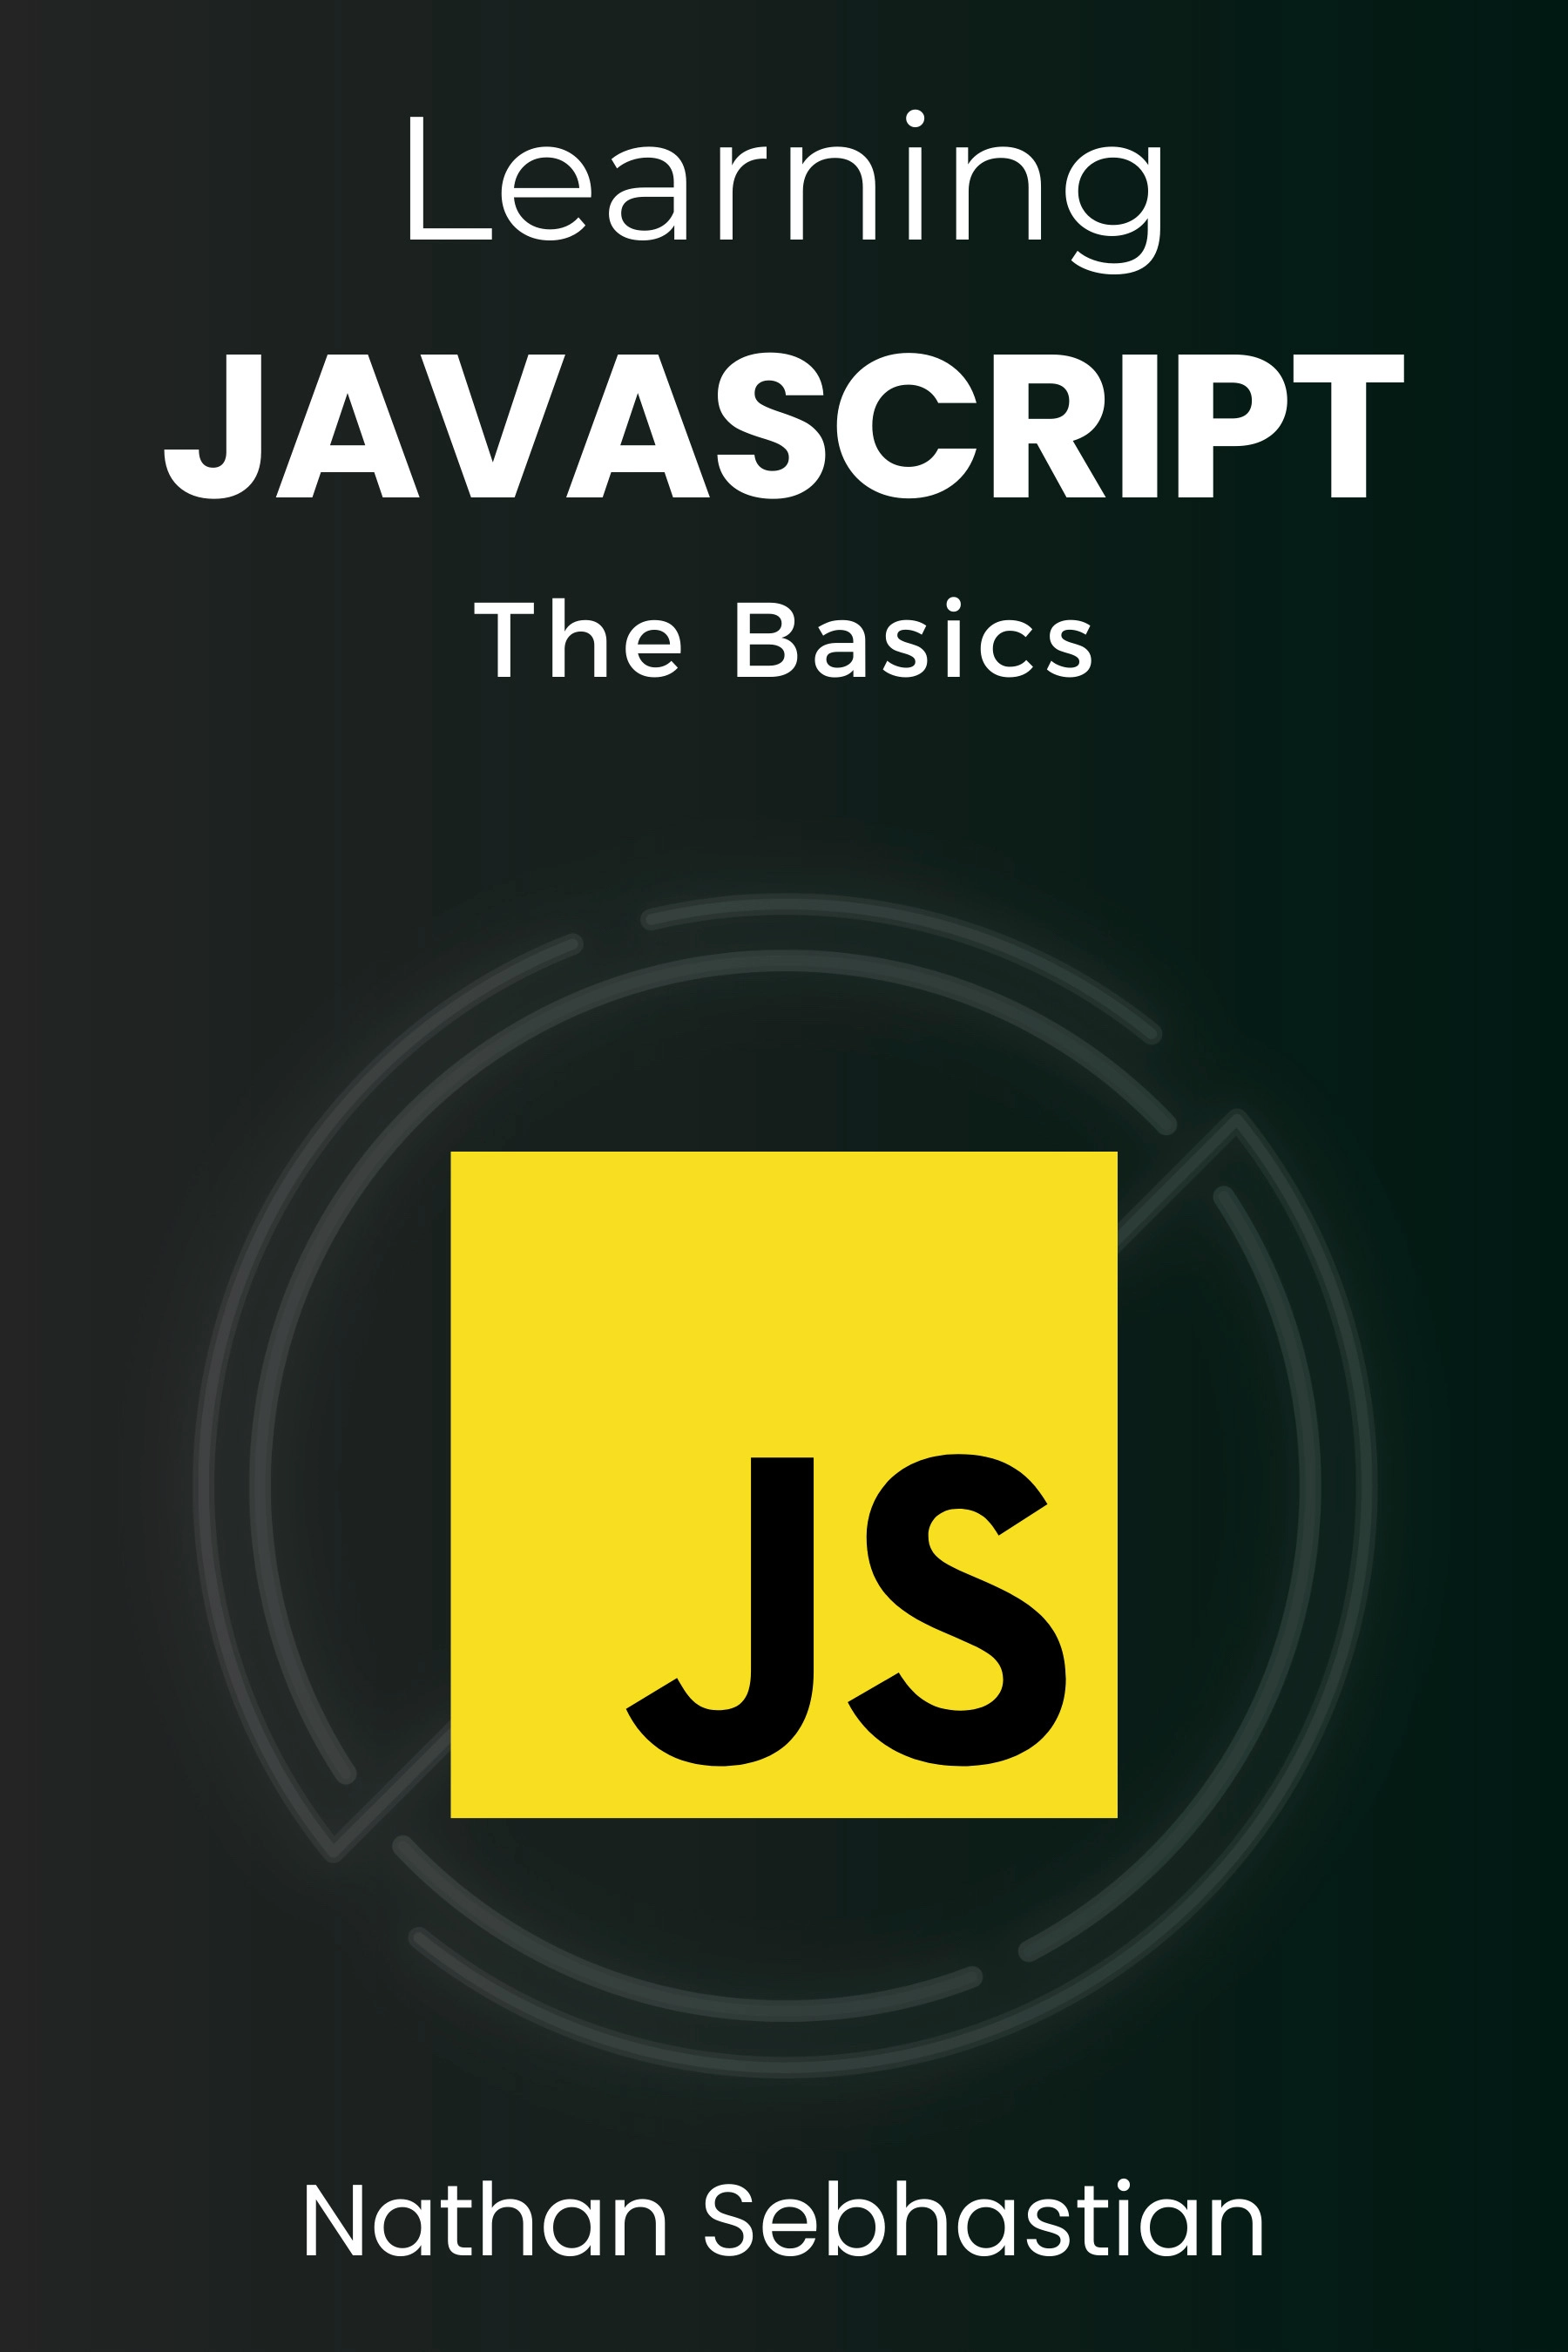
Для отправки введенных данных на форме используются кнопки. Для создания кнопки используется либо элемент button :
С точки зрения функциональности в html эти элементы не совсем равноценны, но в данном случае они нас интересуют с точки зрения взаимодействия с кодом javascript.
При нажатии на любой из этих двух вариантов кнопки происходит отправка формы по адресу, который указан у формы в атрибуте action , либо по адресу веб-страницы, если атрибут action не указан. Однако в коде javascript мы можем перехватить отправку, обрабатывая событие click
При нажатии на кнопку происходит событие click , и для его обработки к кнопке прикрепляем обработчик sendForm . В этом обработчике проверяем введенный в текстовое поле текст. Если его длина больше 5 символов, то выводим сообщение о недостимой длине и прерываем обычный ход события с помощью вызова e.preventDefault() . В итоге форма не отправляется.
Если же длина текста меньше шести символов, то также выводится сообщение, и затем форма отправляется.
Также мы можем при необходимости при отправке изменить адрес, на который отправляются данные:
function sendForm(e)< // получаем значение поля key var keyBox = document.search.key; var val = keyBox.value; if(val.length>5) < alert("Недопустимая длина строки"); document.search.action="PostForm"; >else alert("Отправка разрешена"); >
В данном случае, если длина текста больше пяти символов, то текст отправляется, только теперь он отправляется по адресу PostForm , поскольку задано свойство action:
document.search.action="PostForm";
Для очистки формы предназначены следующие равноценные по функциональности кнопки:
При нажатию на кнопки произойдет очистка форм. Но также функциональность по очистке полей формы можно реализовать с помощью метода reset() :
function sendForm(e)< // получаем значение поля key var keyBox = document.search.key; var val = keyBox.value; if(val.length>5) < alert("Недопустимая длина строки"); document.search.reset(); e.preventDefault(); >else alert("Отправка разрешена"); >
Кроме специальных кнопок отправки и очистки на форме также может использоваться обычная кнопка:
При нажатии на подобную кнопку отправки данных не происходит, хотя также генерируется событие click:
При нажатии на кнопку получаем введенный в текстовое поле текст, создаем новый элемент параграфа для этого текста и добавляем параграф в элемент printBlock.
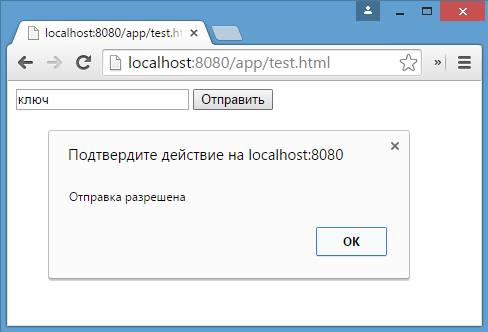
Dynamically add button, textbox, input, radio elements in html form using JavaScript.
Code language: HTML, XML (xml)HTML> HEAD> TITLE>Dynamically add Textbox, Radio, Button in html Form using JavaScript TITLE> SCRIPT language="javascript"> function add(type) < //Create an input type dynamically. var element = document.createElement("input"); //Assign different attributes to the element. element.setAttribute("type", type); element.setAttribute("value", type); element.setAttribute("name", type); var foo = document.getElementById("fooBar"); //Append the element in page (in span). foo.appendChild(element); > SCRIPT> HEAD> BODY> FORM> H2>Dynamically add element in form. H2> Select the element and hit Add to add it in form. BR/> SELECT name="element"> OPTION value="button">Button OPTION> OPTION value="text">Textbox OPTION> OPTION value="radio">Radio OPTION> SELECT> INPUT type="button" value="Add" onclick="add(document.forms[0].element.value)"/> span id="fooBar"> span> FORM> BODY> HTML>
Also note that we have used setAttribute() method to assign the attributes to our dynamically created element.
Demo
Any other way of adding elements dynamically in html page? Let me know. If you read this far, you should follow me on twitter here.