:active
The :active pseudo selector changes the appearance of a link while it is being activated (being clicked on or otherwise activated). It’s usually only seen for a split second, and provides visual feedback that the element was indeed clicked. It’s most typically used on anchor links ( ). For instance, here’s CSS that will make anchor links bump down one pixel (giving the impression of being pushed in three-dimensional space) in the active state:
:active can also apply to any element. In the Pen below, clicking anywhere on the page will make the whole page yellow:
Doing them in that order is ideal.
a:link < /* Essentially means a[href], or that the link actually goes somewhere */ color: blue; >a:visited < color: purple; >a:hover < color: green; >a:active
Otherwise, say if you listed the :visited style last, if that link was visited it would override the :active and :hover declaration and the link would always be purple regardless if you were hovering or if the link was active (not ideal).
| IE | Edge | Firefox | Chrome | Safari | Opera |
|---|---|---|---|---|---|
| All | All | All | All | All | All |
| Android Chrome | Android Firefox | Android Browser | iOS Safari | Opera Mobile |
|---|---|---|---|---|
| All | All | All | All | All |
Source: caniuse
CSS Active Link
![]()
A link is active whenever you click on it. When you click on the given link, it will open the linked page. We can create any link in HTML and give style to that link using CSS. CSS contains different properties, such as the “: active” selector for selecting and styling the active links, the “: link” selector for styling the links which are not visited, and the “visited” selector for the styling of the visited page. In this guide, we will describe how to create links in HTML and apply styling to the created links using CSS. We can change the color, background color, font size, or font style of the link using CSS. We will explain all these concepts in this guide.
Example 1
Open your HTML file to create links. For styling these links, we will create our CSS file. We are using the visual code studio to perform these examples. So, we create the HTML file, and the HTML code is also given here. After completing the code, save it with the “.html” extension.
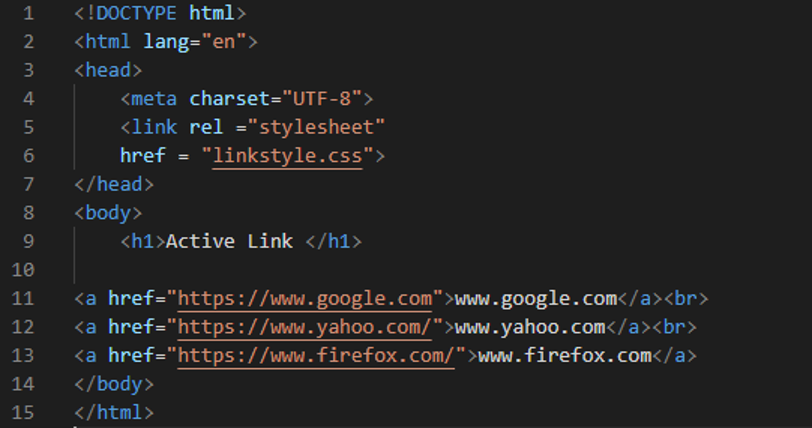
In the previous HTML code, we create three different links. The first link we have created is the “google” link, the second link is the “yahoo” link, and the last link is the “firefox” link. We will also style these links in CSS. This HTML file is here for just creating these links. Now, move to the following CSS file, and see how to style these links.
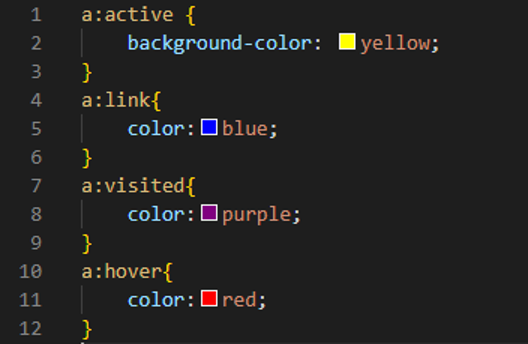
In the previous image, we use the “: active” selector, which we use to give style to that link. When the user presses this link, the link’s background color turns “yellow”. Then we have the “: link” selector, which styles the link that is not visited and changes the color of the unvisited link to “blue”. It will appear “blue” on the screen. After this, we use the “: visited” selector, and this visited selector changes the color of the visited link to “purple”. Finally, we have the “: hover” selector in which we change the color of the link to a “red” color when the cursor moves over the link. When you move your mouse on these links, the color of these links changes to “red”. In this example, we changed the color of the link when you hover on it and visit the link or the color of the unvisited link.
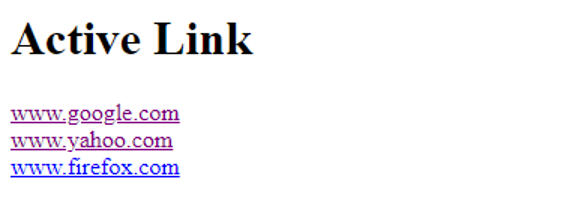
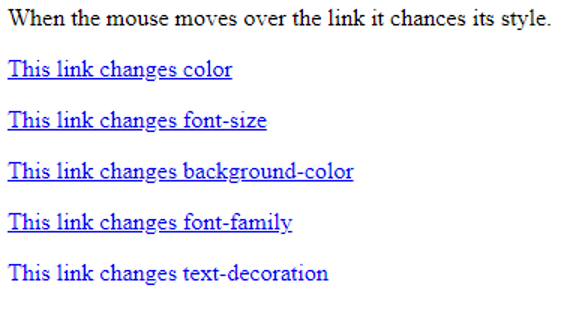
You can see three links in the previous image. The first two links are color “purple”, so it means these two links are visited. The third link’s color is “blue”, meaning this third link is not visited as we set these colors in the CSS code for the visited and unvisited links. When we hover on any link, its color turns to a “red” color. When we click on any link, the color of the link’s background will appear “yellow”. When we click on the first google link, the google page will appear on the screen, as shown in the following image:

Example 2
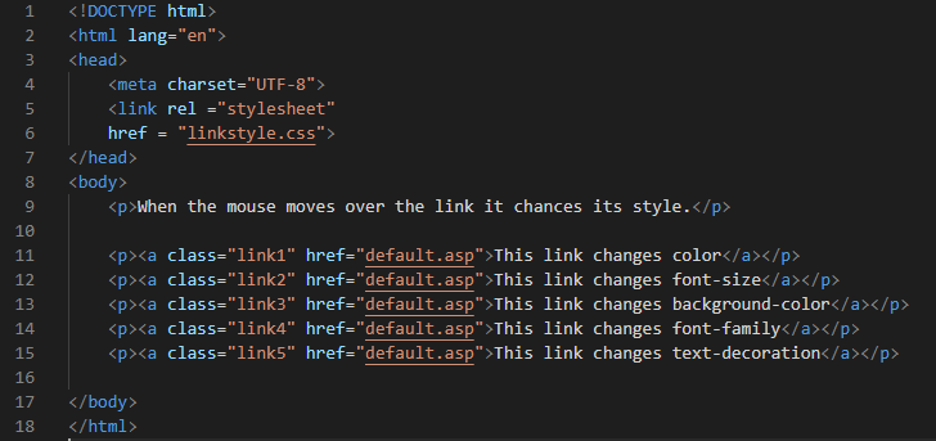
This is another example where we create a link between the paragraph and give styles to this link in CSS. Let’s see how the link is active in between the paragraphs.
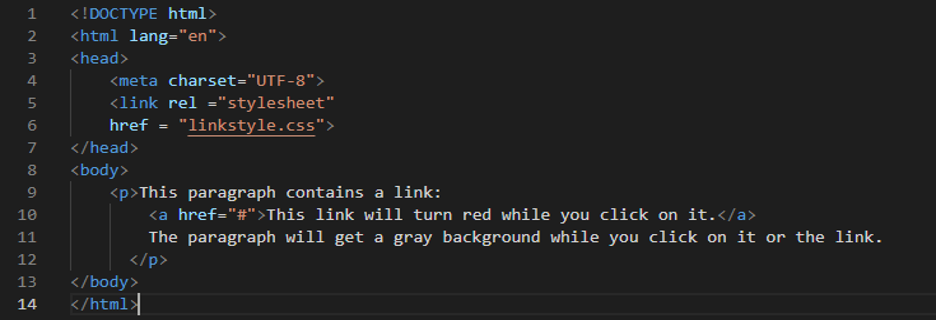
In the previous image, you can see that we have created a paragraph using HTML and added a link in between the paragraph. We will use CSS in this example to change the link’s and paragraph’s color.
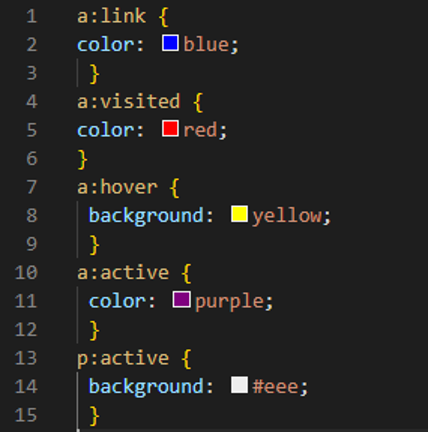
In the previous CSS file, you can see that we changed the color of the link to “blue” inside the curly braces of “: link”, so this link will appear blue between paragraphs. Then, we use a “red” color for the visited link. For “hover”, we select the background color as “yellow”. The “active” color of the link is set as “purple”, and the active paragraph color is designated as “#eee” color. So, when the link is active, it changes the link’s color as well as the background color of the paragraph.
In this first output, you can see that the link’s color in the paragraph appears “blue” as we set it as “blue” in our CSS file.

In the second output, the color of the link turns to “red”, which means we have visited the link here, so its color is changed from “blue” to “red”.

Example 3
In this third example, we will change the link’s font size, font style, and colors using CSS. For this, we have to create different links in HTML.
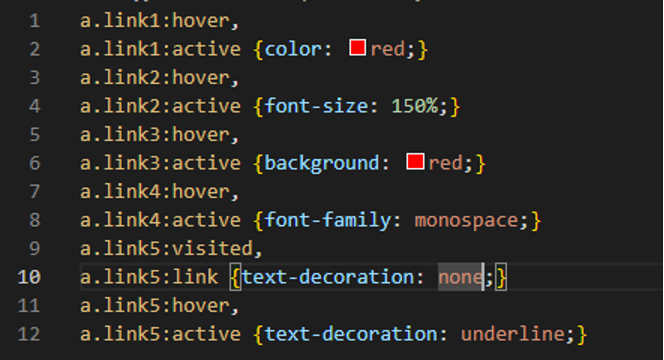
We use the “link1” name of the class and apply the style on this first link. The first link appears “red” when it is “active”. Then, we change the “font-size” of the second link. When we hover over this link, the size of this link increases to “150%”. We set the “background-color” of the third link to “red”, so the background color becomes “red” when we hover over the third link. We change the font style of the fourth link by utilizing the “font-family” property. We use the “text-decoration” in the fifth link and set it to “underline”. The output is shown.
This output changes its color when we hover over the first link. When we hover over the second link, its font size changes. When it comes to the third link, its background color changes. The font style changes to “monospace” when you hover over the fourth link.
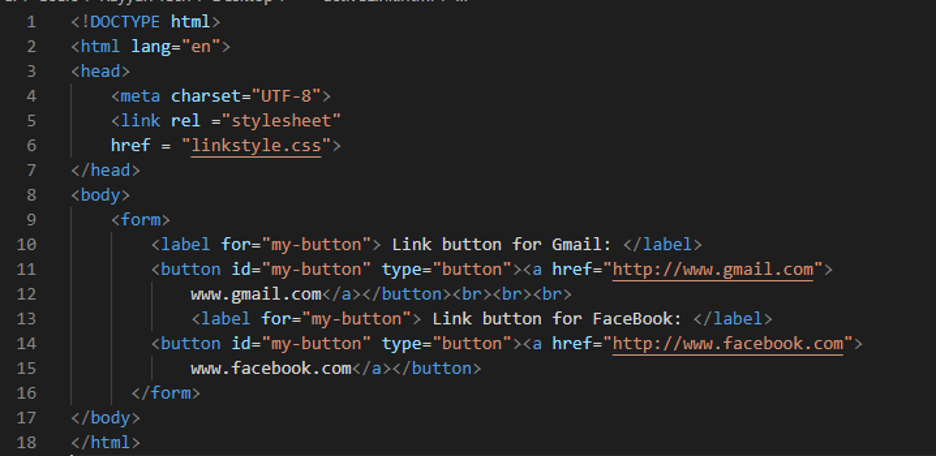
Example 4
In this example, we will create two link buttons with links inside the buttons. In the first button, we place the link of “Gmail”. Inside the second button, we put the link of “Facebook”. So, when you click on button one, it will open the Gmail page. When you click the second button, it will open the Facebook page. Now, we also want to apply the style of these links.
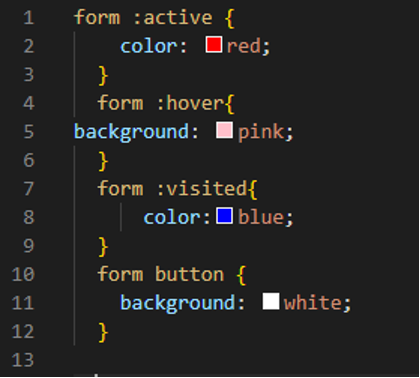
When this link is active, the color of this link appears “red” as we place the “color: red” inside the curly braces of the “: active” selector. When we hover over this link, which is inside the button, the color of the button turns “pink” as we set this color in the CSS file. After visiting these links, the color will be “blue”, and the color of the button’s background will be “white”.
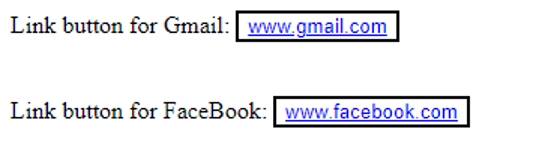
The previous output shows two link buttons in which we have two different links, and you can see that the color of both links is “blue”, meaning both links are visited.
Conclusion
We have learned about the “Active link” in this guide. We have applied different styling on different links using the CSS properties. We have performed four various examples here as we know that the link is active when pressed. Here, we have changed the style of the active link, the font size of the link when we hover over it, and the color after visiting the link. We used different colors for the visited and unvisited links in this guide. We have learned to style these active links in CSS in detail.
About the author
Aqsa Yasin
I am a self-motivated information technology professional with a passion for writing. I am a technical writer and love to write for all Linux flavors and Windows.
CSS Links
With CSS, links can be styled in many different ways.
Styling Links
Links can be styled with any CSS property (e.g. color , font-family , background , etc.).
Example
In addition, links can be styled differently depending on what state they are in.
The four links states are:
- a:link — a normal, unvisited link
- a:visited — a link the user has visited
- a:hover — a link when the user mouses over it
- a:active — a link the moment it is clicked
Example
/* unvisited link */
a:link color: red;
>
/* visited link */
a:visited color: green;
>
/* mouse over link */
a:hover color: hotpink;
>
/* selected link */
a:active color: blue;
>
When setting the style for several link states, there are some order rules:
Text Decoration
The text-decoration property is mostly used to remove underlines from links:
Example
a:visited text-decoration: none;
>
a:hover text-decoration: underline;
>
a:active text-decoration: underline;
>
Background Color
The background-color property can be used to specify a background color for links:
Example
a:link <
background-color: yellow;
>
a:visited background-color: cyan;
>
a:hover background-color: lightgreen;
>
a:active background-color: hotpink;
>
Link Buttons
This example demonstrates a more advanced example where we combine several CSS properties to display links as boxes/buttons:
Example
a:link, a:visited <
background-color: #f44336;
color: white;
padding: 14px 25px;
text-align: center;
text-decoration: none;
display: inline-block;
>
a:hover, a:active background-color: red;
>
More Examples
Example
This example demonstrates how to add other styles to hyperlinks:
Example
Another example of how to create link boxes/buttons:
a:link, a:visited <
background-color: white;
color: black;
border: 2px solid green;
padding: 10px 20px;
text-align: center;
text-decoration: none;
display: inline-block;
>
a:hover, a:active background-color: green;
color: white;
>
Example
This example demonstrates the different types of cursors (can be useful for links):

COLOR PICKER


Report Error
If you want to report an error, or if you want to make a suggestion, do not hesitate to send us an e-mail:
Thank You For Helping Us!
Your message has been sent to W3Schools.
Top Tutorials
Top References
Top Examples
Get Certified
W3Schools is optimized for learning and training. Examples might be simplified to improve reading and learning. Tutorials, references, and examples are constantly reviewed to avoid errors, but we cannot warrant full correctness of all content. While using W3Schools, you agree to have read and accepted our terms of use, cookie and privacy policy.