- How to Handle Error in Web.xml for Java web applications
- Sorry, the page you requested were not found.
- Related Java Error Handling Tutorials:
- Other Java Servlet Tutorials:
- About the Author:
- Add comment
- Comments
- Jakarta EE Servlet Exception Handling
- Get started with Spring 5 and Spring Boot 2, through the Learn Spring course:
- 1. Introduction
- 2. Jakarta EE Servlet Exceptions
- 3. Default Error Handling
- 4. Custom Error Handling
- 4.1. Status Code Error Handling with an HTML Page
- 4.2. Exception Type Error Handling with a Servlet
- 5. Conclusion
How to Handle Error in Web.xml for Java web applications
In Java web application development, error handling is required to build user-friendly and secured websites. In case of errors occurred, the user doesn’t have to see technical error details which they cannot understand. Instead, they should see a friendly page that tells them what happened. Also, it’s recommended to handle error properly to hide sensitive, technical information which can be exploited by hackers.
Java EE allows you to handle errors (by HTTP error codes and Java exception types) easily by putting some pieces of configuration in the web deployment descriptor document (the web.xml file). That means instead of showing the default error pages provided by the server, you can show your own error pages.
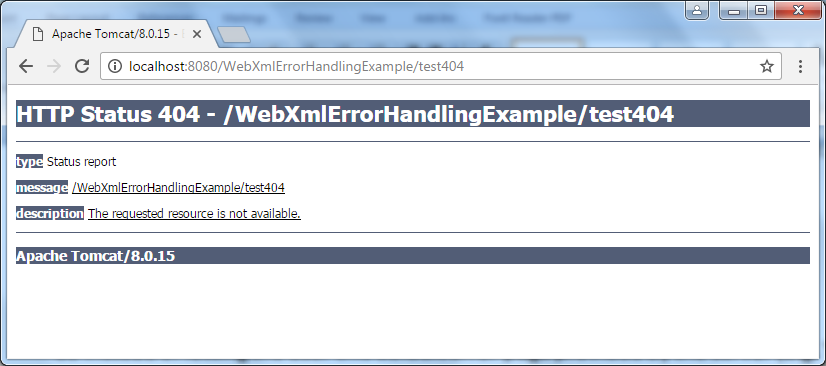
For example, putting the following declaration in the web.xml will override the handling of HTTP 404 error by the server:
With this declaration, if any 404 error occurred, your own error page is displayed to the user ( Error404.jsp page in the above example). Note that your custom error page is relative to the web application’s context root.
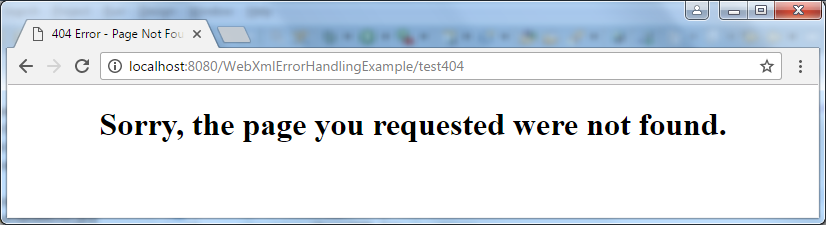
In your own error handling page, you can hide the technical information by showing only readable message to the user. For example, here’s the HTML code of the Error404.jsp page:
Sorry, the page you requested were not found.
You can show them a friendlier version like this:
You can add other elements to handle other error codes. For example, the following XML snippet declares the page that handles the HTTP 500 error:
Similarly, you can also declare JSP pages to handle exceptions thrown by the application. For example, the following XML code declares which page handles exceptions of type java.io.IOException :
java.io.IOException /IOException.jsp
You can also declare a generic exception page to catch all types of exception like this:
java.lang.Throwable /Exception.jsp
Here, if any exception occurred and it is not declared to be handled specifically in the web.xml , then the server will show the Exception.jsp page, because all exceptions are subtypes of the Throwable type.
Note that the most specific exception type is chosen if there are multiple matches. Consider the following declaration:
java.io.IOException /IOException.jsp java.lang.Throwable /Exception.jsp
In this case, if an IOException occurred, both the handlers match, but the handler for java.io.Exception is chosen because it is more specific than the one for java.lang.Throwable .
But if a ServletException occurred, the handler for java.lang.Throwable is chosen because there’s no specific handling for this exception.
That’s how to handle errors in web.xml for Java web applications. You can download the sample project in the attachment.
Related Java Error Handling Tutorials:
Other Java Servlet Tutorials:
About the Author:

Nam Ha Minh is certified Java programmer (SCJP and SCWCD). He started programming with Java in the time of Java 1.4 and has been falling in love with Java since then. Make friend with him on Facebook and watch his Java videos you YouTube.
Add comment
Comments
I have executed the above code. But in all the cases the result is «Sorry, the page you requested were not found.» Kindly clarify
CodeJava.net shares Java tutorials, code examples and sample projects for programmers at all levels.
CodeJava.net is created and managed by Nam Ha Minh — a passionate programmer.
Copyright © 2012 — 2023 CodeJava.net, all rights reserved.
Jakarta EE Servlet Exception Handling
![]()
Repeatedly, code that works in dev breaks down in production. Java performance issues are difficult to track down or predict.
Simply put, Digma provides immediate code feedback. As an IDE plugin, it identifies issues with your code as it is currently running in test and prod.
The feedback is available from the minute you are writing it.
Imagine being alerted to any regression or code smell as you’re running and debugging locally. Also, identifying weak spots that need attending to, based on integration testing results.
Of course, Digma is free for developers.
![]()
As always, the writeup is super practical and based on a simple application that can work with documents with a mix of encrypted and unencrypted fields.
![]()
We rely on other people’s code in our own work. Every day.
It might be the language you’re writing in, the framework you’re building on, or some esoteric piece of software that does one thing so well you never found the need to implement it yourself.
The problem is, of course, when things fall apart in production — debugging the implementation of a 3rd party library you have no intimate knowledge of is, to say the least, tricky.
Lightrun is a new kind of debugger.
It’s one geared specifically towards real-life production environments. Using Lightrun, you can drill down into running applications, including 3rd party dependencies, with real-time logs, snapshots, and metrics.
Learn more in this quick, 5-minute Lightrun tutorial:
![]()
Slow MySQL query performance is all too common. Of course it is. A good way to go is, naturally, a dedicated profiler that actually understands the ins and outs of MySQL.
The Jet Profiler was built for MySQL only, so it can do things like real-time query performance, focus on most used tables or most frequent queries, quickly identify performance issues and basically help you optimize your queries.
Critically, it has very minimal impact on your server’s performance, with most of the profiling work done separately — so it needs no server changes, agents or separate services.
Basically, you install the desktop application, connect to your MySQL server, hit the record button, and you’ll have results within minutes:
![]()
DbSchema is a super-flexible database designer, which can take you from designing the DB with your team all the way to safely deploying the schema.
The way it does all of that is by using a design model, a database-independent image of the schema, which can be shared in a team using GIT and compared or deployed on to any database.
And, of course, it can be heavily visual, allowing you to interact with the database using diagrams, visually compose queries, explore the data, generate random data, import data or build HTML5 database reports.
Get started with Spring 5 and Spring Boot 2, through the Learn Spring course:
1. Introduction
In this tutorial, we’re going to handle exceptions in a Jakarta EE Servlet application – in order to provide a graceful and expected outcome whenever an error happens.
2. Jakarta EE Servlet Exceptions
First, we’ll define a Servlet using the API annotations (have a look at the Servlets Intro for more details) with a default GET processor that will throw an exception:
@WebServlet(urlPatterns = "/randomError") public class RandomErrorServlet extends HttpServlet < @Override protected void doGet( HttpServletRequest req, HttpServletResponse resp) < throw new IllegalStateException("Random error"); >>3. Default Error Handling
Let’s now simply deploy the application into our servlet container (we’re going to assume that the application runs under http://localhost:8080/javax-servlets).
When we access the address http://localhost:8080/javax-servlets/randomError, we’ll see the default servlet error handling in place:
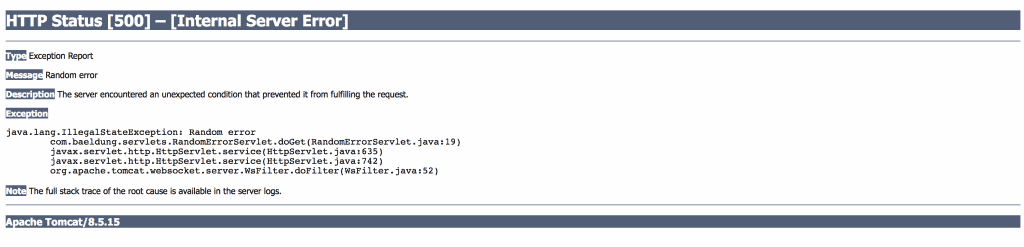
Default error handling is provided by the servlet container and can be customized at a container or application level.
4. Custom Error Handling
We can define custom error handling using a web.xml file descriptor in which we can define the following types of policies:
- Status code error handling – it allows us to map HTTP error codes (client and server) to a static HTML error page or an error handling servlet
- Exception type error handling – it allows us to map exception types to static HTML error pages or an error handling servlet
4.1. Status Code Error Handling with an HTML Page
We can set up our custom error handling policy for HTTP 404 errors in the web.xml:
Now, access http://localhost:8080/javax-servlets/invalid.html from the browser – to get the static HTML error page.
4.2. Exception Type Error Handling with a Servlet
We can set up our custom error handling policy for java.lang.Exception in web.xml:
java.lang.Exception /errorHandler In ErrorHandlerServlet, we can access the error details using the error attributes provided in the request:
- «); Arrays.asList( ERROR_STATUS_CODE, ERROR_EXCEPTION_TYPE, ERROR_MESSAGE) .forEach(e -> writer.write(«
- » + e + «:» + req.getAttribute(e) + » «) ); writer.write(«
Now, we can access http://localhost:8080/javax-servlets/randomError to see the custom error servlet working.
Note: Our exception type defined in the web.xml is too broad and we should specify all the exceptions we want to handle in more detail.
We can also use the container-provided servlet logger in our ErrorHandlerServlet component to log additional details:
Exception exception = (Exception) req.getAttribute(ERROR_EXCEPTION); if (IllegalArgumentException.class.isInstance(exception))
It’s worth knowing what’s beyond the servlet-provided logging mechanisms, check the guide on slf4j for more details.
5. Conclusion
In this brief article, we have seen default error handling and specified custom error handling in a servlet application without adding external components nor libraries.
As always, you can find the source code over on Servlets tutorial repository.
![]()
Slow MySQL query performance is all too common. Of course it is. A good way to go is, naturally, a dedicated profiler that actually understands the ins and outs of MySQL.
The Jet Profiler was built for MySQL only, so it can do things like real-time query performance, focus on most used tables or most frequent queries, quickly identify performance issues and basically help you optimize your queries.
Critically, it has very minimal impact on your server’s performance, with most of the profiling work done separately — so it needs no server changes, agents or separate services.
Basically, you install the desktop application, connect to your MySQL server, hit the record button, and you’ll have results within minutes: