- Create & Manage 3D Models via Java API
- Open Source Java Library that included support for Geometries Transformation, Generating NURBS Curves & Surfaces, Manage 3D Vectors & so on.
- At A Glance
- Platform Independence
- Getting Started with iGeo
- Install iGeo via GitHub
- Geometries Transformation via Java API
- Generating NURBS Curves and Surfaces
- Managing 3D Vectors via Java API
- Map Images on Geometries
- Начинаем работу с jPCT — бесплатным 3d движком для Java
- Create 3D Models and Animated 3D Scenes using Java
- Create an Animated Scene in Java#
- Create Primitive 3D Shapes and Convert Meshes to Binary Format#
- Manipulate Objects in 3D Scene#
- Work with Geometric Data of 3D Scene#
- Aspose.3D for Java Resources#
Create & Manage 3D Models via Java API
Open Source Java Library that included support for Geometries Transformation, Generating NURBS Curves & Surfaces, Manage 3D Vectors & so on.
iGeo is an open source Java 3D modeling library that allows software developers to create and manage 3D models inside their own apps. It has provided components for vector math operations, NURBS curve and surface geometries, managing polygon meshes, 3D display and navigation, and 3D model file I/O. The library has included different shading modes such as wireframe, shaded, transparent shade, shade without edges, and more. The library has the best computational design in architecture, product design, interaction design, and more
The iGeo library is freely available under the GNU Lesser General Public License as published by the free software foundation, version 3. The library has also supported an interface called PiGeon specialized in processing. The library has included features for navigating 3D view, save files, such as zoom, toggle view, rotation, pan, and much more. It has provided several functions for managing panelization such as rectangular panelization, triangulation, diagrid triangulation, diamond panelization, grid lines, diagonal lines & points on the Surface, grid points on the surface, and many more.
At A Glance
An overview of iGeo features.
- Create 3D Models
- Transform geometries
- Load 3D models
- Generate NURBS
- Map Images
- 3D Vectors
- component handling
- Surfaces support
- Scatter plots
- Bar charts

iGeo
iGeo supports popular 3D file formats listed below.
iGeo
Platform Independence
iGeo can be run on any system having Java runtime installed.
iGeo
Getting Started with iGeo
The easiest way to install iGeo is by using GitHub. Please use the following command for a smooth installation.
Install iGeo via GitHub
Geometries Transformation via Java API
The open source iGeo API has included functionality for geometrical transformation inside their Java applications. There are several important methods available for geometrical transformation such as duplicating geometry, rotating geometries, reflecting geometry, moving for a specified amount of movement, scaling up or down geometries, scaling geometries only in one direction, shear geometries, and much more.
Generating NURBS Curves and Surfaces
NURBS stands for Non-Uniform Rational B-Spline and it is a mathematical model to define geometries in space. It is one of the most popular mathematical models of geometries and is used in many CAD programs. The iGeo API has included support for creating NURBS Curves and Surfaces using Java commands. The ICurve and ISurface can be used to generate URBS curves and surfaces by providing an array or a 2-dimensional array of IVec and degrees.
Managing 3D Vectors via Java API
The open source iGeo library enables software developers to create and manage their vectors inside their own Java apps. The library has provided several useful functionalities related to vector management such as adding or subtracting vectors, duplicating a vector variable to another variable, multiplying or dividing vectors, flipping vectors, measuring the distance between two vectors, setting the length of a vector, generating one scalar value out of two vectors, reflect a vector on 3-dimensional plane and many more.
Map Images on Geometries
The free iGeo library enables software developers to map images on geometries with ease using Java code. You can control the line length by image, control the depth of the surface by image, control the width of the panel, control rotation by image, control scaling by image, sample color of the image, and so on.
Начинаем работу с jPCT — бесплатным 3d движком для Java
jPCT — 3d движок для Java позволяющий использовать OpenGL и Software рендеры, разрабатывать 3d приложения для десктопа, интернет и Android. Так давайте попробуем его в действии написав на нем небольшую игру. 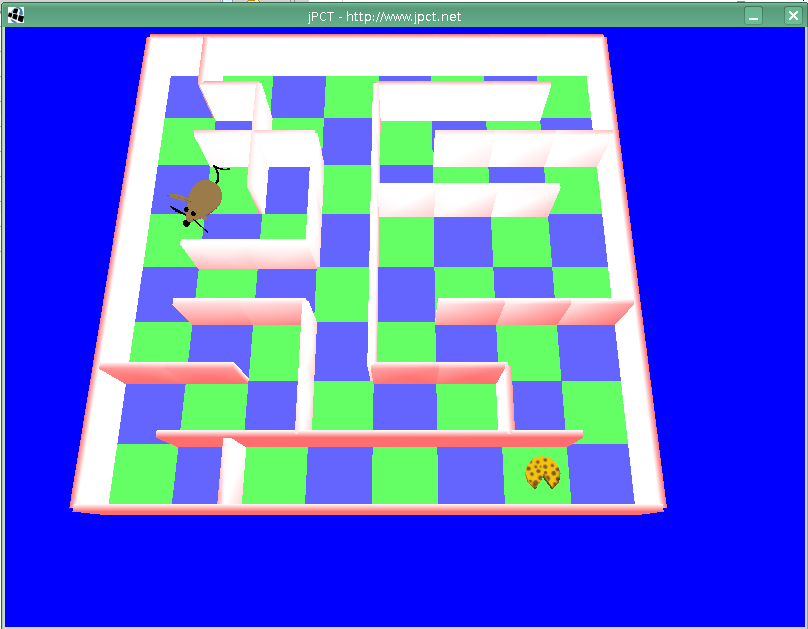
Получить jPCT можно здесь . Распакуйте архив в удобное Вам место. В нем Вы найдете jar файлы, документацию и необходимые нативные библиотеки. Далее запускайте Eclipse и выберите создание нового проекта. Введите имя проекта, нажмите далее. На вкладке Библиотеки выберите Добавить внешние jar добавьте jpct.jar, lwjgl.jar, lwjgl_util.jar. Для jpct укажите размещение javadoc, а для lwjgl — расположение нативной библиотеки. 
Давайте попробуем сделать небольшую игру про мышку бегающую по лабиринту в поисках сыра. Как наверное и любой 3d движок jPCT предоставляет классы Object3D, Сamera, World. jPCT поддерживает несколько форматов 3d моделей, не буду их все здесь перечислять, если Вам интересно то обратитесь к документации. 3ds модели загружаются с помощью статического метода класса Loader load3DS который вернет Вам массив объектов 3ds сцены. Перед загрузкой 3d объектов желательно загрузить текстуры, тогда текстурирвание призойдет автоматически при условии что имена текстур соответствуют информации полученной из 3ds файла. Текстуры загружаются следующим образом:
final TextureManager texMan = TextureManager.getInstance();
texMan.addTexture( «TextureName.png», new Texture ( «TextureFileName.png» ) );
После создания объектов их нужно добавить в мир с помощью метода addObject класса World. В программе может быть несколько объектов World, но при этом каждый объект может принадлежать только одному из них. Перед тем как отображать объекты их нужно «построить», при этом вычисляются нормали, ограничивающий прямоугольник и др. Это можно сделать вызовом метода buildAllObjects() класса World. Создали мир, теперь как говорится да будет свет! Свет добавляем как Вы уже наверное догадались методом addLight при этом указав его координаты и интенсивность красного зеленого и голубого цвета. Все координаты в jPCT задаются в основном в виде SimpleVector(класс jPCT), хотя сохранилась и «старая» форма с тремя координатами float.
То, как мы все это увидим определяет камера. Камеру можно двигать, поворачивать, направлять на объект и направлять параллельно оси z объекта(align). Кстати в jPCT ось x направлена вправо, ось z — от наблюдателя, а ось y — вниз(под ноги).
Как я уже сказал jPCT поддерживает software рендер и OpenGL. Вот так создается фреймбуффер:
final FrameBuffer buffer = new FrameBuffer(800, 600, FrameBuffer.SAMPLINGMODE_NORMAL);
buffer.disableRenderer(IRenderer.RENDERER_SOFTWARE);
buffer.enableRenderer(IRenderer.RENDERER_OPENGL);
Потом когда он нам станет не нужен вернем его в прежнее состояние:
buffer.disableRenderer(IRenderer.RENDERER_OPENGL);
buffer.dispose();
Нарисовать мир в буфер очень просто:
buffer.clear(java.awt.Color.BLUE);
theWorld.renderScene(buffer);
theWorld.draw(buffer);
buffer.update();
buffer.displayGLOnly();
Как Вы уже наверное догадались все вокруг будет голубое.
Помимо собственно рендера в jpct есть классы для обработки пользовательского ввода. Для ввода с клавиатуры это класс KeyMapper. Вы просто создаете новый объект KeyMapper а потом можете в любое нужное время получить состояние клавиш с помощью вызова poll(),
Также есть детектор столкновений. В нашей игре мышь будет стукаться об стенки а в конце столкновение мыши и сыра вызовет конец игры. Поэтому для объекта мыши вызовем метод setCollisionMode( Object3D.COLLISION_CHECK_SELF ). а для сыра и стенок setCollisionMode( Object3D.COLLISION_CHECK_OTHERS ). Сыр еще будет нас оповещать о столкновении чтобы мы знали что игра закончилась ( addCollisionListener(this) ). Теперь каждый раз когда мышь двигается нужно вызывать метод класса Object3D checkForCollisionEllipsoid( SimpleVector — перемещение, SimpleVector — эллипсоид приблизительно описывающий мышь, 8 — глубина рекурсии). Помимо еллипсоида можно использовать сферу и куб — соответственно методы checkForCollisionSpherical(. ), checkForCollision(. ). Это все что есть в jPCT из физики, если нужно что большее то можно присмотреться например к jBullet.
import java.awt.Color; import java.awt.event.KeyEvent; import java.io.BufferedReader; import java.io.FileReader; import java.util.ArrayList; import java.util.List; import java.util.StringTokenizer; import com.threed.jpct.*; public class RatDungeon implements CollisionListener < private final Object3D rat; private final Object3D cheese; private Camera camera; private final Camera attached = new Camera(); private final World theWorld = new World(); private final KeyMapper keyMapper; private boolean forward = false; private boolean backward = false; private boolean left = false; private boolean right = false; private boolean doLoop = true; private final SimpleVector ellipsoid = new SimpleVector(15, 18, 32); private final float SPEED = 2.0f; private final float MAXSPEED = 3.0f; private boolean switchCamera = false; private final int high_camera = 1; private final int attached_camera = 2; private int cameraType = high_camera; private final float cellSize = 60f; private boolean gameOver = false; public RatDungeon() throws Exception < textures (); rat = loadObject( "Nave.3ds" ); rat.scale(0.3f); rat.setCollisionMode( Object3D.COLLISION_CHECK_SELF ); theWorld.addObject(rat); cheese = loadObject( "queso.3DS" ); cheese.scale(0.8f); cheese.setCollisionMode( Object3D.COLLISION_CHECK_OTHERS ); cheese.addCollisionListener(this); theWorld.addObject(cheese); loadWorld(); Config.linearDiv = 700; Config.lightDiscardDistance = 650; Config.collideOffset = 800; theWorld.addLight( new SimpleVector (175, -250, -175), 15, 15, 15 ); theWorld.addLight( new SimpleVector (350, -250, 0), 15, 15, 15 ); theWorld.addLight( new SimpleVector (0, -250, 0), 15, 15, 15 ); theWorld.addLight( new SimpleVector (350, -250, -350), 15, 15, 15 ); theWorld.addLight( new SimpleVector (0, -250, -350), 15, 15, 15 ); theWorld.buildAllObjects(); keyMapper = new KeyMapper(); >private void loop() throws Exception < final FrameBuffer buffer = new FrameBuffer(800, 600, FrameBuffer.SAMPLINGMODE_NORMAL); buffer.disableRenderer(IRenderer.RENDERER_SOFTWARE); buffer.enableRenderer(IRenderer.RENDERER_OPENGL); moveCamera(); final long delay = 20; long previous = System.currentTimeMillis(); while( doLoop ) < buffer.clear(java.awt.Color.BLUE); theWorld.renderScene(buffer); theWorld.draw(buffer); buffer.update(); buffer.displayGLOnly(); final long current = System.currentTimeMillis(); if( current - previous >delay ) < pollControls(); move(); moveCamera(); if( switchCamera ) < switchCamera = false; if( cameraType == high_camera ) < cameraType = attached_camera; theWorld.setCameraTo(attached); >else if( cameraType == attached_camera ) < cameraType = high_camera; theWorld.setCameraTo(camera); >> previous = current; if( gameOver ) < System.out.println( "Game over. " ); gameOver = false; >> > buffer.disableRenderer(IRenderer.RENDERER_OPENGL); buffer.dispose(); System.exit(0); > private void loadWorld() throws Exception < final BufferedReader in = new BufferedReader( new FileReader( "level.txt" ) ); String s; int width = 0, height = 0; int ratX = 0, ratY = 0; int cheeseX = 0, cheeseY = 0; int line_num = -1; final List< int[] >walls = new ArrayList(); while( ( s = in.readLine() ) != null ) < if( s.startsWith("rat", 0) ) < final StringTokenizer st = new StringTokenizer(s); st.nextToken(); ratX = Integer.parseInt( st.nextToken() ); ratY = Integer.parseInt( st.nextToken() ); >else if( s.startsWith("cheese", 0) ) < final StringTokenizer st = new StringTokenizer(s); st.nextToken(); cheeseX = Integer.parseInt( st.nextToken() ); cheeseY = Integer.parseInt( st.nextToken() ); >else < if( ( s.indexOf('_') != -1 ) || ( s.indexOf('|') != -1 ) ) < if( width == 0 ) width = s.length()/2; if( s.indexOf('|') != -1 ) line_num++; for( int i = 0; i < s.length(); i++ ) < if( s.charAt(i) == '_' ) < final int coords[] = < i/2, line_num, i/2, line_num + 1 >; walls.add( coords ); > else if( s.charAt(i) == '|' ) < final int coords[] = < i/2 - 1, line_num, i/2, line_num + 1 >; walls.add( coords ); > > > > > height = line_num + 1; createTable( width, height, walls ); rat.translate( cellSize*ratX, 0, - cellSize*ratY ); cheese.translate( cellSize*cheeseX, -5, - cellSize*cheeseY ); camera = theWorld.getCamera (); camera.rotateX( (-1.1f-0.14f) ); camera.setPosition( new SimpleVector( cellSize*(width/2), -cellSize*(height + 2), - cellSize*height ) ); > private void move() < SimpleVector moveRes = new SimpleVector(0, 0, 0); if( forward ) < final SimpleVector t = rat.getZAxis(); t.scalarMul(SPEED); moveRes.add(t); >if( backward ) < final SimpleVector t = rat.getZAxis(); t.scalarMul(-SPEED); moveRes.add(t); >if( left ) < rat.rotateY( (float) Math.toRadians(-1.8f) ); >if( right ) < rat.rotateY( (float) Math.toRadians(1.8f) ); >if( moveRes.length() > MAXSPEED ) < moveRes.makeEqualLength( new SimpleVector(0, 0, MAXSPEED) ); >moveRes = rat.checkForCollisionEllipsoid(moveRes, ellipsoid, 8); rat.translate(moveRes); moveRes = new SimpleVector(0, 0, 0); > private void moveCamera() < attached.setPositionToCenter(rat); attached.align(rat); attached.rotateCameraX( (float) Math.toRadians(30) ); attached.moveCamera( Camera.CAMERA_MOVEOUT, 150 ); >private void pollControls() < KeyState ks = null; while( ( ks = keyMapper.poll() ) != KeyState.NONE ) < if(ks.getKeyCode() == KeyEvent.VK_ESCAPE) < doLoop = false; >if(ks.getKeyCode() == KeyEvent.VK_C ) < if( cameraType == high_camera ) switchCamera = true; >if(ks.getKeyCode() == KeyEvent.VK_D ) < if( cameraType == attached_camera ) switchCamera = true; >if( ks.getKeyCode() == KeyEvent.VK_UP ) < forward = ks.getState(); >if (ks.getKeyCode() == KeyEvent.VK_DOWN) < backward = ks.getState(); >if (ks.getKeyCode() == KeyEvent.VK_LEFT) < left = ks.getState(); >if (ks.getKeyCode() == KeyEvent.VK_RIGHT) < right = ks.getState(); >if (org.lwjgl.opengl.Display.isCloseRequested()) < doLoop = false; >> private void createTable( final int sizeX, final int sizeY, final List < int[] >walls ) < for( int x = 0; x < sizeX; x++ ) < for( int y = 0; y < sizeY; y++ ) < final Object3D cell = Primitives.getBox( cellSize/2, 0.1f ); cell.translate( x*cellSize, 0, - y*cellSize ); cell.rotateY( (float )Math.PI/4 ); if( ( x%2 + y%2 ) == 1 ) cell.setAdditionalColor( new Color( 0, 250, 0 ) ); else cell.setAdditionalColor( new Color( 0, 0, 250 ) ); cell.setLighting( Object3D.LIGHTING_NO_LIGHTS ); theWorld.addObject(cell); >> final Color wallColor = new Color( 230, 10, 10 ); for( int i = 0; i < walls.size(); i++ ) < final int cell1X = walls.get(i)[0]; final int cell1Y = walls.get(i)[1]; final int cell2X = walls.get(i)[2]; final int cell2Y = walls.get(i)[3]; final int x = cell2X; final int y = cell1Y; final Object3D wall = Primitives.getBox( cellSize/2, 0.1f ); wall.rotateY( (float )Math.PI/4 ); wall.translate( cellSize*x, -cellSize/2, -cellSize*y ); if( cell1X < cell2X ) < wall.rotateZ( (float )Math.PI/2 ); wall.translate( new SimpleVector( -cellSize/2, 0, 0 ) ); >else < wall.rotateX( (float )Math.PI/2 ); wall.translate( new SimpleVector( 0, 0, -cellSize/2 ) ); >wall.setAdditionalColor( wallColor ); wall.setCollisionMode( Object3D.COLLISION_CHECK_OTHERS ); theWorld.addObject(wall); > > private Object3D loadObject( final String fileName ) < final Object3D objParts [] = Loader.load3DS( fileName, 1f ); Object3D ret = new Object3D (0); for( int i = 0; i < objParts.length; i++ ) < final Object3D part = objParts [i]; part.setCenter( new SimpleVector(0, 0, 0) ); part.rotateX( (float)-Math.PI/2 ); part.rotateMesh(); part.setRotationMatrix( new Matrix() ); if( (i&1) == 1 ) < part.setTransparency(0); >ret = Object3D.mergeObjects (ret, part); > return ret; > private void textures() < final TextureManager texMan = TextureManager.getInstance(); texMan.addTexture( "ROJO.JPG", new Texture ( "ROJO.JPG" ) ); texMan.addTexture( "QUESO.JPG", new Texture ( "QUESO.JPG" ) ); >@Override public void collision(final CollisionEvent ce) < gameOver = true; >@Override public boolean requiresPolygonIDs() < return false; >public static void main(final String[] args) throws Exception < new RatDungeon().loop(); >> В дальнейшем планирую рассказать о переносе игры в интернет (java апплет) и на Android с минимальными изменениями кода.
Create 3D Models and Animated 3D Scenes using Java
We are pleased to announce that the first version 18.5 of Aspose.3D for Java API has been released. Aspose.3D for Java API has incorporated import and export features, and developers would be able to convert their 3D models to any supported 3D formats. All readable and writable supported file formats are listed in these help topics: Read 3D document and Save 3D document.
Create an Animated Scene in Java#
Aspose.3D for Java API supports rendering the animated scene, and the help topic narrates prerequisites to move an object. Developers can also set up the Camera with a target to constrain.
Create Primitive 3D Shapes and Convert Meshes to Binary Format#
Aspose.3D for Java API includes support of creating 3D scene from scratch, defining Metadata of the 3D scene, creating primitive 3D Shapes and visiting sub nodes to convert meshes to custom binary format. Please refer to following help topics:
Manipulate Objects in 3D Scene#
With Aspose.3D for Java API, developers can generate and store tangent and binormal data for all meshes. The tangent and bitangent are orthogonal vectors with the Normal and instruct about the rate of change of the texture coordinates over the mesh surface. Developers can also triangulate mesh, split mesh, convert primitive shapes to meshes, encode 3D mesh in the Google Draco file, convert all Polygons to triangles and generate normal data for all meshes of the 3D scene. Please refer to these help topics:
Work with Geometric Data of 3D Scene#
Aspose.3D for Java API supports rotating objects in a 3D scene, add node hierarchy, share geometry data of mesh between multiple nodes, concatenate Quaternions apply to 3D objects, define Mesh from scratch, set up normals or UV on objects and also add Material. All code examples are available in these help topics:
Aspose.3D for Java Resources#
The following resources will help you work with Aspose.3D for Java:
- Home page for Aspose.3D for Java API.
- Aspose.3D for Java API wiki docs – Help documentation and API reference documents.
- Aspose.3D product family forum – Post your technical questions, queries and any other problem you faced while running Aspose.3D APIs.
- Enable email subscription – Do not limit yourself, stay up-to-date with the latest news about the Aspose.3D APIs and new features, fixes, plus other API related topics by subscribing to Aspose.3D blog.
- Aspose.3D for Java Examples – We have published our code examples on the social coding website GitHub.com. Anyone can explore the code examples for learning purposes.
- Release Notes – For details on API fixes, please check Release Notes having a complete list of the new features.